{image &&  }
}
{title &&
{title}
}
{children}
 * If you **can** see the Advanced option, your key is fully
enabled and you can proceed with your integration
* If you **cannot** see the Advanced option, please contact our Support team
([on this page](https://www.loqate.com/en-us/contact/), or via
[LoqateSupport@gbgplc.com](mailto:%20LoqateSupport@gbgplc.com)) or your
Account Manager and ask them to enable your API key for use with Adobe
Commerce. Once this is enabled, you can proceed with your integration
## Integration Management
This section will include instructions on how to install, upgrade and uninstall
the
[Loqate Adobe Commerce Integration](https://commercemarketplace.adobe.com/gbg-loqate-loqate-integration.html).
As stated in the introduction of this document, this part of the guide is
primarily aimed at technical users with knowledge of Adobe Commerce who manage
your environment.
### Supported Versions
The Loqate integration for Adobe Commerce will support versions of Magento 2.4.
It has been built with PHP8.
New versions should be backwards compatible and require no extra development on
your side after you upgrade.
### Module name
Depending on how you’re installing the app you might install from different
namespaces.
When installing directly via Composer, without going via the Adobe Commerce
store, you should use the package name "**lqt/loqate-integration**" (this
supersedes "\*\*loqate-integration/adobe"\*\*from version 1.1.8 onwards).
When installing from the Adobe Commerce app store you will need to have your
Composer credentials in place for
**[repo.magento.com](http://repo.magento.com),** and you should install from the
package name provided by the app store (as of November 2024 this is
"**gbg-loqate/loqate-integration**").
For the examples in this guide, we’ll use the non-store version
"**lqt/loqate-integration**".
## Installing the module
To begin, open a terminal and run the following command in your Adobe Commerce
directory:
**composer require lqt/loqate-integration**
Next, set up the module by running the following commands:
**php bin/magento module:enable Loqate\_ApiIntegration **
**php bin/magento setup:upgrade **
**php bin/magento setup:di:compile **
## Upgrading the module
Before you upgrade:
* Back up your files and database.
* Start with your test environment.
* Keep a copy of any customisation you made to the module’s original code.
* Check out the changelog.
If you have customised the integrations code, you’ll need to port these
customisations after upgrading and resolve any potential conflict.
Run the following commands:
**composer remove lqt/loqate-integration**
**composer lqt/loqate-integration**
**php bin/magento setup:upgrade **
**php bin/magento setup:di:compile **
**php bin/magento setup:static-content:deploy **
**php bin/magento cache:clean **
## Uninstalling the module
Before you uninstall:
* Back up your files and database.
* Keep a copy of any customisation you made to the module’s original code in
case you need to reinstall it later.
Run the following commands:
**composer remove lqt/loqate-integration**
**php bin/magento setup:upgrade **
**php bin/magento setup:di:compile **
**php bin/magento setup:static-content:deploy **
**php bin/magento cache:clean **
## Using the Integration
## Before you start
There are configurations that Loqate offer within your account section on a key.
The configurations you will see in this guide are solely related to the
performance and capabilities of the integration for Adobe commerce.
## Integration Configuration
Once the installation process has completed, you can then configure the module
in the admin panel of the store.
The configuration section for the integration can be found by navigating
to **Stores -> Configuration -> Loqate -> Main Settings.**
For this integration to work, you need to provide a valid API key to the **API
Key** input field found in the configuration section of the module. This is a
required field and can be found in the “Your services” section of your account
on [https://www.loqate.com/](https://www.loqate.com/).
Under the Loqate configuration you will find the below sections which we have
within the integration.
## Main Settings
**API Key** - Navigate to the **Your Services** section of your Loqate account
and copy your API key. Next, navigate back to the Adobe Loqate configuration
page and paste it in this field for your integration to work.
## Address Capture
Our market leading address capture product allows you to search for and select
global accurate premise level addresses from our comprehensive data sources.
This service is available to be added in below sections of your Adobe commerce
store:
* **Enable on Customer Account:** by enabling this, a drop-down list will be
displayed in the customer account page, based on the input text
- **Enable on Checkout:** by enabling this, a drop-down list will be displayed
in the checkout page, based on the input text
* **Enable on Customer Account (Admin):** by enabling this, a drop-down list
will be displayed in the customer account page in the Admin, based on the
input text
- **Enable on Create Order (Admin):** by enabling this, a drop-down list will be
displayed in the create order page in the Admin, based on the input text
The below features and customisations can be found within the config menu for
Address Capture.
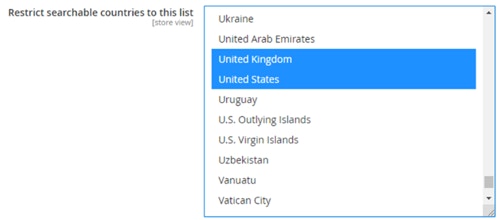
### **Restrict searchable countries**
Merchants can restrict the address results to search only within specific
countries. By default, no country is selected and the integration doesn’t apply
any country restrictions.
Multiple consecutive countries can be selected by clicking on the first country,
scrolling towards the end country, holding down SHIFT and clicking on that end
country.
**Multiple countries can be selected by holding down CTRL and clicking on
them**. All the countries can be selected by clicking once within the field and
pressing CTRL+A.
* If you **can** see the Advanced option, your key is fully
enabled and you can proceed with your integration
* If you **cannot** see the Advanced option, please contact our Support team
([on this page](https://www.loqate.com/en-us/contact/), or via
[LoqateSupport@gbgplc.com](mailto:%20LoqateSupport@gbgplc.com)) or your
Account Manager and ask them to enable your API key for use with Adobe
Commerce. Once this is enabled, you can proceed with your integration
## Integration Management
This section will include instructions on how to install, upgrade and uninstall
the
[Loqate Adobe Commerce Integration](https://commercemarketplace.adobe.com/gbg-loqate-loqate-integration.html).
As stated in the introduction of this document, this part of the guide is
primarily aimed at technical users with knowledge of Adobe Commerce who manage
your environment.
### Supported Versions
The Loqate integration for Adobe Commerce will support versions of Magento 2.4.
It has been built with PHP8.
New versions should be backwards compatible and require no extra development on
your side after you upgrade.
### Module name
Depending on how you’re installing the app you might install from different
namespaces.
When installing directly via Composer, without going via the Adobe Commerce
store, you should use the package name "**lqt/loqate-integration**" (this
supersedes "\*\*loqate-integration/adobe"\*\*from version 1.1.8 onwards).
When installing from the Adobe Commerce app store you will need to have your
Composer credentials in place for
**[repo.magento.com](http://repo.magento.com),** and you should install from the
package name provided by the app store (as of November 2024 this is
"**gbg-loqate/loqate-integration**").
For the examples in this guide, we’ll use the non-store version
"**lqt/loqate-integration**".
## Installing the module
To begin, open a terminal and run the following command in your Adobe Commerce
directory:
**composer require lqt/loqate-integration**
Next, set up the module by running the following commands:
**php bin/magento module:enable Loqate\_ApiIntegration **
**php bin/magento setup:upgrade **
**php bin/magento setup:di:compile **
## Upgrading the module
Before you upgrade:
* Back up your files and database.
* Start with your test environment.
* Keep a copy of any customisation you made to the module’s original code.
* Check out the changelog.
If you have customised the integrations code, you’ll need to port these
customisations after upgrading and resolve any potential conflict.
Run the following commands:
**composer remove lqt/loqate-integration**
**composer lqt/loqate-integration**
**php bin/magento setup:upgrade **
**php bin/magento setup:di:compile **
**php bin/magento setup:static-content:deploy **
**php bin/magento cache:clean **
## Uninstalling the module
Before you uninstall:
* Back up your files and database.
* Keep a copy of any customisation you made to the module’s original code in
case you need to reinstall it later.
Run the following commands:
**composer remove lqt/loqate-integration**
**php bin/magento setup:upgrade **
**php bin/magento setup:di:compile **
**php bin/magento setup:static-content:deploy **
**php bin/magento cache:clean **
## Using the Integration
## Before you start
There are configurations that Loqate offer within your account section on a key.
The configurations you will see in this guide are solely related to the
performance and capabilities of the integration for Adobe commerce.
## Integration Configuration
Once the installation process has completed, you can then configure the module
in the admin panel of the store.
The configuration section for the integration can be found by navigating
to **Stores -> Configuration -> Loqate -> Main Settings.**
For this integration to work, you need to provide a valid API key to the **API
Key** input field found in the configuration section of the module. This is a
required field and can be found in the “Your services” section of your account
on [https://www.loqate.com/](https://www.loqate.com/).
Under the Loqate configuration you will find the below sections which we have
within the integration.
## Main Settings
**API Key** - Navigate to the **Your Services** section of your Loqate account
and copy your API key. Next, navigate back to the Adobe Loqate configuration
page and paste it in this field for your integration to work.
## Address Capture
Our market leading address capture product allows you to search for and select
global accurate premise level addresses from our comprehensive data sources.
This service is available to be added in below sections of your Adobe commerce
store:
* **Enable on Customer Account:** by enabling this, a drop-down list will be
displayed in the customer account page, based on the input text
- **Enable on Checkout:** by enabling this, a drop-down list will be displayed
in the checkout page, based on the input text
* **Enable on Customer Account (Admin):** by enabling this, a drop-down list
will be displayed in the customer account page in the Admin, based on the
input text
- **Enable on Create Order (Admin):** by enabling this, a drop-down list will be
displayed in the create order page in the Admin, based on the input text
The below features and customisations can be found within the config menu for
Address Capture.
### **Restrict searchable countries**
Merchants can restrict the address results to search only within specific
countries. By default, no country is selected and the integration doesn’t apply
any country restrictions.
Multiple consecutive countries can be selected by clicking on the first country,
scrolling towards the end country, holding down SHIFT and clicking on that end
country.
**Multiple countries can be selected by holding down CTRL and clicking on
them**. All the countries can be selected by clicking once within the field and
pressing CTRL+A.
 ## Address Verify
Our address verification product allows you to parse, cleanse and select the
most accurate addresses from our comprehensive data sources. You are able to
determine the level of quality according to your preferences, more information
below:
## Address Verify
Our address verification product allows you to parse, cleanse and select the
most accurate addresses from our comprehensive data sources. You are able to
determine the level of quality according to your preferences, more information
below:
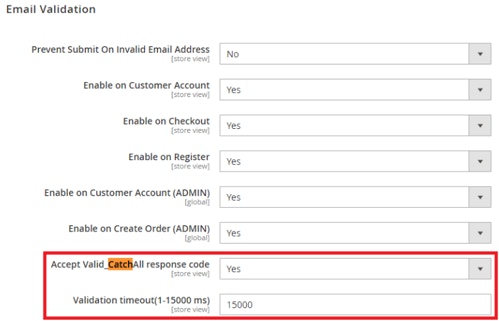 * **Validation timeout: **the request timeout can also be customised,
the default value and maximum is 15000 ms.(15 seconds). If you wish to reduce
this, you can enter the value in milliseconds here
## Phone Validation
Validate the accuracy of the phone numbers captured in your Adobe Commerce
environment with our simple but effective phone validation product.
In the config menu for this service you will first see the option below:
* **Prevent Submit on Invalid Phone Number: **this is used in order to
prevent the user from adding invalid phone numbers in the phone fields
If set to NO then a warning will be displayed at the save address in which the
customer is told that the phone number is unable to be validated. This may be
useful if you do not depend too much on the accuracy of the phone number and
wish to proceed with the entered information. If the end user selects ‘Save’ a
second time, the entered phone number will be accepted and the user can proceed.
If set to YES then your end user will be unable to proceed until a validated
email address has been entered.
This service is available to be added in below sections of your Adobe commerce
store:
* **Enable on Customer Account:** if this is set to YES then the validation will
be displayed on the customer account page
- **Enable on Checkout:** if this is set to YES then the validation will be
displayed on the checkout page
* **Enable on Customer Account (Admin):** if this is set to YES then the
validation will be displayed on the customer account page in the Admin
- **Enable on Create Order (Admin):** if this is set to YES then the validation
will be displayed on the create order page in the Admin
## Additional config
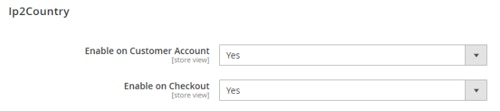
### IP2Country
This optimisation can pre-determine the country of the end user’s IP to populate
the country selection field within parts of the integration.
The user’s IP (if redeemable) is gathered by Loqate and the API returns the
country ISO2 code, that is then mapped within Magento’s country form. The form
will be set by default to that country and addresses will be searched from that
country unless the customer changes it.
Upon accessing a page with an address form creation (new customer address, new
address at checkout), an Ip2Country request is done if configured for the
integration:\\
* **Validation timeout: **the request timeout can also be customised,
the default value and maximum is 15000 ms.(15 seconds). If you wish to reduce
this, you can enter the value in milliseconds here
## Phone Validation
Validate the accuracy of the phone numbers captured in your Adobe Commerce
environment with our simple but effective phone validation product.
In the config menu for this service you will first see the option below:
* **Prevent Submit on Invalid Phone Number: **this is used in order to
prevent the user from adding invalid phone numbers in the phone fields
If set to NO then a warning will be displayed at the save address in which the
customer is told that the phone number is unable to be validated. This may be
useful if you do not depend too much on the accuracy of the phone number and
wish to proceed with the entered information. If the end user selects ‘Save’ a
second time, the entered phone number will be accepted and the user can proceed.
If set to YES then your end user will be unable to proceed until a validated
email address has been entered.
This service is available to be added in below sections of your Adobe commerce
store:
* **Enable on Customer Account:** if this is set to YES then the validation will
be displayed on the customer account page
- **Enable on Checkout:** if this is set to YES then the validation will be
displayed on the checkout page
* **Enable on Customer Account (Admin):** if this is set to YES then the
validation will be displayed on the customer account page in the Admin
- **Enable on Create Order (Admin):** if this is set to YES then the validation
will be displayed on the create order page in the Admin
## Additional config
### IP2Country
This optimisation can pre-determine the country of the end user’s IP to populate
the country selection field within parts of the integration.
The user’s IP (if redeemable) is gathered by Loqate and the API returns the
country ISO2 code, that is then mapped within Magento’s country form. The form
will be set by default to that country and addresses will be searched from that
country unless the customer changes it.
Upon accessing a page with an address form creation (new customer address, new
address at checkout), an Ip2Country request is done if configured for the
integration:\\
 ###
Loqate API results can be customised via the enhanced fields functionality.
Before the address is auto-completed by the end user, values can be enhanced by
specifying the fields within this section of the integration config.
Trailing characters can be added in admin config page, for example ! for
capitalisation and \$ to remove diacritics.
The fields are mapped as following:
| Frontend Form Field | Backend Text Input |
| ------------------- | ------------------ |
| Street Address1 | Line1 |
| Street Address2 | Line2 |
| State/Province | ProvinceName |
| City | City |
Note: State/Province will be changed only in the case of a text field, as Adobe
Commerce displays a dropdown for certain countries.
###
Loqate API results can be customised via the enhanced fields functionality.
Before the address is auto-completed by the end user, values can be enhanced by
specifying the fields within this section of the integration config.
Trailing characters can be added in admin config page, for example ! for
capitalisation and \$ to remove diacritics.
The fields are mapped as following:
| Frontend Form Field | Backend Text Input |
| ------------------- | ------------------ |
| Street Address1 | Line1 |
| Street Address2 | Line2 |
| State/Province | ProvinceName |
| City | City |
Note: State/Province will be changed only in the case of a text field, as Adobe
Commerce displays a dropdown for certain countries.
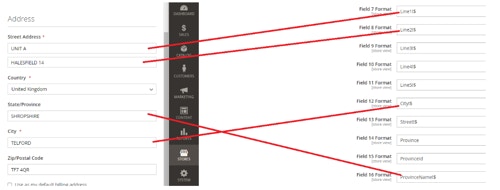 In the screenshot above, all values will be enhanced – replaced from the
enhanced fields call, capitalised and without diacritics.
In the screenshot above, all values will be enhanced – replaced from the
enhanced fields call, capitalised and without diacritics.
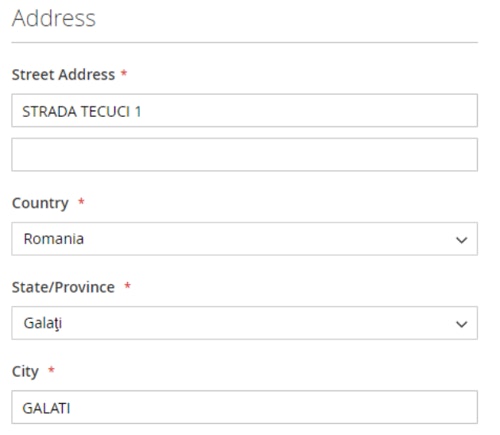 This is an example where diacritics were removed from the city name, as it would
have been the same as the value in the State/Province field.
Additional data can be returned within other fields(ex: Latitude, Longitude),
but that data is not mapped to form fields and the values will not be replaced.
These values can be found in the API response call.
### Multiple storefront support
The Loqate integration supports multiple store(s) configuration. If you had an
operation that needed to interact differently for the UK, and another for a
Spanish storefront, then this capability has been introduced to allow management
of this.
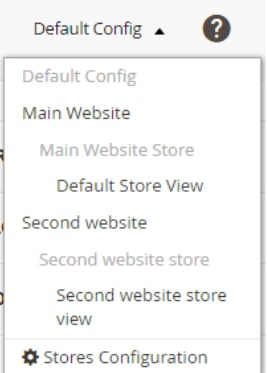
The priority for configuration values is defaulted to the standard Magento
site:**Store->Website->Default**
This is an example where diacritics were removed from the city name, as it would
have been the same as the value in the State/Province field.
Additional data can be returned within other fields(ex: Latitude, Longitude),
but that data is not mapped to form fields and the values will not be replaced.
These values can be found in the API response call.
### Multiple storefront support
The Loqate integration supports multiple store(s) configuration. If you had an
operation that needed to interact differently for the UK, and another for a
Spanish storefront, then this capability has been introduced to allow management
of this.
The priority for configuration values is defaulted to the standard Magento
site:**Store->Website->Default**
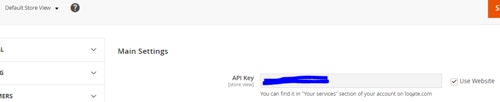
 In this store, the API key is inherited from the parent website, which inherits
it from the Default config:
In this store, the API key is inherited from the parent website, which inherits
it from the Default config:
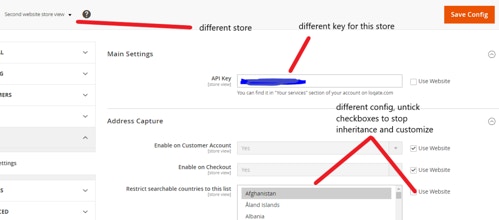
 Different stores can use different API keys for the Loqate service, and even
different settings (e.g.: restrict one store to specific countries and another
to other countries).
Different stores can use different API keys for the Loqate service, and even
different settings (e.g.: restrict one store to specific countries and another
to other countries).
 ## Troubleshooting
The development of this integration has been concluded in isolation from other
third-party Adobe Commerce integrations, and therefore may not be compatible
with these.
## Troubleshooting
The development of this integration has been concluded in isolation from other
third-party Adobe Commerce integrations, and therefore may not be compatible
with these.