> ## Documentation Index
> Fetch the complete documentation index at: https://docs.loqate.com/llms.txt
> Use this file to discover all available pages before exploring further.
# Salesforce CRM Integration Guide
> Add Address Capture, Email and Phone Validation to Salesforce CRM. Install from AppExchange with Lightning components and Flow support.
The Loqate app, available from the [Salesforce AppExchange](https://appexchange.salesforce.com/appxListingDetail?listingId=a0N4V00000HOiI0UAL),
allows you to quickly and easily add Loqate address verification services to your instance of Salesforce CRM,
providing type-ahead lookup functionality for address fields, and validation for both email addresses and phone numbers.
With some or all of these services enabled, you can reduce the amount of time spent inputting customer details,
and improve the accuracy of your database.
## Setup Video
## Available services
The Loqate app gives you access to these Loqate services in your Salesforce CRM instance:
* [**Address Capture**](https://www.loqate.com/en-gb/address-capture), which provides a type-ahead solution for address input -
referred to in Salesforce as **Address finder**
* [**Email Validation**](https://www.loqate.com/en-gb/email-validation-software), which ensures the accuracy of customer email addresses -
referred to in Salesforce as **Email validator**
* [**Phone Validation**](https://www.loqate.com/en-gb/phone-validation), which ensures the accuracy of customer phone numbers -
referred to in Salesforce as **Phone number validator**
## Use cases
There are two ways of using Loqate services in your Salesforce instance:
* On **record** pages, using Lightning components - all Loqate services
* During **actions**, using Flows (recommended) or Visualforce components (legacy, and not recommended) - Address Capture only
The [Process](#process) section below will take you through how to set up both methods, beginning with overall installation before
moving onto setting up mappings for use on record pages, then setting up Flows. For details of Visualforce setup,
see the separate [Legacy Visualforce elements](#legacy) section at the end of this article.
## Prerequisites
Before installing the Loqate app you will need:
* A live Salesforce CRM account
* A live Loqate account
* A Loqate API key\*
\***Note** that your API key is designed to be an open access key to your account - there are security controls within your
Loqate account to ensure this is not abused. The key used in the app will be your primary mechanism of reporting for usage,
so we recommend create a new key rather than reusing one you may already have on a website or other application.
## Process
There are a few quick steps to get the Loqate app up and running:
* [Install the app](#installing-the-loqate-app)
* [Assign permissions](#setting-permissions)
* [Add your Loqate API key](#app-setup)
* [Set up address mappings](#address-mappings)
* [Add Loqate widgets to your object pages](#loqate-widgets)
* [Optional: Address finder settings](#optional-address-finder-settings)
* [Add address Capture to Flows](#add-address-capture-to-flows)
If you only want to use the Email validator and Phone validator controls, you can skip the address mapping step.
If you want to also use the Address finder control though, please follow all of the steps below.
### Installing the Loqate app
We recommend installing the Loqate app directly from the Salesforce AppExchange - adding the app from here will ensure you're always
installing the latest version.
#### Setting permissions
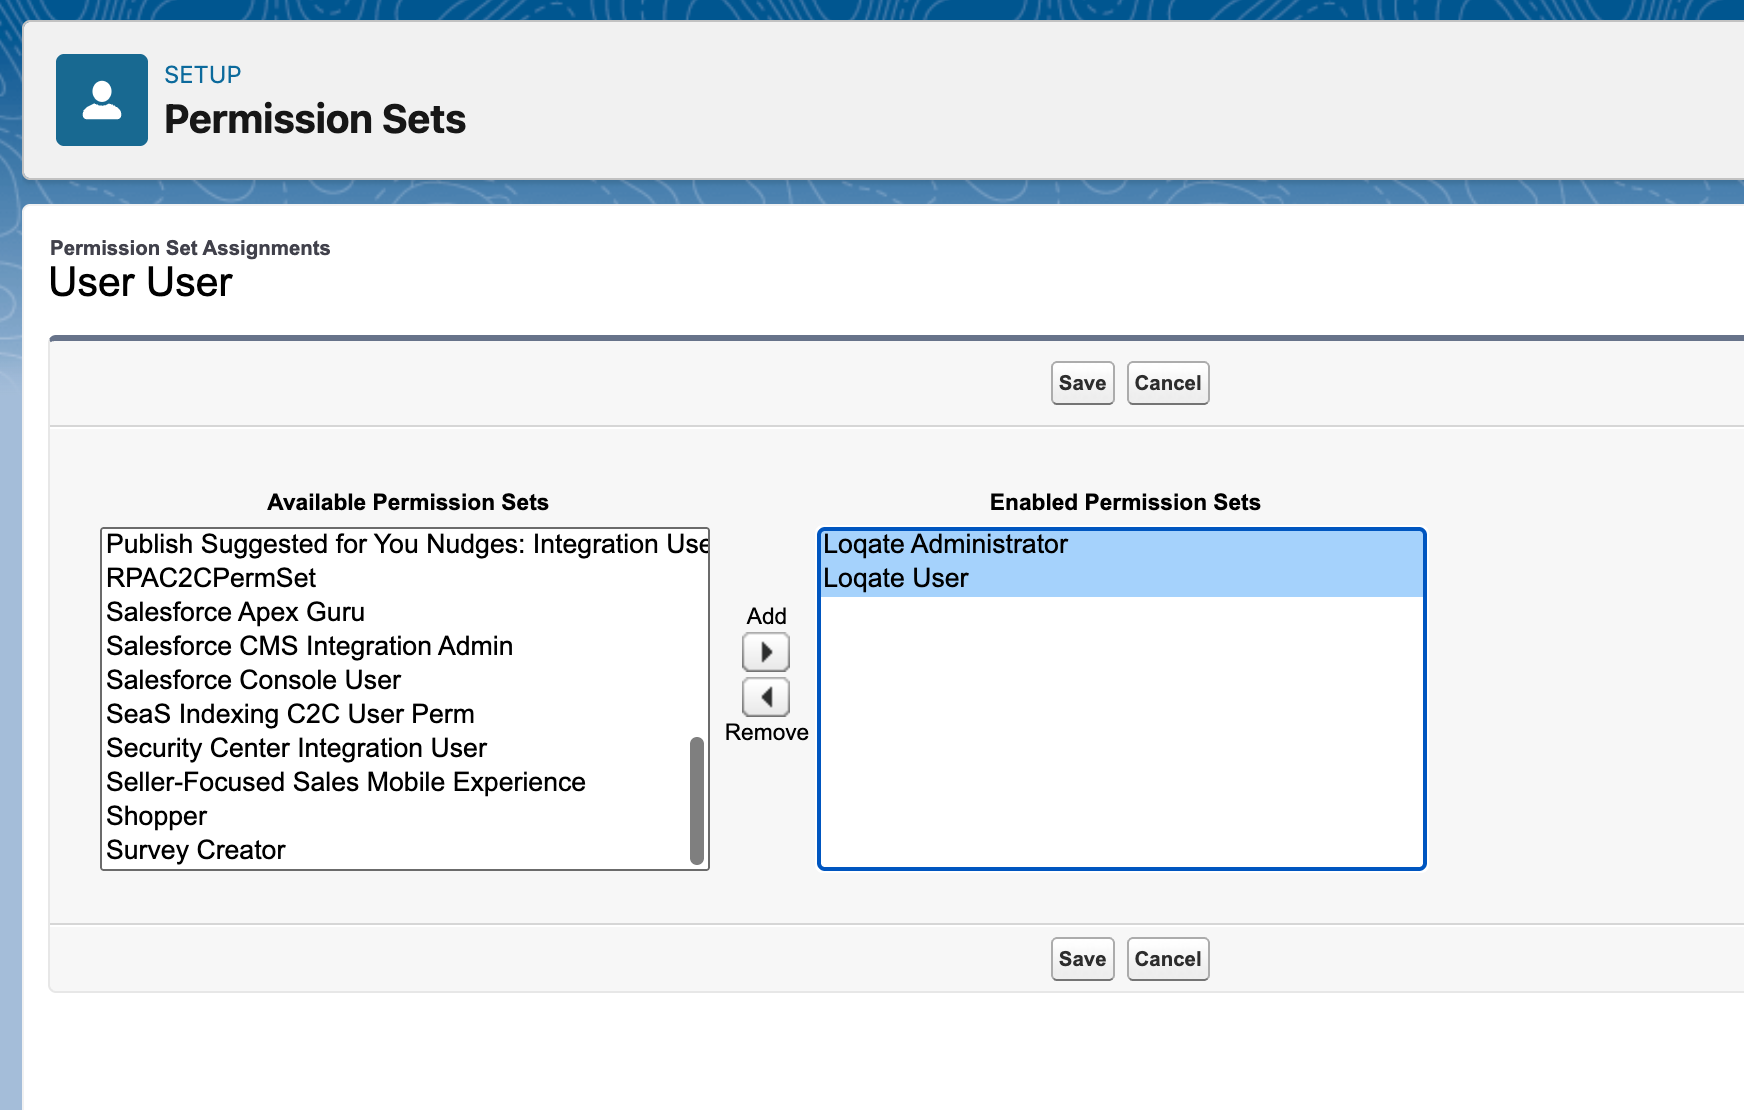
The Loqate app ships with one administrator permission set, three end-user permission sets, and an Apex-access set you stack on top of a user set. Assign **Loqate Administrator** to whoever configures the package, and a **Loqate User** set (plus **Loqate User (Apex Access)** for users on Apex-capable licences) to anyone who needs to capture addresses on a page, form, or flow.
See [Permission Sets](#permission-sets) for a full description of each set, the licence-type rules, and guidance on which combination to pick for your org.
Set the permissions as required for each of your users under Setup → Permission Sets, then move on to the next step.
#### App setup
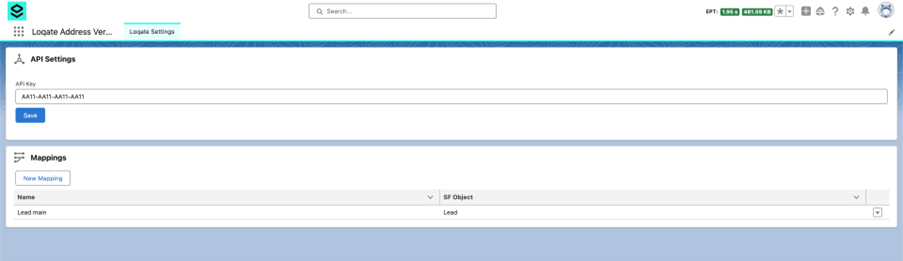
With the app installed and permission sets assigned, the next step is to add your Loqate API key to the app, which you can do in
the **API Settings** section of the Loqate Settings page.
**Note:** accessing the Settings page requires the Loqate Administrator permission set.
Select the Loqate app from the App Launcher, then copy and paste your API key into the **API Settings** section and click Save.
With that done, the Email validator and Phone validator controls are both enabled and can be added to pages - if you only want to
use those two controls, you can skip ahead to the Loqate widgets section. To add the Address finder control as well, follow the
steps below for creating address mappings.
#### Address mappings
For each address type that you want to populate using the Address finder control, you need to create an address mapping.
This may involve creating multiple mappings for a single object - for example, for the Contact object you might create one mapping for
the 'Mailing' address and another for the 'Other' address.
You can create address mappings in the Settings page of the Loqate app.
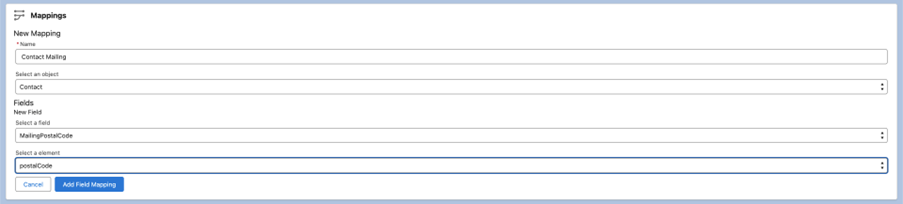
* In the Mappings section, click **New Mapping**
* Name your mapping (we recommend using a distinct and memorable name, to distinguish it from other address types - for example,
"Contact Mailing")
* From the 'Select an object' drop-down, choose the object that you want to create a mapping for
* Click the **+ Add Field** button, then from the 'Select a field' drop-down choose a field that you want to populate with address data
* From the 'Select a element' drop-down, choose a Loqate element to map to your chosen field
* Click the **Add Field Mapping** button to save and add your new mapping to the list
You can create as many mappings as you need by just repeating these steps.
#### Custom mappings
If required, you can also use custom address mappings.
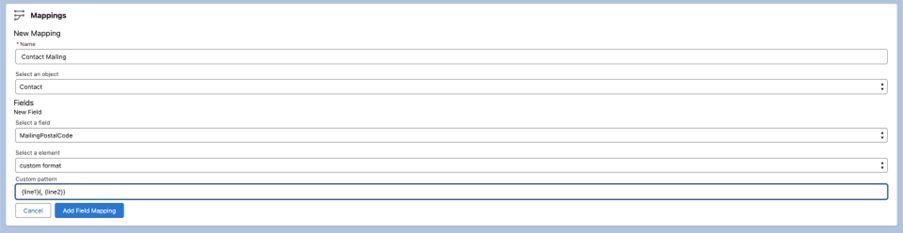
* When selecting an element to map to a field, choose the **custom format** option option from the drop-down list
* In the 'Custom pattern' field that appears, enter your custom field mapping
* For example, entering "{line1},{ line2} will concatenate line1 and line2, separated by a comma and a space (assuming line2 is
available - if not, only line1 will be included)
* See the Formatting section of our [Advanced Setup Guide](/our-services/address-capture/sdk) for more information about
custom field values
### Loqate widgets
In order to start using Loqate functionality, you need to add each control (i.e. Address finder, Email validator and Phone validator,
where appropriate) to your object pages.
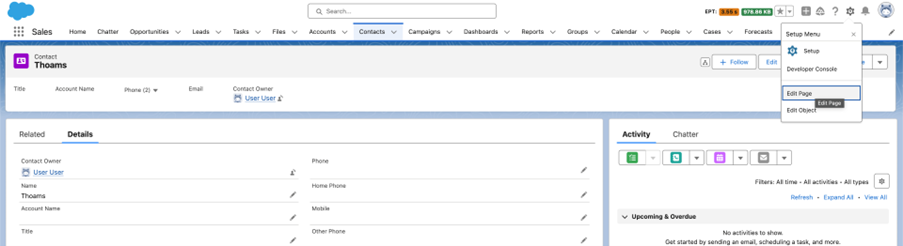
* From the Details tab on the Contacts page, select **Settings** and then **Edit Page**
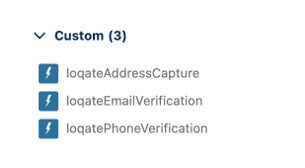
* In the Lightning App Builder, look for the Loqate controls in the Custom section of the Components menu. You should see
`loqateAddressCapture`, `loqateEmailVerification` and `loqatePhoneVerification`:
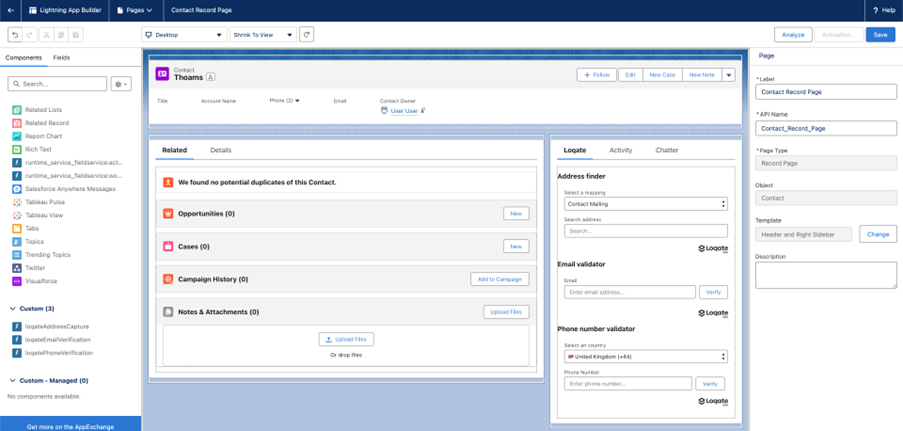
* You can drag each of these onto your page, placing them where you want them. Here's an example showing all three components added to
the right-hand side of the page:
* Once you've placed all of the components, Save and Activate the page to be able to start using them
* Repeat this process for all pages that you want to add the Loqate features to
### Optional: Address finder settings
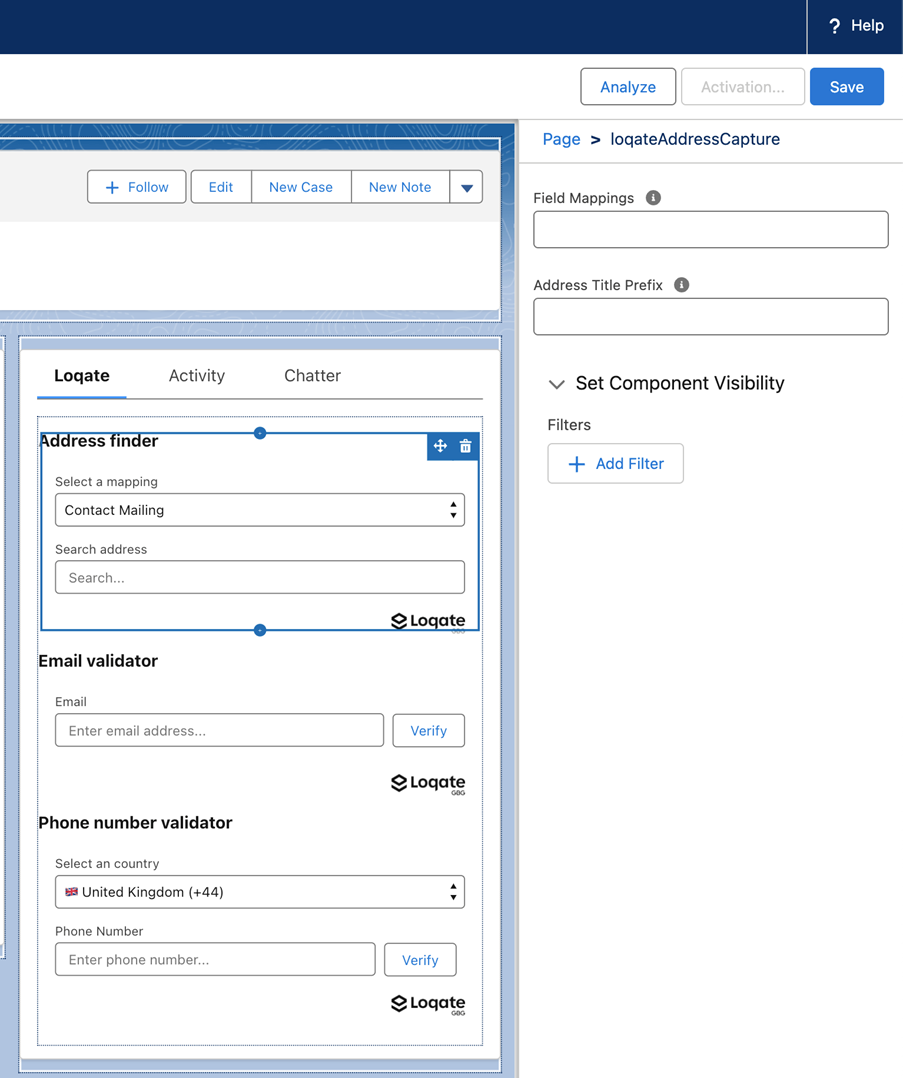
The Address finder control includes some additional settings which you can amend if required. To see these settings, select an
Address finder control where it's been added to one of your pages.
You'll need to amend the settings for each instance of the control.
#### Field mappings
By default, the Address finder control will display a select box listing all of the mappings you've created for the object on which
the control has been placed. You can then select the relevant mapping you want to use.
Optionally though, you can lock the Address finder control to a particular mapping by entering a specific mapping name in the
**Field Mappings** box. The control will no longer display the 'Select a mapping' box, and will instead always use the mapping you've
chosen.
#### Address title prefix
If you have multiple Address finder controls on a single page (for example if you've locked one or more of them to particular mappings),
it's useful to give each one a specific name to clearly differentiate them. You can use this setting to add additional text to the start
of each control's title.
Whatever text you enter in the **Address Title Prefix** box will be added at the start of its title - so for example if you have both
'mailing' and 'other' address fields on a page, add "Mailing" into this box for one of the controls so that it will display as
"Mailing Address finder".
### Add Address Capture to Flows
Follow these steps to add Address Capture to a Flow:
* Open the Flow editor for the Flow you want to add Address Capture to. For this example we’ll use **Create a case**
* From here, choose a screen to add the Loqate control to, and open the screen editor. In this example we'll use the
**Confirm Customer Info** screen
* The Loqate Address Capture component will be listed under **Custom**, so scroll down to that and drag the component onto your view
* Make sure you add a name into the **API Name** field
* You shouldn't need to fill in any of the other fields, as they're in place to allow for the Flows data model
* Click **Done**, then run or debug the Flow to view the control and output
* From here you can see that the **Search for an address** field is present
* Having searched for and found an address, click **Next** to move to the next screen - in this case the **Confirm Customer Details** screen
* Here you can see the returned address data, which you can then use in the rest of the Flow
#### Handling Custom Field Types in Flows
When using the Loqate Flow action to return custom fields, the output values are returned as **Text**. This is fine for most scenarios, but can cause issues when mapping onto Salesforce standard fields that expect other data types (for example, `MailingLatitude` and `MailingLongitude`, which are **Number** fields).
If you attempt to map a Text resource directly to a Number field in a **Create or Update Records** element, Flow will block the mapping.
**Solution: Use a Number Formula Resource**
You can convert the returned Text into a Number inside your Flow before mapping.
**Steps:**
1. In Flow Builder, open the **Manager** panel and click **New Resource**.
2. Select **Resource Type**: `Formula`.
3. Give it an **API Name** (e.g. `latNumber`).
4. Set **Data Type**: `Number`.
5. Set **Decimal Places**: `6` (or another precision suitable for coordinates).
6. Enter the following formula, referencing the Text output from the Loqate action (e.g. `selectedAddressField1`):
```bash theme={null}
IF(
ISBLANK({!ADDRESS_FINDER.selectedAddressField1}),
NULL,
IF(
ISNUMBER({!ADDRESS_FINDER.selectedAddressField1}),
VALUE({!ADDRESS_FINDER.selectedAddressField1}),
NULL
)
)
```
* `VALUE()` casts the text into a number.
* Blank or invalid inputs return NULL so the Flow won't fault.
7. Save the resource.
8. In your **Create/Update Records** element, set the record field (e.g. `MailingLatitude`) to this formula resource.
Repeat the same steps for Longitude if required.
**Example**
* **Loqate selectedAddressField1** → `"52.123456"` (Text)
* **Formula (latNumber)** → `52.123456` (Number)
* **Mapped to Contact.MailingLatitude** → works successfully.
## Permission Sets
The Loqate for Salesforce managed package ships with **five permission sets**. After installing the package you assign these to your users to grant access to the address-capture components and the configuration screens.
There is **one administrator permission set** for configuring the package, **three user permission sets** that grant the read-only object/field access end users need, and **one Apex-access permission set** that you stack on top of one of the user sets for any user who is on a licence type that supports Apex class access on permission sets.
The reason for the split: Salesforce auto-restricts which user licences a permission set can be assigned to as soon as the set declares Apex class access. Keeping the user sets free of class access lets them remain truly licence-agnostic, and the Apex Access set carries the licence restriction so it only narrows assignment for users who need it.
You can find all of these in **Setup → Permission Sets** after the package is installed.
***
### Loqate Administrator
**Purpose:** the configuration role. Assign this to anyone who needs to enter the Loqate API key, define how Loqate address fields map onto your Salesforce objects, or otherwise maintain the integration.
**What it grants:**
* Full read, create, edit, and delete access to all of the Loqate configuration objects (settings and field mappings).
* Edit access to the API key field and to the mapping fields that define which Loqate address element populates which Salesforce field.
* Apex class access to all of the controllers backing the configuration UI.
* Visibility of the **Loqate Address Verification** app in the App Launcher.
* Visibility of the **Loqate Settings** tab.
**Who should get it:** Salesforce administrators or whoever owns the Loqate integration in your org. End users should **not** be assigned this set — it would let them rotate the API key or change field mappings, which would break address capture for everyone else.
**Stacking:** none required. The administrator set is self-sufficient and only assignable to internal Salesforce-licensed users in any case.
***
### Loqate User (All User Types)
**Purpose:** the standard end-user permission set. Assign this to anyone who needs to use Loqate address capture on a Salesforce form, page, or flow. It is licence-agnostic, so it can be assigned to internal Salesforce users, Experience Cloud (Community / Partner) users, Platform users, and any other user licence type.
**What it grants:**
* Read-only access to the Loqate configuration objects so the address-capture component can resolve which fields to populate.
* “View All” on the configuration records, meaning users will always see the mappings regardless of record-ownership or sharing rules.
* The Loqate Address Verification app and the Loqate Settings tab are **hidden** — end users do not see the configuration UI.
**What it does *not* grant:** access to the Apex controllers the address-capture components call at runtime. For users on licences that support Apex class access, also assign **Loqate User (Apex Access)** (see below). Without that, users will see the error `You do not have access to the Apex class named 'LoqateAddressMappingController'` the moment the component loads, **unless** the package was installed *for all users* — in which case the install-time profile grant covers class access and the Apex Access set is not strictly required (assigning it anyway is harmless and recommended for clarity).
**When to choose it:** this is the default end-user object/field choice for most orgs. Pick this set if your org doesn’t have a specific policy against “View All” on custom configuration objects.
***
### Loqate User (Restricted View All)
**Purpose:** the same end-user role as **Loqate User (All User Types)**, but **without “View All”** on the configuration objects. Users can only see mapping and settings records that your org’s sharing rules already grant them access to.
**What it grants:**
* Read-only access to the Loqate configuration objects (same as the standard end-user set).
* **No** “View All” — record visibility is governed by your org’s sharing model.
* App and tab hidden.
**What it does *not* grant:** Apex class access. Same caveat as above — stack **Loqate User (Apex Access)** on top for users on licences that support Apex class access.
**When to choose it:** assign this instead of the standard end-user set when:
* Your org’s security policy forbids granting “View All” on custom configuration objects.
* You are preparing for or maintaining a security review (e.g. AppExchange/internal audit) that flags blanket view-all permissions.
* You want to intentionally scope which users can see which mapping records.
If you choose this option, make sure your sharing rules / record ownership are configured so that the relevant mapping and settings records are visible to the users who need them. If a user can’t see the mapping records, the address-capture component won’t know how to populate fields and the integration will not work for them.
***
### Loqate User (Apex Access)
**Purpose:** grants the Apex class access required by the user-facing address-capture components (`AppSettingsController`, `LoqateAddressMappingController`). Designed to be **stacked on top of** one of the User sets above.
**What it grants:**
* Apex class access to the two controllers the end-user LWCs call at runtime.
**What it does *not* grant:** any object, field, tab, or app visibility. It must be combined with **Loqate User (All User Types)** or **Loqate User (Restricted View All)** to be useful.
**Why it is a separate set:** Salesforce automatically restricts which user licences can be assigned a permission set that declares Apex class access. Bundling that restriction into the main user sets would break their licence-agnostic promise and would silently fail to assign for users on licences such as **Chatter Free**, **Chatter External**, **Identity Only** and certain legacy portal licences. By keeping the class access in its own set, the user sets remain assignable to anyone, and the Apex Access set only narrows assignment for users who actually need the class access.
**When to assign it:**
* Always, for any end user on a licence that supports Apex class access on permission sets — internal Salesforce users, Salesforce Platform users, Customer Community / Customer Community Plus / Partner Community / External Apps users, and similar.
* **Skip it** for users on licence types that do not support Apex class access on permission sets (Chatter Free, Chatter External, Identity Only, certain legacy portal licences). Those users cannot use the Loqate components anyway — the underlying licence does not allow them to call Apex from an LWC — but the User set on its own can still be assigned to them without error.
**Strictly optional case:** if the package was installed using the *Install for All Users* option, the install-time profile grant already covers Apex class access for internal user profiles. You can technically skip the Apex Access set for those users, though assigning it anyway is harmless and removes the dependency on the install-time grant (which can be lost if a profile is later cloned or modified).
***
### Loqate User (Salesforce Users Only) — *deprecated*
**Purpose:** the original end-user permission set, retained for backwards compatibility with installations that were configured before the licence-agnostic variants were introduced.
**Why it’s deprecated:** this set is restricted to **Salesforce-licensed users only**. That excludes Experience Cloud, Platform, and other licence types that many customers need to grant address-capture access to.
**What you should do:**
* **New installations:** do not assign this set. Use **Loqate User (All User Types)** or **Loqate User (Restricted View All)** instead, plus **Loqate User (Apex Access)** for Apex-capable users.
* **Existing installations:** continue to work. When convenient, migrate existing assignments to one of the supported sets above.
***
### Quick decision guide
| Need | Assign |
| ------------------------------------------------------------------------------------------------------------------ | ------------------------------------------------------------------------------------------------------------------------------------------------------------ |
| Configure the package, enter the API key, edit field mappings | **Loqate Administrator** |
| Standard end user on an Apex-capable licence (internal Salesforce, Platform, Community, Partner, External Apps, …) | **Loqate User (All User Types)** + **Loqate User (Apex Access)** |
| End user as above, but your org’s security policy disallows “View All” on configuration objects | **Loqate User (Restricted View All)** + **Loqate User (Apex Access)** |
| User on a licence that does not support Apex class access on permission sets (Chatter Free, Identity Only, …) | **Loqate User (All User Types)** only — note: address capture will not function for these users; the licence itself blocks Apex from running on their behalf |
| Existing assignment from an older installation using the deprecated set | *Loqate User (Salesforce Users Only)* — migrate to the supported sets above |
***
### How to assign a permission set
1. In Salesforce, go to **Setup → Users → Users**.
2. Open the user record you want to grant access to.
3. Under **Permission Set Assignments**, click **Edit Assignments**.
4. Move the relevant Loqate permission set(s) from **Available** to **Enabled**. For end users on Apex-capable licences this means selecting **two** sets — one User set (All User Types or Restricted View All) and **Loqate User (Apex Access)**.
5. Click **Save**.
The user will gain access at next login (or immediately, depending on session state).
***
### Troubleshooting
**“You do not have access to the Apex class named ‘LoqateAddressMappingController’”** — the user has one of the User sets assigned but not **Loqate User (Apex Access)**, and the package was not installed *for all users* (or the profile-level grant has been lost). Assign **Loqate User (Apex Access)** in addition to the User set.
**“Can’t assign permission set Loqate User (Apex Access) to user X. The user license doesn’t allow Apex Class Access”** — the user is on a licence type that does not permit Apex class access on permission sets (Chatter Free, Chatter External, Identity Only, certain legacy portal licences). Assign **Loqate User (All User Types)** alone. Address capture will not work for the user, but this is a constraint of their Salesforce licence, not of the Loqate package — no permission-set configuration can grant Apex access to a licence that does not support it.
## Public Experience Cloud sites
If your public **Experience Cloud site** (formerly Community) is unable to perform address searches using the Loqate components, the issue may be caused by Salesforce’s **Secure Guest User Record Access** model.
Even when the **Loqate Settings** record has external organization-wide defaults (OWD) set to **Public Read Only**, Salesforce enforces an additional restriction for guest users—effectively treating all objects as **Private**.\
This means you must **explicitly share** the Loqate Settings record with your site’s guest user.
### Configure guest access to Loqate Settings
Follow these steps to create a sharing rule that grants your guest user read access to the Loqate Settings record:
1. In **Setup**, navigate to\
**Sharing Settings → Loqate Settings Sharing Rules**.
2. Click **New**.
3. Enter a **Label** and **Rule Name** of your choice.
4. Select **Guest user access, based on criteria** as the **Rule Type**.
5. Under **Criteria**, set:
* **Field:** `ApiKey`
* **Operator:** `not equal to`
* **Value:** *(leave blank)*
6. In the **Share with** dropdown, select your **site’s guest user**.
7. Set the **Access Level** to **Read Only**.
8. Click **Save**.
Once the sharing rule has been created and processed, guest users should be able to access the Loqate Settings record, and address searches will begin to function correctly again.
## In use
With the Loqate app installed and configured, you can start using the Address finder, Email validator and Phone number validator
controls when inputting addresses, email addresses and phone numbers into Salesforce.
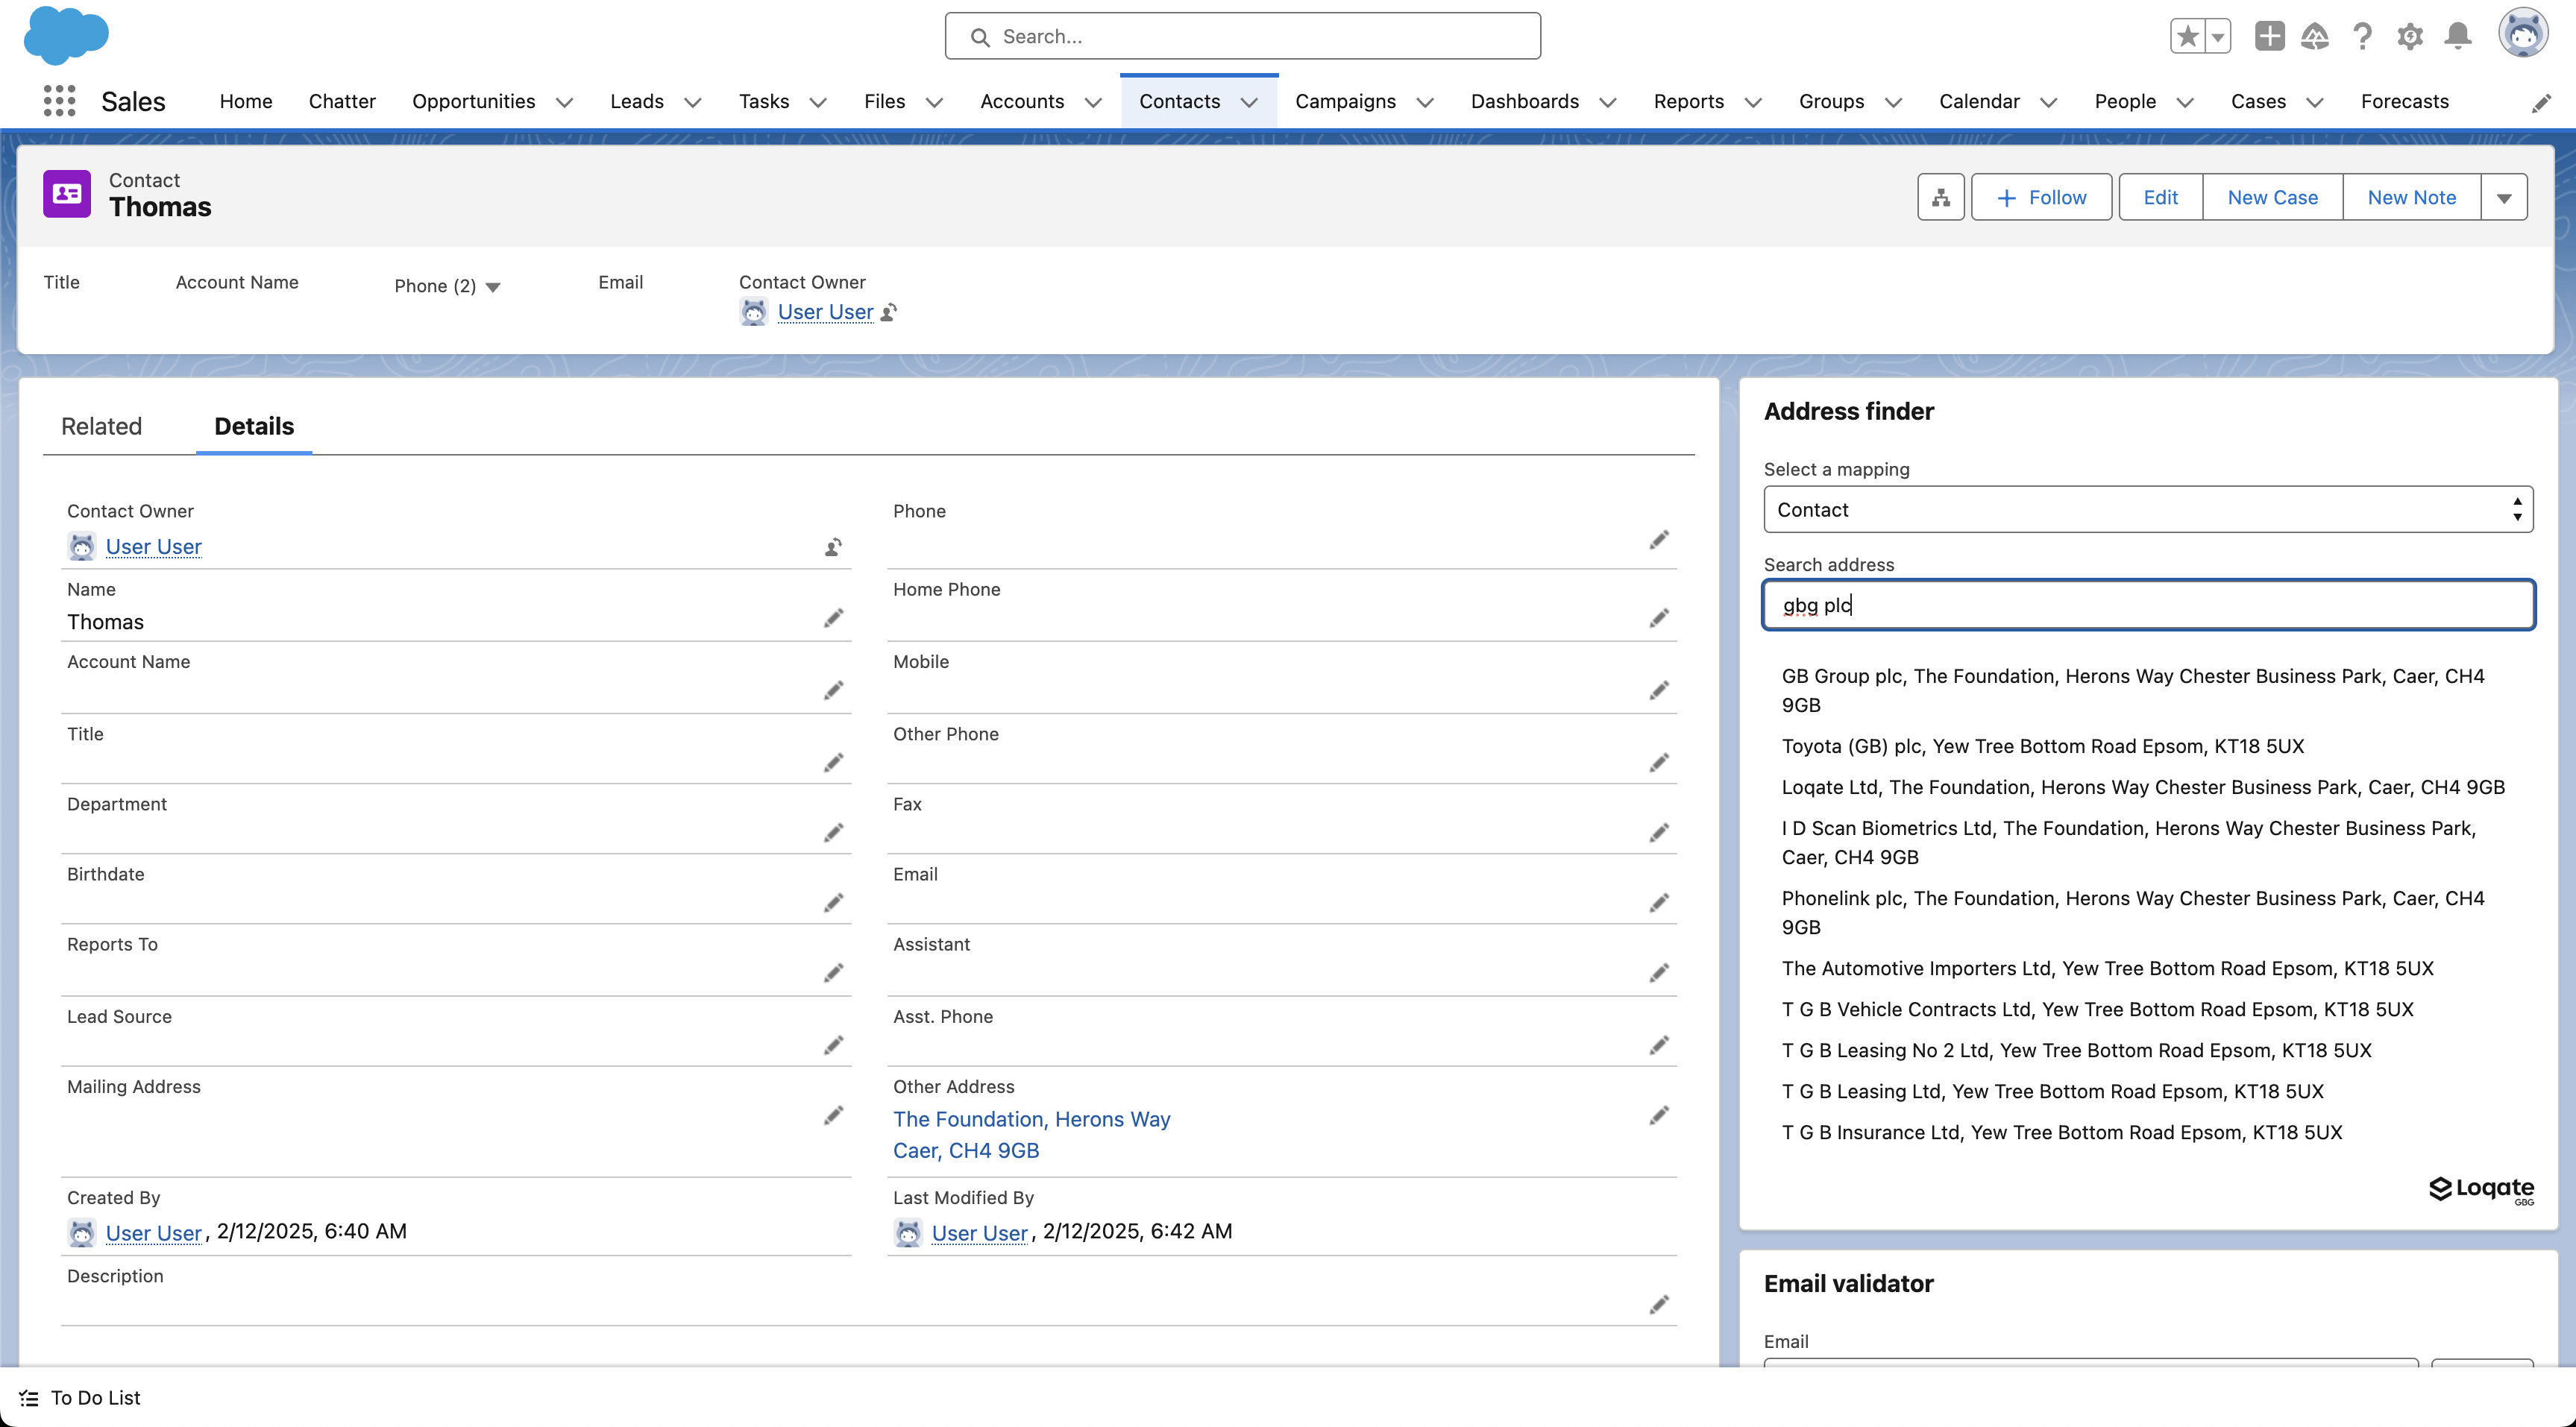
For example, here's how the Address finder control looks during an address search:
## Legacy Visualforce elements
In some cases you may want to use a more legacy approach to including Address Capture in your Salesforce instance, for example by
overriding the **New** button action on a record listing page.
In the following examples we’ll use the standard **Contact** record type to demonstrate the use of the included legacy Visualforce
component.
The Loqate app ships with a Visualforce page that can be used to replace the **New** button action via Object Manager, and is a
reference build for the outcome of this example.
### Building the page
In this example we will be creating a new page to replace the standard Contact Create page and allow for Address Capture to be used in
that process. Please note that this is a legacy approach, and we would recommend you use Flow views for this kind of action.
Each of the address controls in the above screenshot are an example of the `legacyLoqateAddressCapture` Visualforce component.
The full Visualforce page looks like this:
```apex theme={null}
```
As you can see the controls are included like this:
```apex theme={null}
```
You may need one, or as in this case multiple instances of the control for your page.
The attributes for this component are as follows:
| Attribute name | Description | Example |
| :------------------------ | :------------------------------------------------------------------------------------------------------------------------------------------------------------------------------------------------------ | :--------------------------- |
| label | This is the label for the control, and will appear alongside the control input box on pages. | Mailing Address |
| namespace | Optional. This attribute is important when you have multiple controls on a single page, as this allows the controls to operate independently of each other. It must be unique across rendered controls. | mailing |
| onAddressSelectedFunction | This should be set to the name of the callback function that selected addresses will be returned to. | handleMailingAddressSelected |
| Mapping | Optional. If a mapping group name is provided, the second argument passed to the callback function will be an object whose keys and values are those of the mapped fields. | Contact Mailing |
Let's look in more detail at some of the aspects of the callback function and how the data gets into a record.
The page itself (as well as using Lightning stylesheets to give a Lightning look and feel) uses the standard Contact controller:
```apex theme={null}
```
This allows it to act as a creation form for the standard Contact object. This in turn means that you can set values against the
Contact records properties within the page. For the first and last name fields, this is achieved by binding the field to the
FirstName and LastName fields of the controller:
```apex theme={null}
```
However, for the address lookups controls this is a little more involved. You can’t map directly from JS to the values, so instead
you expose the properties you want to set via a selection of hidden inputs:
```apex theme={null}
```
You can then declare a callback function for each of the address lookups on the page. These fill take the address output of the lookup,
and push it into the record fields defined above:
```apex theme={null}
```
Finally, you can add a command button that will call the Save function on the standard controller:
```apex theme={null}
```
The response to this button press off a standard controller is to redirect to the record, so that flow is taken care of.
### Using the page in place of the standard New view
With a Visualforce page in place that uses the Address Capture components, you now need to override the default behaviour of the
New button on the contact listing page.
This is achieved through the Object Manager, so navigate to Setup and search for Object Manager. Once there, select **Contact** from the list.
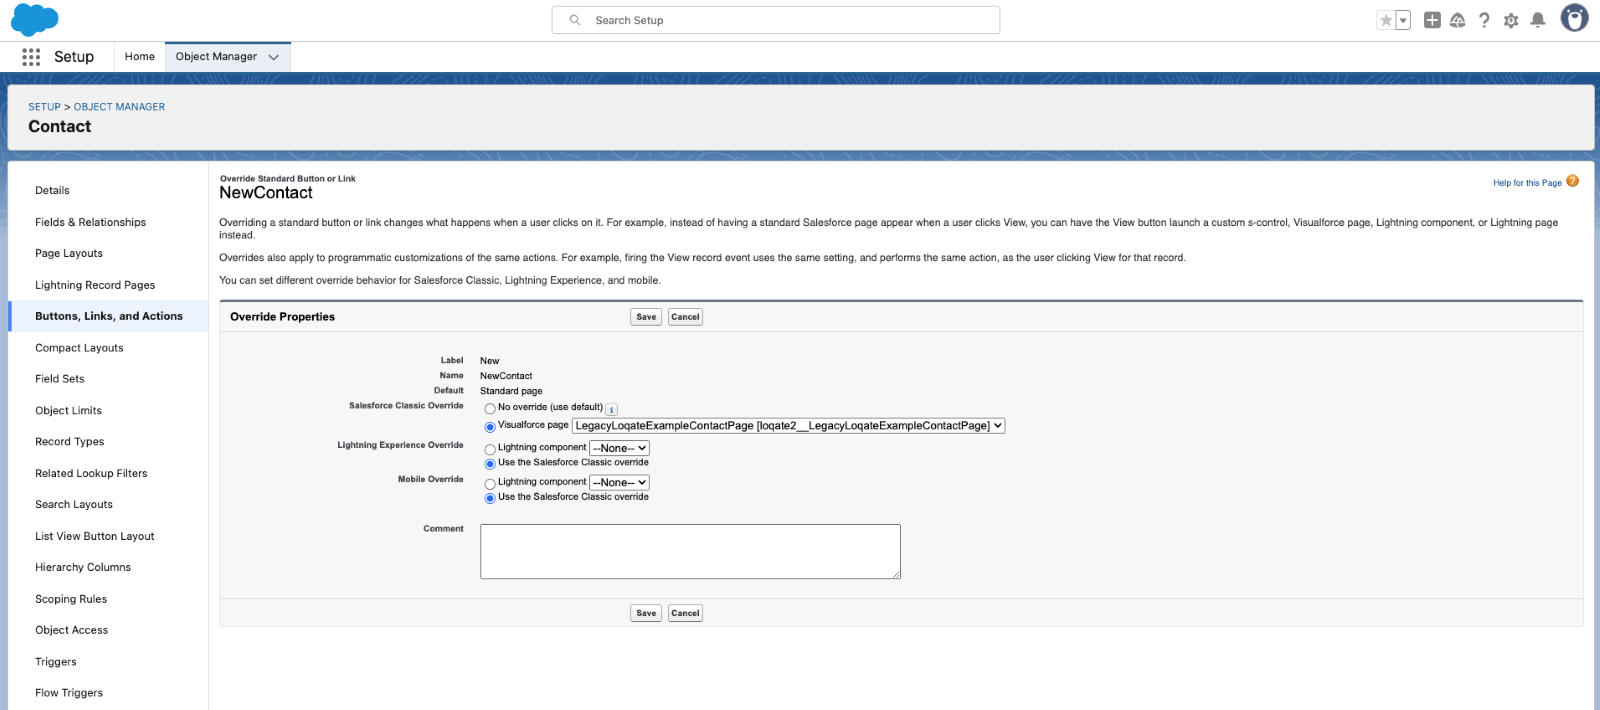
Next select **Button, Links and Actions** from the left-hand menu, then edit the **New** action – you should be able to select the new
page from the **Visualforce** page dropdown field:
Click **Save**, and from now on the New action on the contact listing page will open your new page, and you can create contacts with
verified addresses.
 #### App setup
With the app installed and permission sets assigned, the next step is to add your Loqate API key to the app, which you can do in
the **API Settings** section of the Loqate Settings page.
#### App setup
With the app installed and permission sets assigned, the next step is to add your Loqate API key to the app, which you can do in
the **API Settings** section of the Loqate Settings page.
 **Note:** accessing the Settings page requires the Loqate Administrator permission set.
Select the Loqate app from the App Launcher, then copy and paste your API key into the **API Settings** section and click Save.
With that done, the Email validator and Phone validator controls are both enabled and can be added to pages - if you only want to
use those two controls, you can skip ahead to the Loqate widgets section. To add the Address finder control as well, follow the
steps below for creating address mappings.
#### Address mappings
For each address type that you want to populate using the Address finder control, you need to create an address mapping.
This may involve creating multiple mappings for a single object - for example, for the Contact object you might create one mapping for
the 'Mailing' address and another for the 'Other' address.
You can create address mappings in the Settings page of the Loqate app.
* In the Mappings section, click **New Mapping**
* Name your mapping (we recommend using a distinct and memorable name, to distinguish it from other address types - for example,
"Contact Mailing")
* From the 'Select an object' drop-down, choose the object that you want to create a mapping for
**Note:** accessing the Settings page requires the Loqate Administrator permission set.
Select the Loqate app from the App Launcher, then copy and paste your API key into the **API Settings** section and click Save.
With that done, the Email validator and Phone validator controls are both enabled and can be added to pages - if you only want to
use those two controls, you can skip ahead to the Loqate widgets section. To add the Address finder control as well, follow the
steps below for creating address mappings.
#### Address mappings
For each address type that you want to populate using the Address finder control, you need to create an address mapping.
This may involve creating multiple mappings for a single object - for example, for the Contact object you might create one mapping for
the 'Mailing' address and another for the 'Other' address.
You can create address mappings in the Settings page of the Loqate app.
* In the Mappings section, click **New Mapping**
* Name your mapping (we recommend using a distinct and memorable name, to distinguish it from other address types - for example,
"Contact Mailing")
* From the 'Select an object' drop-down, choose the object that you want to create a mapping for
 * Click the **+ Add Field** button, then from the 'Select a field' drop-down choose a field that you want to populate with address data
* From the 'Select a element' drop-down, choose a Loqate element to map to your chosen field
* Click the **+ Add Field** button, then from the 'Select a field' drop-down choose a field that you want to populate with address data
* From the 'Select a element' drop-down, choose a Loqate element to map to your chosen field
 * Click the **Add Field Mapping** button to save and add your new mapping to the list
 You can create as many mappings as you need by just repeating these steps.
#### Custom mappings
If required, you can also use custom address mappings.
* When selecting an element to map to a field, choose the **custom format** option option from the drop-down list
* In the 'Custom pattern' field that appears, enter your custom field mapping
* For example, entering "{line1},{ line2} will concatenate line1 and line2, separated by a comma and a space (assuming line2 is
available - if not, only line1 will be included)
You can create as many mappings as you need by just repeating these steps.
#### Custom mappings
If required, you can also use custom address mappings.
* When selecting an element to map to a field, choose the **custom format** option option from the drop-down list
* In the 'Custom pattern' field that appears, enter your custom field mapping
* For example, entering "{line1},{ line2} will concatenate line1 and line2, separated by a comma and a space (assuming line2 is
available - if not, only line1 will be included)
 * See the Formatting section of our [Advanced Setup Guide](/our-services/address-capture/sdk) for more information about
custom field values
### Loqate widgets
In order to start using Loqate functionality, you need to add each control (i.e. Address finder, Email validator and Phone validator,
where appropriate) to your object pages.
* From the Details tab on the Contacts page, select **Settings** and then **Edit Page**
* See the Formatting section of our [Advanced Setup Guide](/our-services/address-capture/sdk) for more information about
custom field values
### Loqate widgets
In order to start using Loqate functionality, you need to add each control (i.e. Address finder, Email validator and Phone validator,
where appropriate) to your object pages.
* From the Details tab on the Contacts page, select **Settings** and then **Edit Page**
 * In the Lightning App Builder, look for the Loqate controls in the Custom section of the Components menu. You should see
`loqateAddressCapture`, `loqateEmailVerification` and `loqatePhoneVerification`:
* In the Lightning App Builder, look for the Loqate controls in the Custom section of the Components menu. You should see
`loqateAddressCapture`, `loqateEmailVerification` and `loqatePhoneVerification`:
 * You can drag each of these onto your page, placing them where you want them. Here's an example showing all three components added to
the right-hand side of the page:
* You can drag each of these onto your page, placing them where you want them. Here's an example showing all three components added to
the right-hand side of the page:
 * Once you've placed all of the components, Save and Activate the page to be able to start using them
* Repeat this process for all pages that you want to add the Loqate features to
### Optional: Address finder settings
The Address finder control includes some additional settings which you can amend if required. To see these settings, select an
Address finder control where it's been added to one of your pages.
* Once you've placed all of the components, Save and Activate the page to be able to start using them
* Repeat this process for all pages that you want to add the Loqate features to
### Optional: Address finder settings
The Address finder control includes some additional settings which you can amend if required. To see these settings, select an
Address finder control where it's been added to one of your pages.
 You'll need to amend the settings for each instance of the control.
#### Field mappings
By default, the Address finder control will display a select box listing all of the mappings you've created for the object on which
the control has been placed. You can then select the relevant mapping you want to use.
Optionally though, you can lock the Address finder control to a particular mapping by entering a specific mapping name in the
**Field Mappings** box. The control will no longer display the 'Select a mapping' box, and will instead always use the mapping you've
chosen.
#### Address title prefix
If you have multiple Address finder controls on a single page (for example if you've locked one or more of them to particular mappings),
it's useful to give each one a specific name to clearly differentiate them. You can use this setting to add additional text to the start
of each control's title.
Whatever text you enter in the **Address Title Prefix** box will be added at the start of its title - so for example if you have both
'mailing' and 'other' address fields on a page, add "Mailing" into this box for one of the controls so that it will display as
"Mailing Address finder".
### Add Address Capture to Flows
Follow these steps to add Address Capture to a Flow:
* Open the Flow editor for the Flow you want to add Address Capture to. For this example we’ll use **Create a case**
You'll need to amend the settings for each instance of the control.
#### Field mappings
By default, the Address finder control will display a select box listing all of the mappings you've created for the object on which
the control has been placed. You can then select the relevant mapping you want to use.
Optionally though, you can lock the Address finder control to a particular mapping by entering a specific mapping name in the
**Field Mappings** box. The control will no longer display the 'Select a mapping' box, and will instead always use the mapping you've
chosen.
#### Address title prefix
If you have multiple Address finder controls on a single page (for example if you've locked one or more of them to particular mappings),
it's useful to give each one a specific name to clearly differentiate them. You can use this setting to add additional text to the start
of each control's title.
Whatever text you enter in the **Address Title Prefix** box will be added at the start of its title - so for example if you have both
'mailing' and 'other' address fields on a page, add "Mailing" into this box for one of the controls so that it will display as
"Mailing Address finder".
### Add Address Capture to Flows
Follow these steps to add Address Capture to a Flow:
* Open the Flow editor for the Flow you want to add Address Capture to. For this example we’ll use **Create a case**
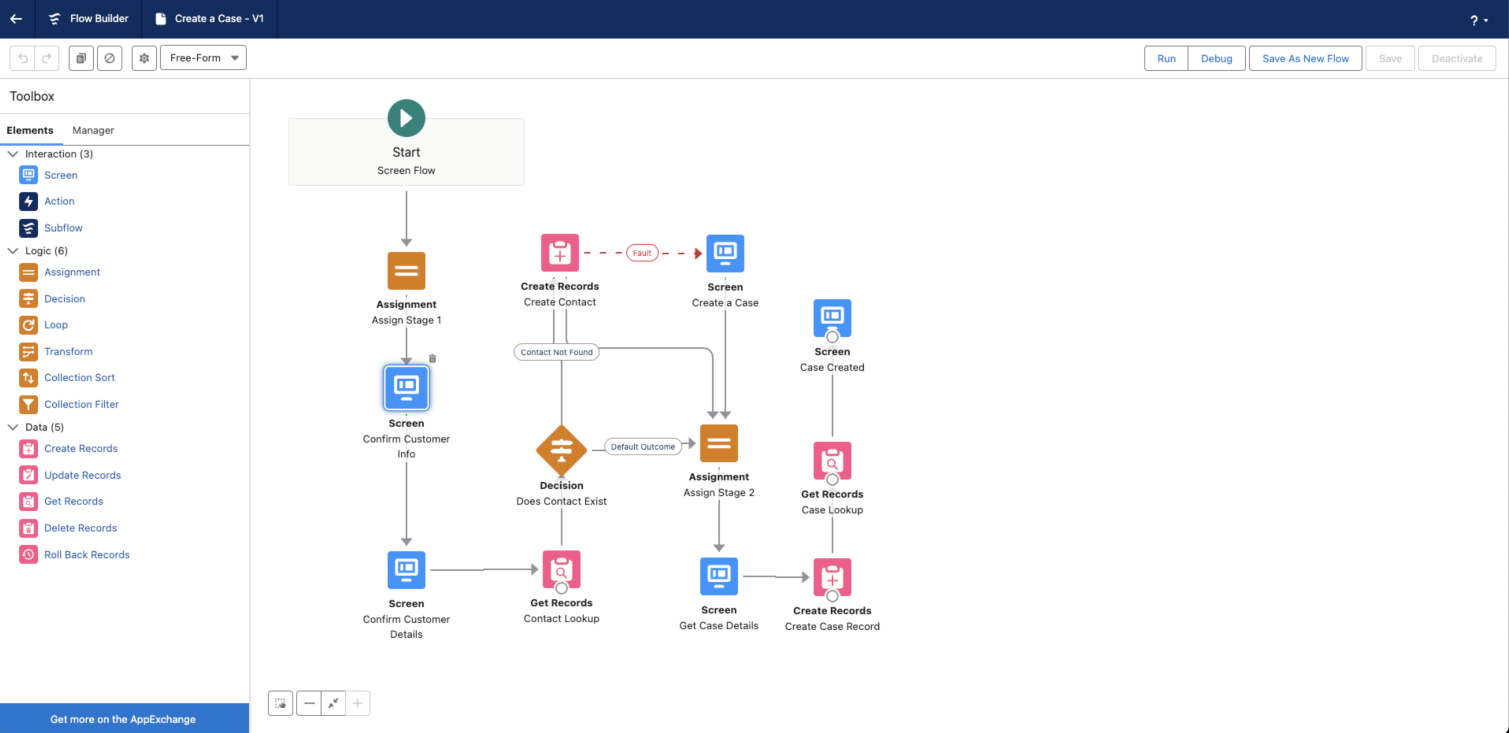 * From here, choose a screen to add the Loqate control to, and open the screen editor. In this example we'll use the
**Confirm Customer Info** screen
* From here, choose a screen to add the Loqate control to, and open the screen editor. In this example we'll use the
**Confirm Customer Info** screen
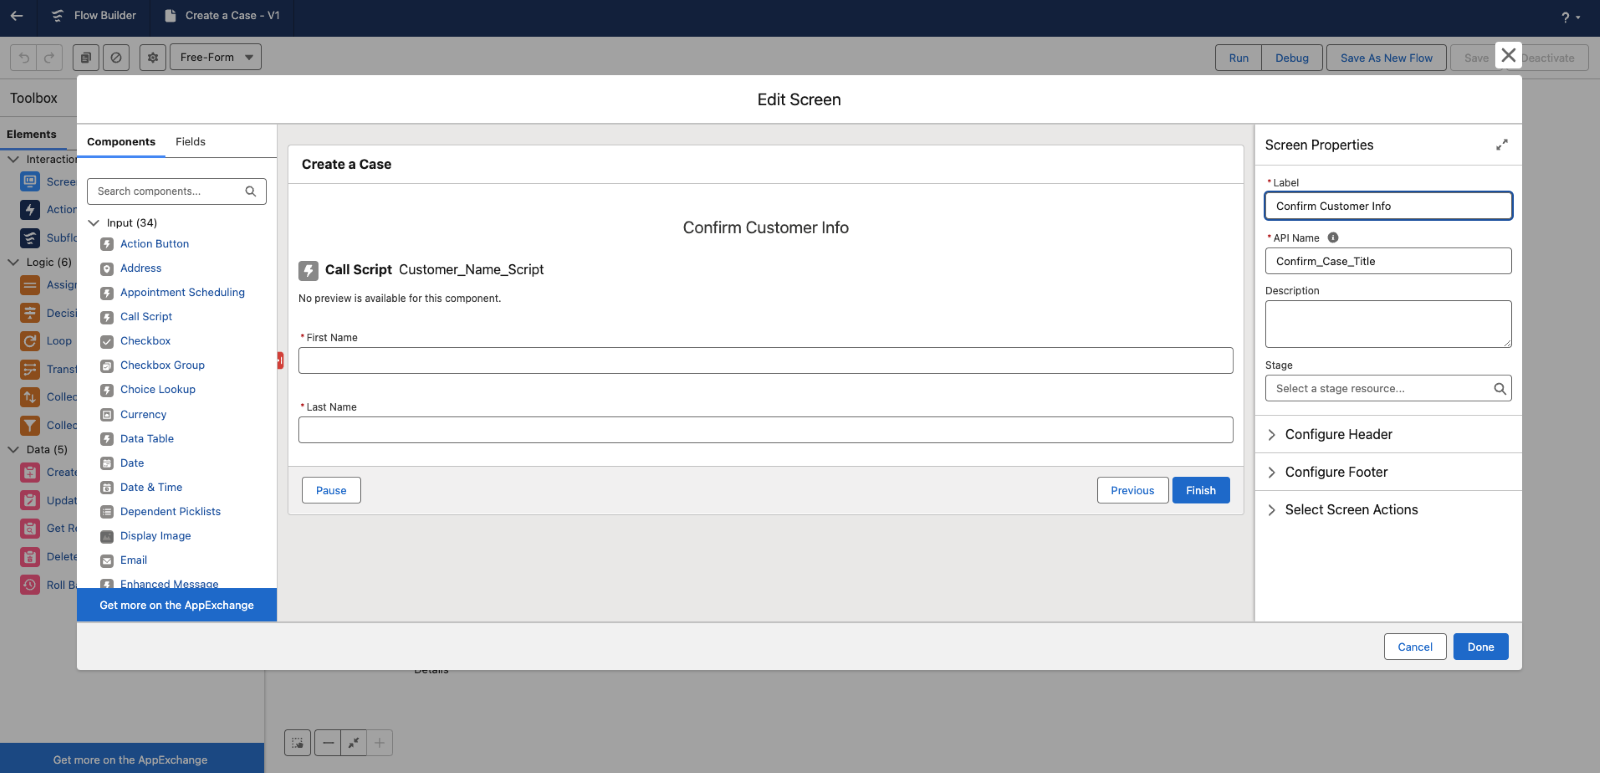 * The Loqate Address Capture component will be listed under **Custom**, so scroll down to that and drag the component onto your view
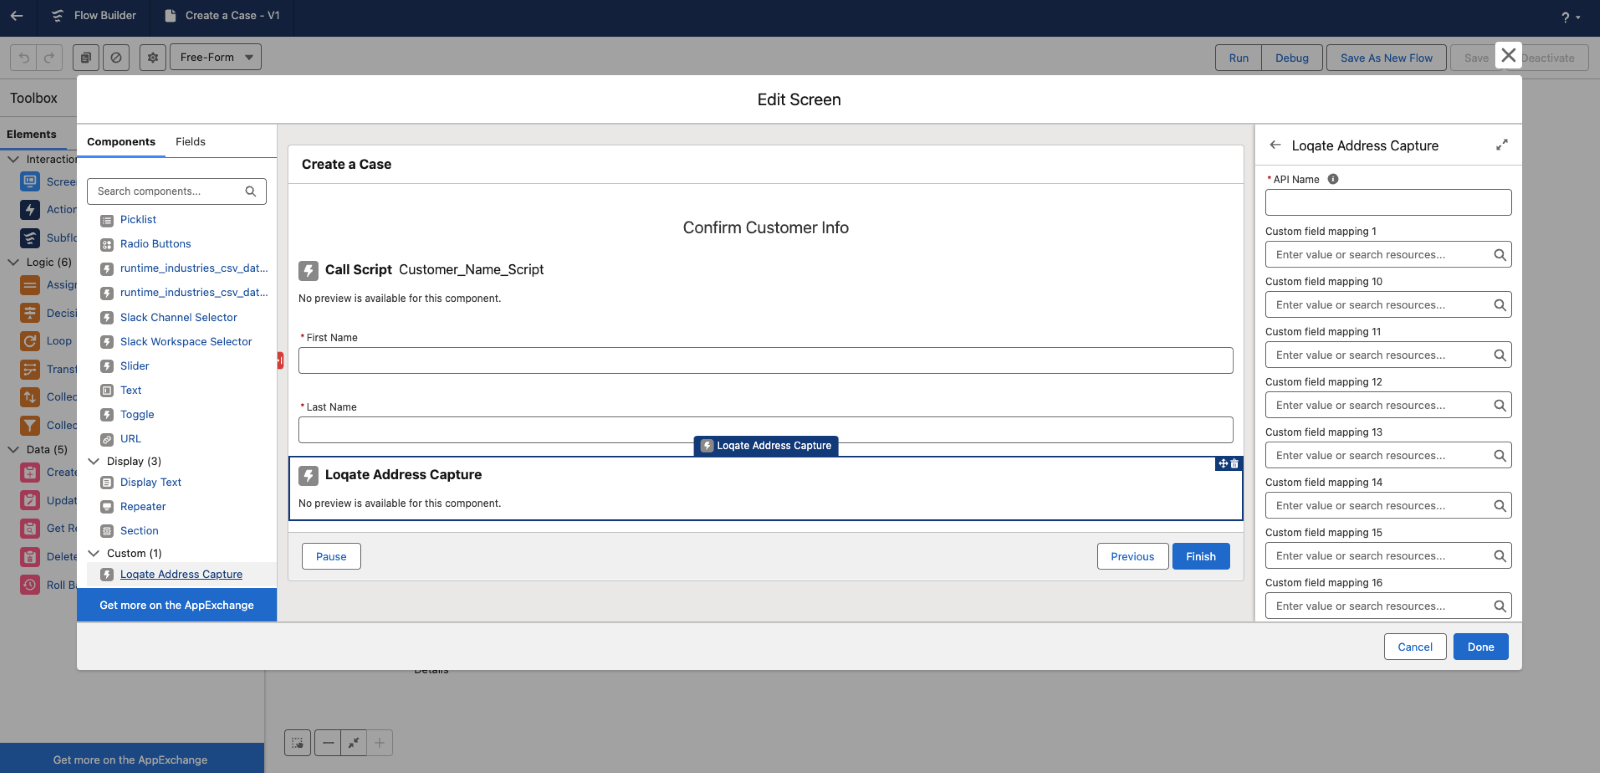 * Make sure you add a name into the **API Name** field
* You shouldn't need to fill in any of the other fields, as they're in place to allow for the Flows data model
* Click **Done**, then run or debug the Flow to view the control and output
* Make sure you add a name into the **API Name** field
* You shouldn't need to fill in any of the other fields, as they're in place to allow for the Flows data model
* Click **Done**, then run or debug the Flow to view the control and output
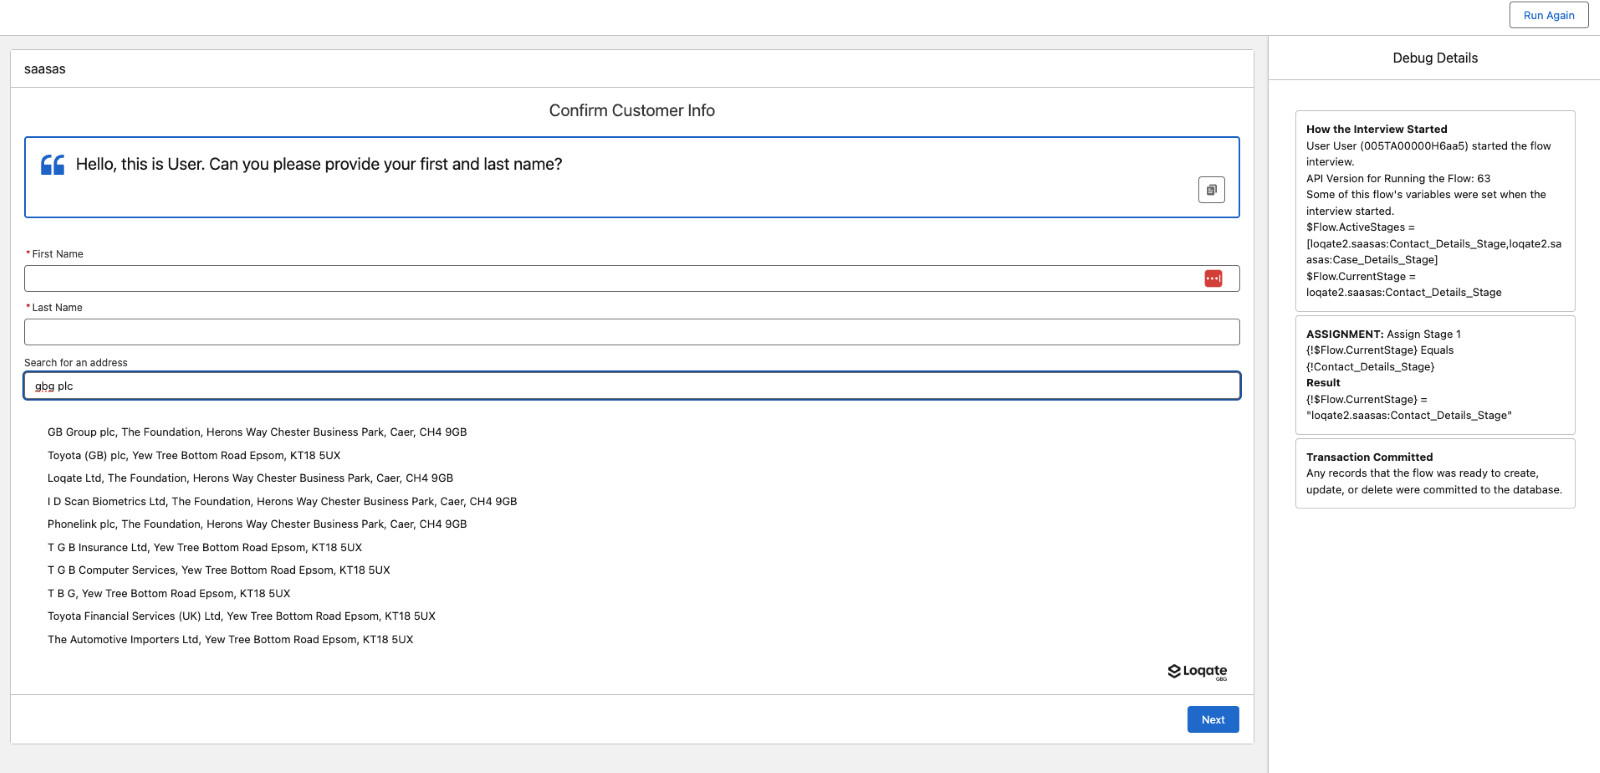 * From here you can see that the **Search for an address** field is present
* Having searched for and found an address, click **Next** to move to the next screen - in this case the **Confirm Customer Details** screen
* From here you can see that the **Search for an address** field is present
* Having searched for and found an address, click **Next** to move to the next screen - in this case the **Confirm Customer Details** screen
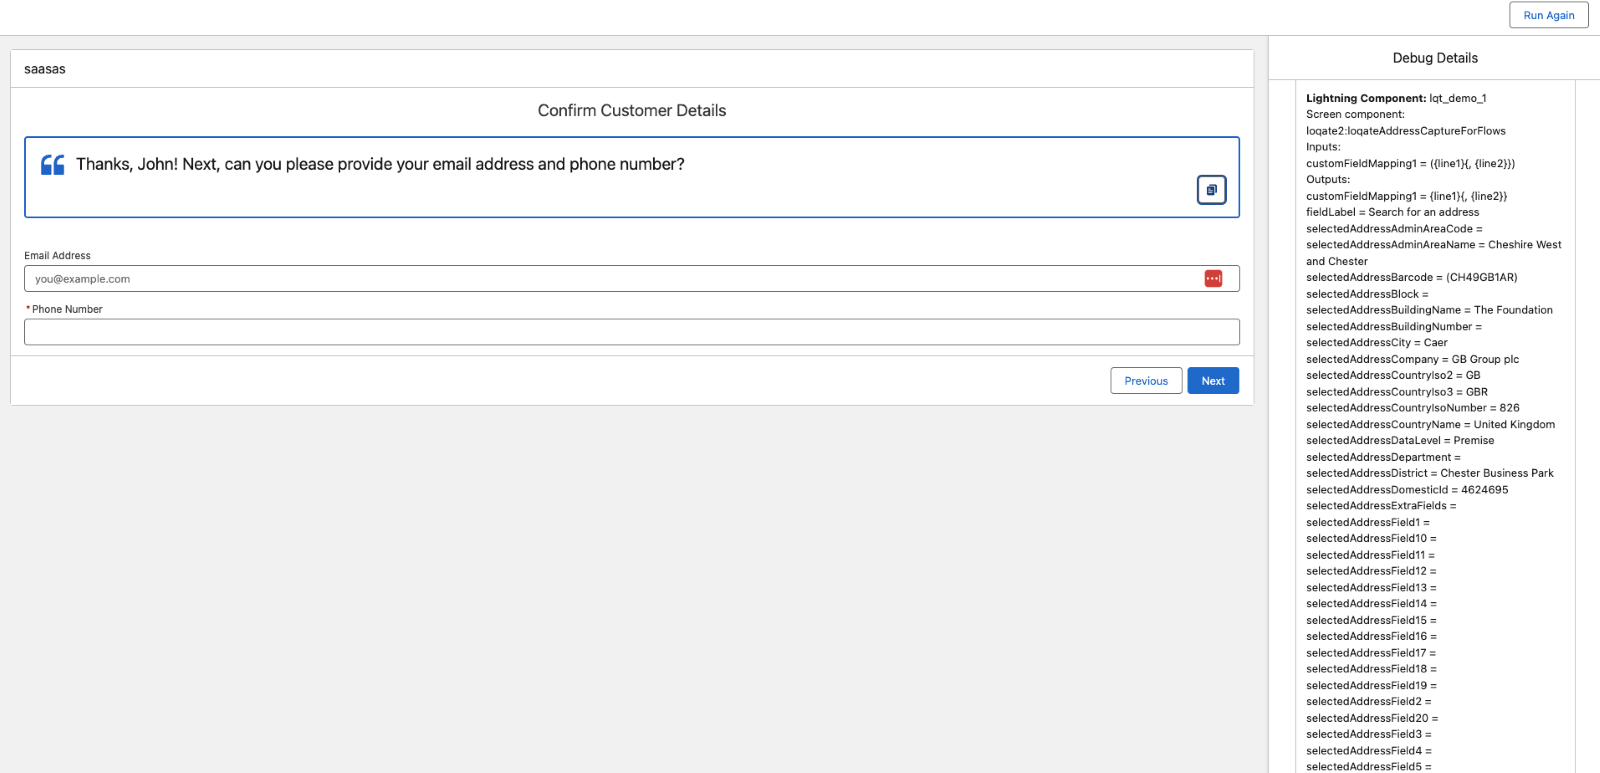 * Here you can see the returned address data, which you can then use in the rest of the Flow
#### Handling Custom Field Types in Flows
When using the Loqate Flow action to return custom fields, the output values are returned as **Text**. This is fine for most scenarios, but can cause issues when mapping onto Salesforce standard fields that expect other data types (for example, `MailingLatitude` and `MailingLongitude`, which are **Number** fields).
If you attempt to map a Text resource directly to a Number field in a **Create or Update Records** element, Flow will block the mapping.
**Solution: Use a Number Formula Resource**
You can convert the returned Text into a Number inside your Flow before mapping.
**Steps:**
1. In Flow Builder, open the **Manager** panel and click **New Resource**.
2. Select **Resource Type**: `Formula`.
3. Give it an **API Name** (e.g. `latNumber`).
4. Set **Data Type**: `Number`.
5. Set **Decimal Places**: `6` (or another precision suitable for coordinates).
6. Enter the following formula, referencing the Text output from the Loqate action (e.g. `selectedAddressField1`):
```bash theme={null}
IF(
ISBLANK({!ADDRESS_FINDER.selectedAddressField1}),
NULL,
IF(
ISNUMBER({!ADDRESS_FINDER.selectedAddressField1}),
VALUE({!ADDRESS_FINDER.selectedAddressField1}),
NULL
)
)
```
* `VALUE()` casts the text into a number.
* Blank or invalid inputs return NULL so the Flow won't fault.
7. Save the resource.
8. In your **Create/Update Records** element, set the record field (e.g. `MailingLatitude`) to this formula resource.
Repeat the same steps for Longitude if required.
**Example**
* **Loqate selectedAddressField1** → `"52.123456"` (Text)
* **Formula (latNumber)** → `52.123456` (Number)
* **Mapped to Contact.MailingLatitude** → works successfully.
## Permission Sets
The Loqate for Salesforce managed package ships with **five permission sets**. After installing the package you assign these to your users to grant access to the address-capture components and the configuration screens.
There is **one administrator permission set** for configuring the package, **three user permission sets** that grant the read-only object/field access end users need, and **one Apex-access permission set** that you stack on top of one of the user sets for any user who is on a licence type that supports Apex class access on permission sets.
The reason for the split: Salesforce auto-restricts which user licences a permission set can be assigned to as soon as the set declares Apex class access. Keeping the user sets free of class access lets them remain truly licence-agnostic, and the Apex Access set carries the licence restriction so it only narrows assignment for users who need it.
You can find all of these in **Setup → Permission Sets** after the package is installed.
***
### Loqate Administrator
**Purpose:** the configuration role. Assign this to anyone who needs to enter the Loqate API key, define how Loqate address fields map onto your Salesforce objects, or otherwise maintain the integration.
**What it grants:**
* Full read, create, edit, and delete access to all of the Loqate configuration objects (settings and field mappings).
* Edit access to the API key field and to the mapping fields that define which Loqate address element populates which Salesforce field.
* Apex class access to all of the controllers backing the configuration UI.
* Visibility of the **Loqate Address Verification** app in the App Launcher.
* Visibility of the **Loqate Settings** tab.
**Who should get it:** Salesforce administrators or whoever owns the Loqate integration in your org. End users should **not** be assigned this set — it would let them rotate the API key or change field mappings, which would break address capture for everyone else.
**Stacking:** none required. The administrator set is self-sufficient and only assignable to internal Salesforce-licensed users in any case.
***
### Loqate User (All User Types)
**Purpose:** the standard end-user permission set. Assign this to anyone who needs to use Loqate address capture on a Salesforce form, page, or flow. It is licence-agnostic, so it can be assigned to internal Salesforce users, Experience Cloud (Community / Partner) users, Platform users, and any other user licence type.
**What it grants:**
* Read-only access to the Loqate configuration objects so the address-capture component can resolve which fields to populate.
* “View All” on the configuration records, meaning users will always see the mappings regardless of record-ownership or sharing rules.
* The Loqate Address Verification app and the Loqate Settings tab are **hidden** — end users do not see the configuration UI.
**What it does *not* grant:** access to the Apex controllers the address-capture components call at runtime. For users on licences that support Apex class access, also assign **Loqate User (Apex Access)** (see below). Without that, users will see the error `You do not have access to the Apex class named 'LoqateAddressMappingController'` the moment the component loads, **unless** the package was installed *for all users* — in which case the install-time profile grant covers class access and the Apex Access set is not strictly required (assigning it anyway is harmless and recommended for clarity).
**When to choose it:** this is the default end-user object/field choice for most orgs. Pick this set if your org doesn’t have a specific policy against “View All” on custom configuration objects.
***
### Loqate User (Restricted View All)
**Purpose:** the same end-user role as **Loqate User (All User Types)**, but **without “View All”** on the configuration objects. Users can only see mapping and settings records that your org’s sharing rules already grant them access to.
**What it grants:**
* Read-only access to the Loqate configuration objects (same as the standard end-user set).
* **No** “View All” — record visibility is governed by your org’s sharing model.
* App and tab hidden.
**What it does *not* grant:** Apex class access. Same caveat as above — stack **Loqate User (Apex Access)** on top for users on licences that support Apex class access.
**When to choose it:** assign this instead of the standard end-user set when:
* Your org’s security policy forbids granting “View All” on custom configuration objects.
* You are preparing for or maintaining a security review (e.g. AppExchange/internal audit) that flags blanket view-all permissions.
* You want to intentionally scope which users can see which mapping records.
If you choose this option, make sure your sharing rules / record ownership are configured so that the relevant mapping and settings records are visible to the users who need them. If a user can’t see the mapping records, the address-capture component won’t know how to populate fields and the integration will not work for them.
***
### Loqate User (Apex Access)
**Purpose:** grants the Apex class access required by the user-facing address-capture components (`AppSettingsController`, `LoqateAddressMappingController`). Designed to be **stacked on top of** one of the User sets above.
**What it grants:**
* Apex class access to the two controllers the end-user LWCs call at runtime.
**What it does *not* grant:** any object, field, tab, or app visibility. It must be combined with **Loqate User (All User Types)** or **Loqate User (Restricted View All)** to be useful.
**Why it is a separate set:** Salesforce automatically restricts which user licences can be assigned a permission set that declares Apex class access. Bundling that restriction into the main user sets would break their licence-agnostic promise and would silently fail to assign for users on licences such as **Chatter Free**, **Chatter External**, **Identity Only** and certain legacy portal licences. By keeping the class access in its own set, the user sets remain assignable to anyone, and the Apex Access set only narrows assignment for users who actually need the class access.
**When to assign it:**
* Always, for any end user on a licence that supports Apex class access on permission sets — internal Salesforce users, Salesforce Platform users, Customer Community / Customer Community Plus / Partner Community / External Apps users, and similar.
* **Skip it** for users on licence types that do not support Apex class access on permission sets (Chatter Free, Chatter External, Identity Only, certain legacy portal licences). Those users cannot use the Loqate components anyway — the underlying licence does not allow them to call Apex from an LWC — but the User set on its own can still be assigned to them without error.
**Strictly optional case:** if the package was installed using the *Install for All Users* option, the install-time profile grant already covers Apex class access for internal user profiles. You can technically skip the Apex Access set for those users, though assigning it anyway is harmless and removes the dependency on the install-time grant (which can be lost if a profile is later cloned or modified).
***
### Loqate User (Salesforce Users Only) — *deprecated*
**Purpose:** the original end-user permission set, retained for backwards compatibility with installations that were configured before the licence-agnostic variants were introduced.
**Why it’s deprecated:** this set is restricted to **Salesforce-licensed users only**. That excludes Experience Cloud, Platform, and other licence types that many customers need to grant address-capture access to.
**What you should do:**
* **New installations:** do not assign this set. Use **Loqate User (All User Types)** or **Loqate User (Restricted View All)** instead, plus **Loqate User (Apex Access)** for Apex-capable users.
* **Existing installations:** continue to work. When convenient, migrate existing assignments to one of the supported sets above.
***
### Quick decision guide
| Need | Assign |
| ------------------------------------------------------------------------------------------------------------------ | ------------------------------------------------------------------------------------------------------------------------------------------------------------ |
| Configure the package, enter the API key, edit field mappings | **Loqate Administrator** |
| Standard end user on an Apex-capable licence (internal Salesforce, Platform, Community, Partner, External Apps, …) | **Loqate User (All User Types)** + **Loqate User (Apex Access)** |
| End user as above, but your org’s security policy disallows “View All” on configuration objects | **Loqate User (Restricted View All)** + **Loqate User (Apex Access)** |
| User on a licence that does not support Apex class access on permission sets (Chatter Free, Identity Only, …) | **Loqate User (All User Types)** only — note: address capture will not function for these users; the licence itself blocks Apex from running on their behalf |
| Existing assignment from an older installation using the deprecated set | *Loqate User (Salesforce Users Only)* — migrate to the supported sets above |
***
### How to assign a permission set
1. In Salesforce, go to **Setup → Users → Users**.
2. Open the user record you want to grant access to.
3. Under **Permission Set Assignments**, click **Edit Assignments**.
4. Move the relevant Loqate permission set(s) from **Available** to **Enabled**. For end users on Apex-capable licences this means selecting **two** sets — one User set (All User Types or Restricted View All) and **Loqate User (Apex Access)**.
5. Click **Save**.
The user will gain access at next login (or immediately, depending on session state).
***
### Troubleshooting
**“You do not have access to the Apex class named ‘LoqateAddressMappingController’”** — the user has one of the User sets assigned but not **Loqate User (Apex Access)**, and the package was not installed *for all users* (or the profile-level grant has been lost). Assign **Loqate User (Apex Access)** in addition to the User set.
**“Can’t assign permission set Loqate User (Apex Access) to user X. The user license doesn’t allow Apex Class Access”** — the user is on a licence type that does not permit Apex class access on permission sets (Chatter Free, Chatter External, Identity Only, certain legacy portal licences). Assign **Loqate User (All User Types)** alone. Address capture will not work for the user, but this is a constraint of their Salesforce licence, not of the Loqate package — no permission-set configuration can grant Apex access to a licence that does not support it.
## Public Experience Cloud sites
If your public **Experience Cloud site** (formerly Community) is unable to perform address searches using the Loqate components, the issue may be caused by Salesforce’s **Secure Guest User Record Access** model.
Even when the **Loqate Settings** record has external organization-wide defaults (OWD) set to **Public Read Only**, Salesforce enforces an additional restriction for guest users—effectively treating all objects as **Private**.\
This means you must **explicitly share** the Loqate Settings record with your site’s guest user.
### Configure guest access to Loqate Settings
Follow these steps to create a sharing rule that grants your guest user read access to the Loqate Settings record:
1. In **Setup**, navigate to\
**Sharing Settings → Loqate Settings Sharing Rules**.
2. Click **New**.
3. Enter a **Label** and **Rule Name** of your choice.
4. Select **Guest user access, based on criteria** as the **Rule Type**.
5. Under **Criteria**, set:
* **Field:** `ApiKey`
* **Operator:** `not equal to`
* **Value:** *(leave blank)*
6. In the **Share with** dropdown, select your **site’s guest user**.
7. Set the **Access Level** to **Read Only**.
8. Click **Save**.
Once the sharing rule has been created and processed, guest users should be able to access the Loqate Settings record, and address searches will begin to function correctly again.
## In use
With the Loqate app installed and configured, you can start using the Address finder, Email validator and Phone number validator
controls when inputting addresses, email addresses and phone numbers into Salesforce.
For example, here's how the Address finder control looks during an address search:
* Here you can see the returned address data, which you can then use in the rest of the Flow
#### Handling Custom Field Types in Flows
When using the Loqate Flow action to return custom fields, the output values are returned as **Text**. This is fine for most scenarios, but can cause issues when mapping onto Salesforce standard fields that expect other data types (for example, `MailingLatitude` and `MailingLongitude`, which are **Number** fields).
If you attempt to map a Text resource directly to a Number field in a **Create or Update Records** element, Flow will block the mapping.
**Solution: Use a Number Formula Resource**
You can convert the returned Text into a Number inside your Flow before mapping.
**Steps:**
1. In Flow Builder, open the **Manager** panel and click **New Resource**.
2. Select **Resource Type**: `Formula`.
3. Give it an **API Name** (e.g. `latNumber`).
4. Set **Data Type**: `Number`.
5. Set **Decimal Places**: `6` (or another precision suitable for coordinates).
6. Enter the following formula, referencing the Text output from the Loqate action (e.g. `selectedAddressField1`):
```bash theme={null}
IF(
ISBLANK({!ADDRESS_FINDER.selectedAddressField1}),
NULL,
IF(
ISNUMBER({!ADDRESS_FINDER.selectedAddressField1}),
VALUE({!ADDRESS_FINDER.selectedAddressField1}),
NULL
)
)
```
* `VALUE()` casts the text into a number.
* Blank or invalid inputs return NULL so the Flow won't fault.
7. Save the resource.
8. In your **Create/Update Records** element, set the record field (e.g. `MailingLatitude`) to this formula resource.
Repeat the same steps for Longitude if required.
**Example**
* **Loqate selectedAddressField1** → `"52.123456"` (Text)
* **Formula (latNumber)** → `52.123456` (Number)
* **Mapped to Contact.MailingLatitude** → works successfully.
## Permission Sets
The Loqate for Salesforce managed package ships with **five permission sets**. After installing the package you assign these to your users to grant access to the address-capture components and the configuration screens.
There is **one administrator permission set** for configuring the package, **three user permission sets** that grant the read-only object/field access end users need, and **one Apex-access permission set** that you stack on top of one of the user sets for any user who is on a licence type that supports Apex class access on permission sets.
The reason for the split: Salesforce auto-restricts which user licences a permission set can be assigned to as soon as the set declares Apex class access. Keeping the user sets free of class access lets them remain truly licence-agnostic, and the Apex Access set carries the licence restriction so it only narrows assignment for users who need it.
You can find all of these in **Setup → Permission Sets** after the package is installed.
***
### Loqate Administrator
**Purpose:** the configuration role. Assign this to anyone who needs to enter the Loqate API key, define how Loqate address fields map onto your Salesforce objects, or otherwise maintain the integration.
**What it grants:**
* Full read, create, edit, and delete access to all of the Loqate configuration objects (settings and field mappings).
* Edit access to the API key field and to the mapping fields that define which Loqate address element populates which Salesforce field.
* Apex class access to all of the controllers backing the configuration UI.
* Visibility of the **Loqate Address Verification** app in the App Launcher.
* Visibility of the **Loqate Settings** tab.
**Who should get it:** Salesforce administrators or whoever owns the Loqate integration in your org. End users should **not** be assigned this set — it would let them rotate the API key or change field mappings, which would break address capture for everyone else.
**Stacking:** none required. The administrator set is self-sufficient and only assignable to internal Salesforce-licensed users in any case.
***
### Loqate User (All User Types)
**Purpose:** the standard end-user permission set. Assign this to anyone who needs to use Loqate address capture on a Salesforce form, page, or flow. It is licence-agnostic, so it can be assigned to internal Salesforce users, Experience Cloud (Community / Partner) users, Platform users, and any other user licence type.
**What it grants:**
* Read-only access to the Loqate configuration objects so the address-capture component can resolve which fields to populate.
* “View All” on the configuration records, meaning users will always see the mappings regardless of record-ownership or sharing rules.
* The Loqate Address Verification app and the Loqate Settings tab are **hidden** — end users do not see the configuration UI.
**What it does *not* grant:** access to the Apex controllers the address-capture components call at runtime. For users on licences that support Apex class access, also assign **Loqate User (Apex Access)** (see below). Without that, users will see the error `You do not have access to the Apex class named 'LoqateAddressMappingController'` the moment the component loads, **unless** the package was installed *for all users* — in which case the install-time profile grant covers class access and the Apex Access set is not strictly required (assigning it anyway is harmless and recommended for clarity).
**When to choose it:** this is the default end-user object/field choice for most orgs. Pick this set if your org doesn’t have a specific policy against “View All” on custom configuration objects.
***
### Loqate User (Restricted View All)
**Purpose:** the same end-user role as **Loqate User (All User Types)**, but **without “View All”** on the configuration objects. Users can only see mapping and settings records that your org’s sharing rules already grant them access to.
**What it grants:**
* Read-only access to the Loqate configuration objects (same as the standard end-user set).
* **No** “View All” — record visibility is governed by your org’s sharing model.
* App and tab hidden.
**What it does *not* grant:** Apex class access. Same caveat as above — stack **Loqate User (Apex Access)** on top for users on licences that support Apex class access.
**When to choose it:** assign this instead of the standard end-user set when:
* Your org’s security policy forbids granting “View All” on custom configuration objects.
* You are preparing for or maintaining a security review (e.g. AppExchange/internal audit) that flags blanket view-all permissions.
* You want to intentionally scope which users can see which mapping records.
If you choose this option, make sure your sharing rules / record ownership are configured so that the relevant mapping and settings records are visible to the users who need them. If a user can’t see the mapping records, the address-capture component won’t know how to populate fields and the integration will not work for them.
***
### Loqate User (Apex Access)
**Purpose:** grants the Apex class access required by the user-facing address-capture components (`AppSettingsController`, `LoqateAddressMappingController`). Designed to be **stacked on top of** one of the User sets above.
**What it grants:**
* Apex class access to the two controllers the end-user LWCs call at runtime.
**What it does *not* grant:** any object, field, tab, or app visibility. It must be combined with **Loqate User (All User Types)** or **Loqate User (Restricted View All)** to be useful.
**Why it is a separate set:** Salesforce automatically restricts which user licences can be assigned a permission set that declares Apex class access. Bundling that restriction into the main user sets would break their licence-agnostic promise and would silently fail to assign for users on licences such as **Chatter Free**, **Chatter External**, **Identity Only** and certain legacy portal licences. By keeping the class access in its own set, the user sets remain assignable to anyone, and the Apex Access set only narrows assignment for users who actually need the class access.
**When to assign it:**
* Always, for any end user on a licence that supports Apex class access on permission sets — internal Salesforce users, Salesforce Platform users, Customer Community / Customer Community Plus / Partner Community / External Apps users, and similar.
* **Skip it** for users on licence types that do not support Apex class access on permission sets (Chatter Free, Chatter External, Identity Only, certain legacy portal licences). Those users cannot use the Loqate components anyway — the underlying licence does not allow them to call Apex from an LWC — but the User set on its own can still be assigned to them without error.
**Strictly optional case:** if the package was installed using the *Install for All Users* option, the install-time profile grant already covers Apex class access for internal user profiles. You can technically skip the Apex Access set for those users, though assigning it anyway is harmless and removes the dependency on the install-time grant (which can be lost if a profile is later cloned or modified).
***
### Loqate User (Salesforce Users Only) — *deprecated*
**Purpose:** the original end-user permission set, retained for backwards compatibility with installations that were configured before the licence-agnostic variants were introduced.
**Why it’s deprecated:** this set is restricted to **Salesforce-licensed users only**. That excludes Experience Cloud, Platform, and other licence types that many customers need to grant address-capture access to.
**What you should do:**
* **New installations:** do not assign this set. Use **Loqate User (All User Types)** or **Loqate User (Restricted View All)** instead, plus **Loqate User (Apex Access)** for Apex-capable users.
* **Existing installations:** continue to work. When convenient, migrate existing assignments to one of the supported sets above.
***
### Quick decision guide
| Need | Assign |
| ------------------------------------------------------------------------------------------------------------------ | ------------------------------------------------------------------------------------------------------------------------------------------------------------ |
| Configure the package, enter the API key, edit field mappings | **Loqate Administrator** |
| Standard end user on an Apex-capable licence (internal Salesforce, Platform, Community, Partner, External Apps, …) | **Loqate User (All User Types)** + **Loqate User (Apex Access)** |
| End user as above, but your org’s security policy disallows “View All” on configuration objects | **Loqate User (Restricted View All)** + **Loqate User (Apex Access)** |
| User on a licence that does not support Apex class access on permission sets (Chatter Free, Identity Only, …) | **Loqate User (All User Types)** only — note: address capture will not function for these users; the licence itself blocks Apex from running on their behalf |
| Existing assignment from an older installation using the deprecated set | *Loqate User (Salesforce Users Only)* — migrate to the supported sets above |
***
### How to assign a permission set
1. In Salesforce, go to **Setup → Users → Users**.
2. Open the user record you want to grant access to.
3. Under **Permission Set Assignments**, click **Edit Assignments**.
4. Move the relevant Loqate permission set(s) from **Available** to **Enabled**. For end users on Apex-capable licences this means selecting **two** sets — one User set (All User Types or Restricted View All) and **Loqate User (Apex Access)**.
5. Click **Save**.
The user will gain access at next login (or immediately, depending on session state).
***
### Troubleshooting
**“You do not have access to the Apex class named ‘LoqateAddressMappingController’”** — the user has one of the User sets assigned but not **Loqate User (Apex Access)**, and the package was not installed *for all users* (or the profile-level grant has been lost). Assign **Loqate User (Apex Access)** in addition to the User set.
**“Can’t assign permission set Loqate User (Apex Access) to user X. The user license doesn’t allow Apex Class Access”** — the user is on a licence type that does not permit Apex class access on permission sets (Chatter Free, Chatter External, Identity Only, certain legacy portal licences). Assign **Loqate User (All User Types)** alone. Address capture will not work for the user, but this is a constraint of their Salesforce licence, not of the Loqate package — no permission-set configuration can grant Apex access to a licence that does not support it.
## Public Experience Cloud sites
If your public **Experience Cloud site** (formerly Community) is unable to perform address searches using the Loqate components, the issue may be caused by Salesforce’s **Secure Guest User Record Access** model.
Even when the **Loqate Settings** record has external organization-wide defaults (OWD) set to **Public Read Only**, Salesforce enforces an additional restriction for guest users—effectively treating all objects as **Private**.\
This means you must **explicitly share** the Loqate Settings record with your site’s guest user.
### Configure guest access to Loqate Settings
Follow these steps to create a sharing rule that grants your guest user read access to the Loqate Settings record:
1. In **Setup**, navigate to\
**Sharing Settings → Loqate Settings Sharing Rules**.
2. Click **New**.
3. Enter a **Label** and **Rule Name** of your choice.
4. Select **Guest user access, based on criteria** as the **Rule Type**.
5. Under **Criteria**, set:
* **Field:** `ApiKey`
* **Operator:** `not equal to`
* **Value:** *(leave blank)*
6. In the **Share with** dropdown, select your **site’s guest user**.
7. Set the **Access Level** to **Read Only**.
8. Click **Save**.
Once the sharing rule has been created and processed, guest users should be able to access the Loqate Settings record, and address searches will begin to function correctly again.
## In use
With the Loqate app installed and configured, you can start using the Address finder, Email validator and Phone number validator
controls when inputting addresses, email addresses and phone numbers into Salesforce.
For example, here's how the Address finder control looks during an address search:
 ## Legacy Visualforce elements
In some cases you may want to use a more legacy approach to including Address Capture in your Salesforce instance, for example by
overriding the **New** button action on a record listing page.
In the following examples we’ll use the standard **Contact** record type to demonstrate the use of the included legacy Visualforce
component.
The Loqate app ships with a Visualforce page that can be used to replace the **New** button action via Object Manager, and is a
reference build for the outcome of this example.
### Building the page
In this example we will be creating a new page to replace the standard Contact Create page and allow for Address Capture to be used in
that process. Please note that this is a legacy approach, and we would recommend you use Flow views for this kind of action.
## Legacy Visualforce elements
In some cases you may want to use a more legacy approach to including Address Capture in your Salesforce instance, for example by
overriding the **New** button action on a record listing page.
In the following examples we’ll use the standard **Contact** record type to demonstrate the use of the included legacy Visualforce
component.
The Loqate app ships with a Visualforce page that can be used to replace the **New** button action via Object Manager, and is a
reference build for the outcome of this example.
### Building the page
In this example we will be creating a new page to replace the standard Contact Create page and allow for Address Capture to be used in
that process. Please note that this is a legacy approach, and we would recommend you use Flow views for this kind of action.
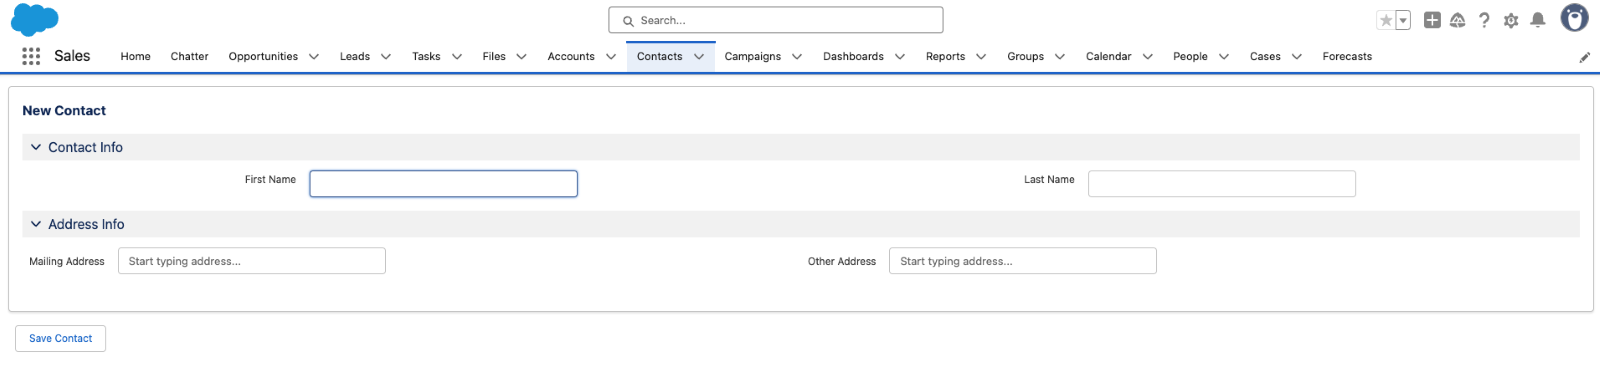 Each of the address controls in the above screenshot are an example of the `legacyLoqateAddressCapture` Visualforce component.
The full Visualforce page looks like this:
```apex theme={null}
Each of the address controls in the above screenshot are an example of the `legacyLoqateAddressCapture` Visualforce component.
The full Visualforce page looks like this:
```apex theme={null}
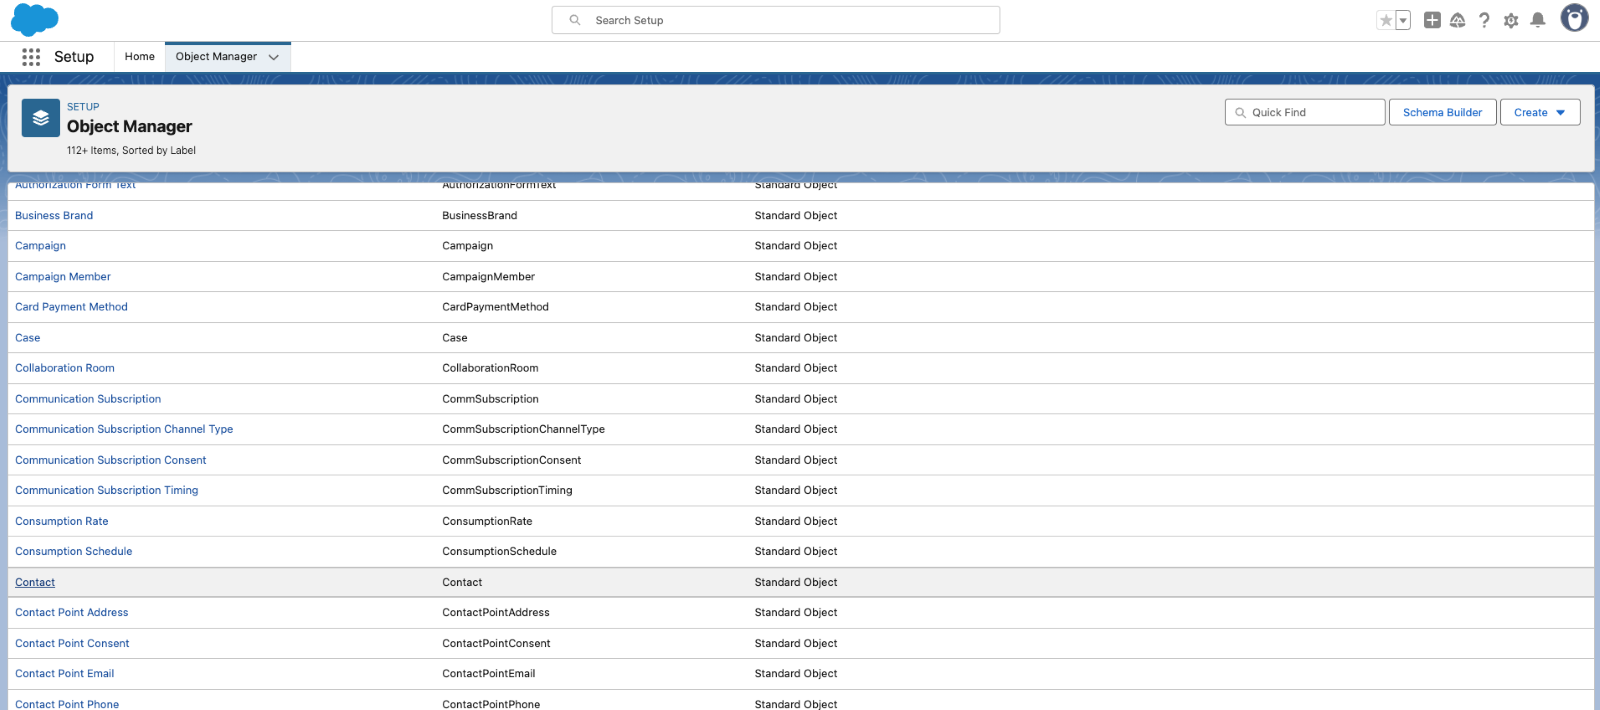 Next select **Button, Links and Actions** from the left-hand menu, then edit the **New** action – you should be able to select the new
page from the **Visualforce** page dropdown field:
Next select **Button, Links and Actions** from the left-hand menu, then edit the **New** action – you should be able to select the new
page from the **Visualforce** page dropdown field:
 Click **Save**, and from now on the New action on the contact listing page will open your new page, and you can create contacts with
verified addresses.
Click **Save**, and from now on the New action on the contact listing page will open your new page, and you can create contacts with
verified addresses.