> ## Documentation Index
> Fetch the complete documentation index at: https://docs.loqate.com/llms.txt
> Use this file to discover all available pages before exploring further.
# Shopify Plus Integration Guide
> Install Loqate in Shopify Plus checkout in minutes. Enable Address Capture, Address Verify, and Email Validation with simple configuration steps.
In this guide we will provide all of the information you need to get up and running using the Loqate Shopify Plus Integration.
If you're looking for the full details of what the Loqate Shopify Plus Integration does and what it looks like in practice,
you can find that here:
## Setup Video
***
## Prerequisites
Before you start installing and setting up the Loqate Shopify Plus Integration, you will need the following:
* A live Shopify Plus account
* A live Loqate account (available at [account.loqate.com](https://account.loqate.com/))
* A new Loqate API key (see the API keys section below for more information on this)
### API keys
You'll need a new Loqate API key, dedicated to this service. Our [Creating API Keys page](/loqate-basics/create-an-api-key)
explains how to do this. We recommend you create a generic API key, but any key will work.
**Note** You use Address Capture, Address Verify and Email Validation from a single API key.
For information about how to ensure your Loqate integration is as secure as possible, see our
[API Security page](/loqate-basics/api-security).
***
## Installation
There are a few quick steps to get the Loqate Shopify Plus Integration up and running:
* [Install and configure the Loqate app](#installing-and-configuring-the-loqate-app)
* [Enable Address Capture, Address Verify and Email Validation](#enabling-loqate-services)
* [Recommended - include company name](#recommended-include-company-name)
As well as those key actions, there are also some additional steps that you can follow if required:
* [Use without Address Capture (not recommended)](#optional-use-without-address-capture-not-recommended)
* [Advanced Settings (optional)](#optional-advanced-settings)
Follow these steps in order, and you'll get up and running quickly and easily. If you need help you can
contact [LoqateSupport@GBG.com](mailto:LoqateSupport@GBG.com).
### Installing and configuring the Loqate app
First, install [the Loqate app](https://apps.shopify.com/loqate) from the Shopify App Store
(see the [Shopify app installation instructions](https://help.shopify.com/en/manual/apps/installing-apps) for more details).
Once that is done:
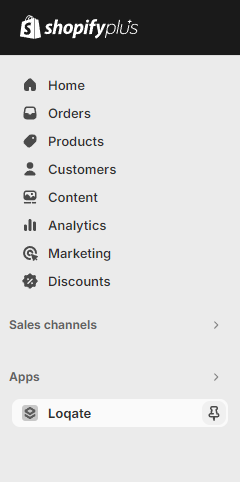
* You should automatically be taken to the Admin section for your new Loqate app
* If not, go to [accounts.shopify.com](https://accounts.shopify.com/), select the **Your store** option, then select the
**Loqate** app on the left-hand side of the screen to open it
* Copy and paste your Loqate API key into the API Key field on this screen, then click the **Save** button:
With that done, you can add one or more of the Loqate services to your store using the steps below.
### Enabling Loqate services
With the app installed, the Standard Address Capture is automatically available. We however
recommend adding the Custom Capture Search Input as it offers an improved experience when
searching sub-building addresses.
First, you need to add the **Loqate-Checkout** app block to your store on the Checkout page.
(see [https://www.shopify.com/enterprise/blog/customize-shopify-checkout](https://www.shopify.com/enterprise/blog/customize-shopify-checkout)).
App blocks allow you to customise the look and functionality of your checkout layout. This block is required in order to
use the Custom Capture Search Input on the Checkout page. Here's how to add this block:
1. In the Admin section of your Shopify Plus account, go to Settings > Checkout. From here you can either edit your existing checkout,
or create a new draft of your checkout layout
2. Next, select the Apps icon (the bottom icon) in the left-hand menu of the checkout editor, then search for 'Loqate'
3. Select the **loqate-checkout** app, then click the plus button and select **Checkout** from the drop-down list - this adds the
app block to the Checkout page
4. Next the [Standard Address Capture search must be disabled.](/integrations/shopify-plus-overview#optional-use-without-address-capture-not-recommended)
This will not turn off Capture entirely. Capture will now only run in the app block added using the instructions above. If the standard search is left enabled,
Capture address searches will happen in two places on the checkout page (in the custom search input as well as the address text input)
5. With that done, make sure to save the changes to your checkout, then exit the editor. If you created a new checkout draft,
you can click the **Publish** button to make it live.
Only stores which are not password protected will successfully allow app
blocks to be added. If the site is password protected, please disable this
before adding.
The final step is to enable the Custom Capture Search Input in the Loqate app's Admin page. First go to the advanced settings in the Loqate App on Shopify.
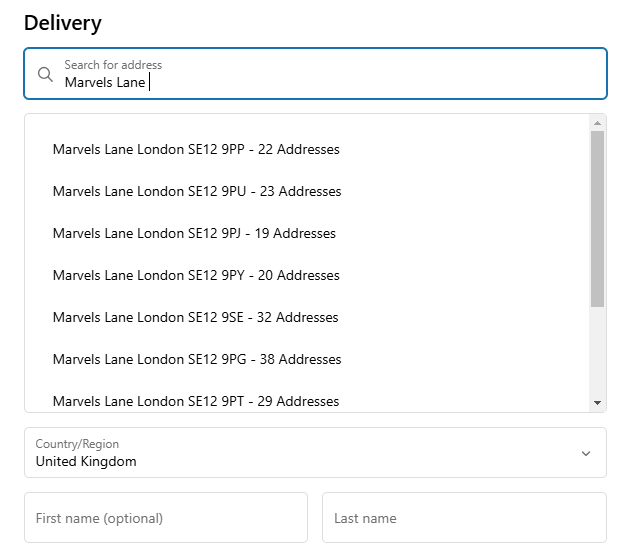
From there enable the Custom Capture Search Input option and save. Please test and check that on checkout a new address search
input has been added above the address form and addresses become available when searching addresses there. It's best practice to test these changes in a lower environment before going to production if possible.
If continuing with the Classic Capture Search which places the address dropdown in the default address text input there is, however, an additional step to make sure Address Capture
is added to your checkout. Here are the steps to follow:
* In the Admin section of your Shopify Plus account, go to **Settings > Checkout**. From here you can either edit your existing
checkout, or create a new draft of your checkout layout.
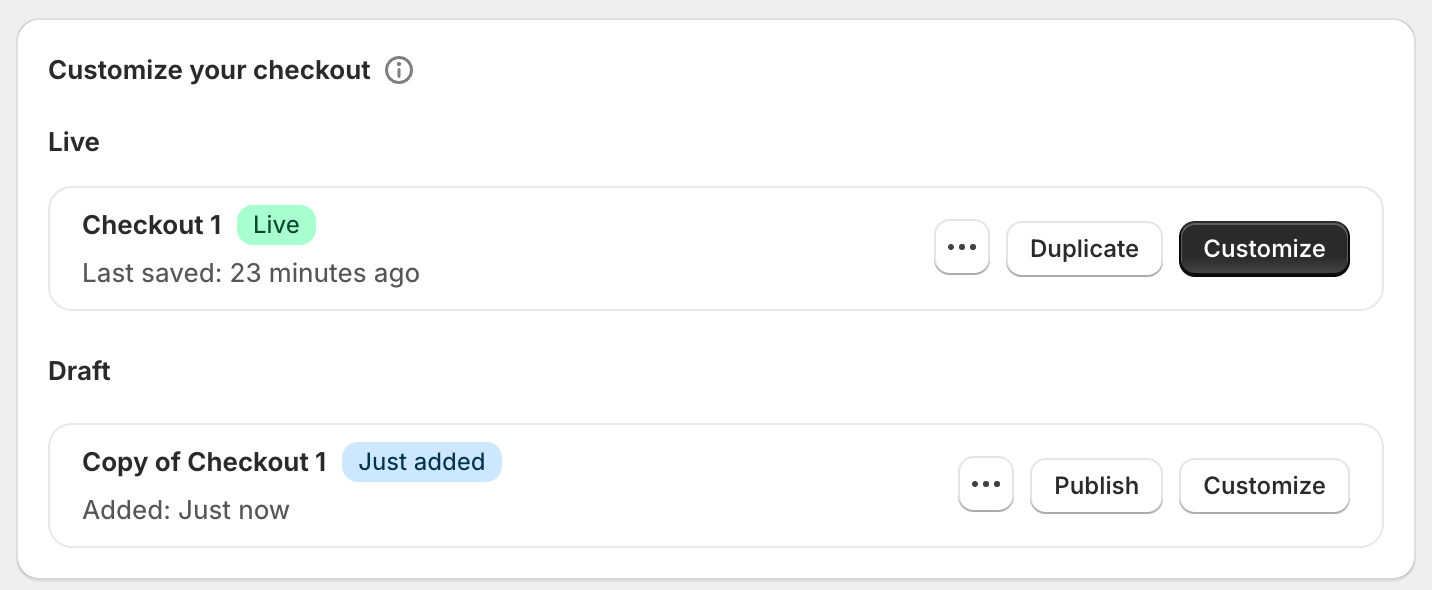
* To edit your existing checkout click the **Customize** button, or to create a new draft checkout click the **Duplicate** button
followed by **Customize** on the new version.
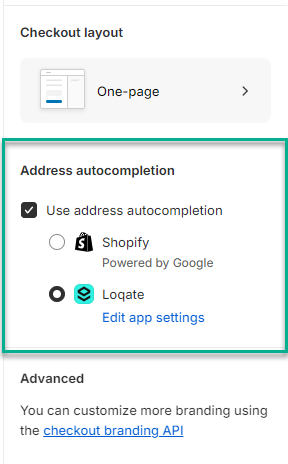
* Once you're editing your checkout, go to the Settings menu (the cog icon on the left-hand side), scroll down to the
**Address autocompletion** section and select the **Loqate** option to set Loqate as your provider:
* Make sure you save the changes to your checkout, then exit the editor. If you created a new checkout draft,
you can click the **Publish** button to make it live.
Address Capture will now be available on your checkout. If you also want to enable Address Verify and/or Email Validation,
carry on through the Address Verify and Email Validation tabs.
There are a few steps required to enable Address Verify functionality on your checkout:
First, you need to add the **Loqate-Checkout** app block to your store
(see [https://www.shopify.com/enterprise/blog/customize-shopify-checkout](https://www.shopify.com/enterprise/blog/customize-shopify-checkout)).
App blocks allow you to customise the look and functionality of your checkout layout and process, and this block is required in order to
use Address Verify on the Thank You page. Here's how to add this block:
* In the Admin section of your Shopify Plus account, go to Settings > Checkout. From here you can either edit your existing checkout,
or create a new draft of your checkout layout (see the Address Capture section above for more details)
* Next, select the Apps icon (the bottom icon) in the left-hand menu of the checkout editor, then search for 'Loqate'
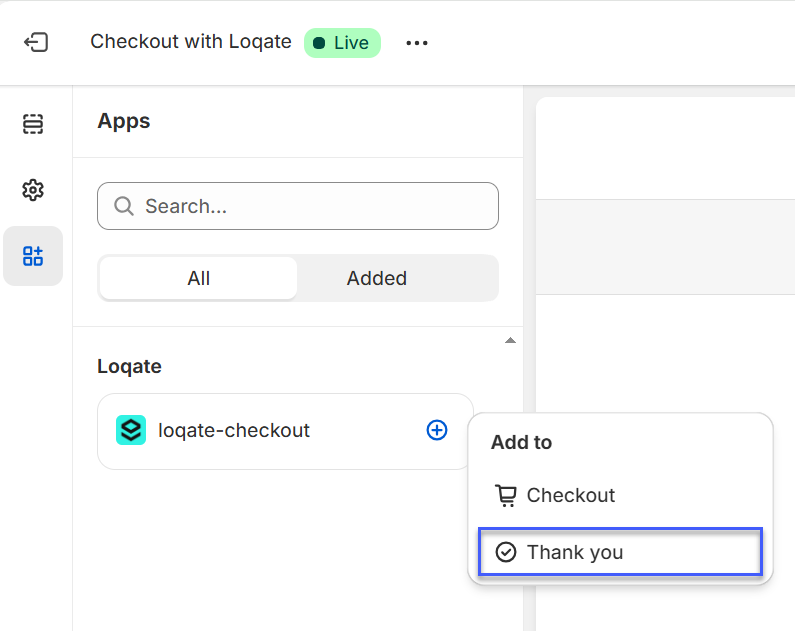
* Select the **loqate-checkout** app, then click the plus button and select **Thank you** from the drop-down list - this adds the
app block to the Thank You page
* With that done, make sure you save the changes to your checkout, then exit the editor. If you created a new checkout draft,
you can click the **Publish** button to make it live.
Only stores which are not password protected will successfully allow app blocks to be added. If the site is password protected, please disable this before adding.
The next step is to disable the default address verification by Shopify. If this is left enabled, additional suggestions may be
displayed against individual address fields, which can cause confusion for customers.
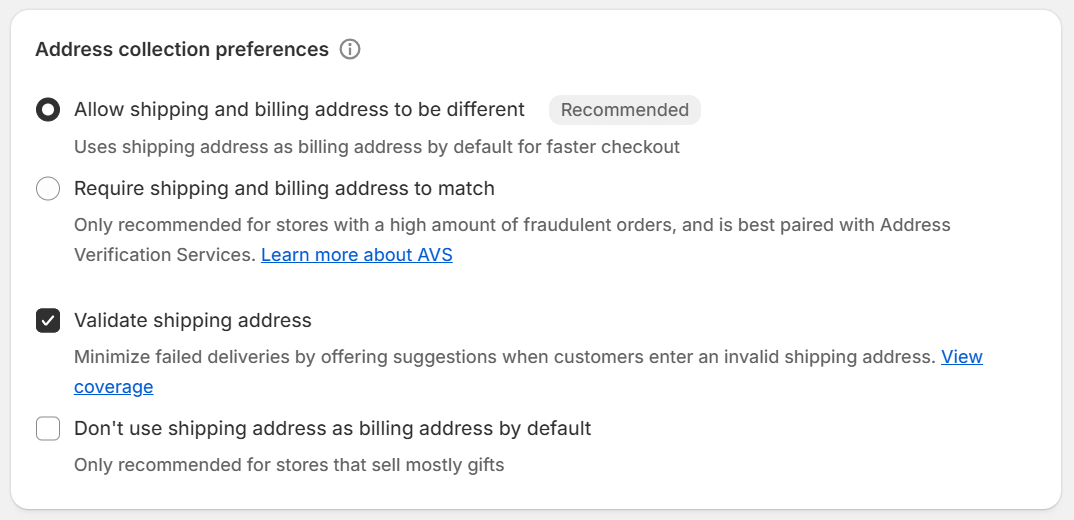
* Still in Settings > Checkout, scroll down to the **Address collection preferences** section:
* Make sure the **Validate shipping address** option is unticked, then click the Save button
The final step is to enable Address Verify in the Loqate app's Admin page.
Once you've entered your key into the API Key field in the Loqate app's Admin page, the Address Verify section below will become editable:
* Scroll down to the Address Verify section and select the **Enable address verification for post checkout** option
* NOTE: to use the post checkout option, please ensure your store is not
[password protected](https://help.shopify.com/en/manual/online-store/themes/password-page)
* If you also want to enable Address Verify on the checkout page you can select the **Enable address verification for checkout**
option too — this is not recommended because it consumes Verify transactions during checkout (including abandoned checkouts). See the note below.
* Click the **Save** button, and Address Verify will now be available.
**Address Verify on the checkout page ("Enable address verification for checkout")**
Use this option with caution. When Address Verify runs on the checkout page (rather than after checkout), the customer's address is verified while they are still completing their order.
This has a few important implications:
* It uses Verify transactions during checkout. Every address that reaches the verification step is checked against Loqate Verify and counts towards your usage — including checkouts that customers later abandon before placing an order. The post checkout option only verifies the address once the order has actually been placed, so it typically results in fewer Verify requests and more predictable usage.
* It does not work with express / wallet payments. Apple Pay, Google Pay, Shop Pay, PayPal and similar express checkouts bypass the standard address form, so Address Verify cannot run for those orders and the customer will not be prompted to correct their address.
* It adds a step to the checkout flow. Because verification happens before the order is placed, customers may be asked to confirm or correct their address as part of completing checkout.
For most stores we recommend the **Enable address verification for post checkout** option, which verifies the address after the order is placed and avoids the points above. Only enable verification on the checkout page if you specifically need the address corrected before the order is created and you understand the additional Verify usage this can incur.
The steps to enable Email Validation in your checkout are similar to those for Address Verify.
First, add the **Loqate-Checkout** app block to your store(if it hasn't already been added by the Capture installation) - It needs to be added to the **Checkout** section.
* In the Admin section of your Shopify Plus account, go to Settings > Checkout. From here you can either edit your existing checkout,
or create a new draft of your checkout layout (see the Address Capture section above for more details)
* Select the Apps icon (the bottom icon) in the left-hand menu of the checkout editor, then search for 'Loqate'
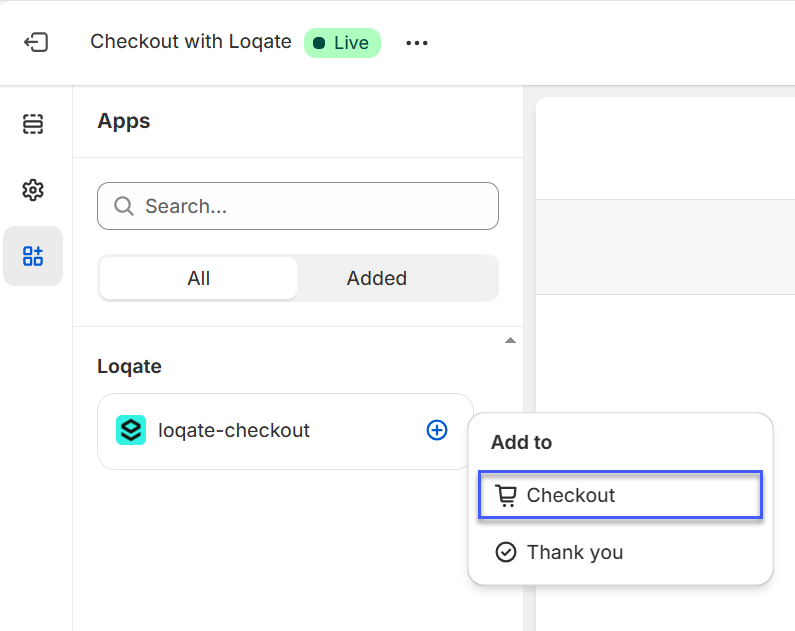
* Select the **loqate-checkout** app, then click the plus button and select **Checkout** from the drop-down list
Once that's done, you just need to select the **Enable email validation** option from the 'Email Validation' section on the Loqate
app's Admin page:
Once that's selected, click the **Save** button and move on to the next section.
***
### Recommended - Include company name
By default, Shopify is set to not include a **Company name** address field. As such, if an address includes a company name
(for example if a customer orders a delivery to their place of work) it won't be included in the address that's populated in Shopify.
We recommend setting Shopify to include Company name as an optional address field, so that it will be populated any time an address
does include a company name. Here's how to change that setting:
* Go to the site Settings page for your Shopify store
* Select the **Checkout** option from the left-hand menu
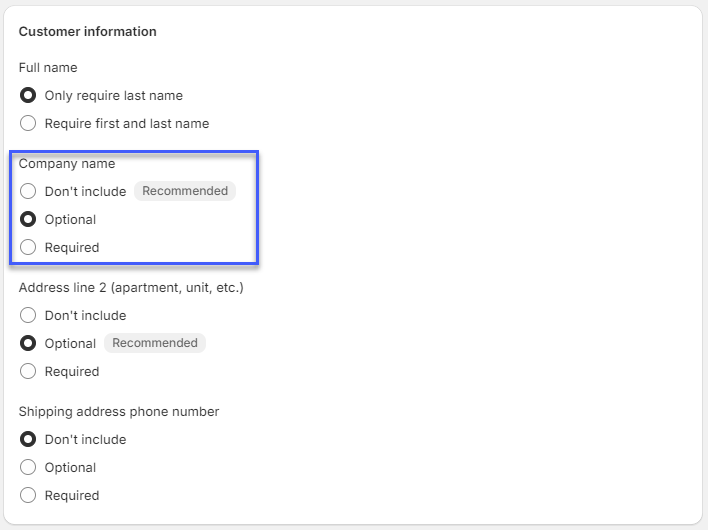
* Scroll down to the **Customer information** section
* Set Company name to **Optional**, then click the Save button
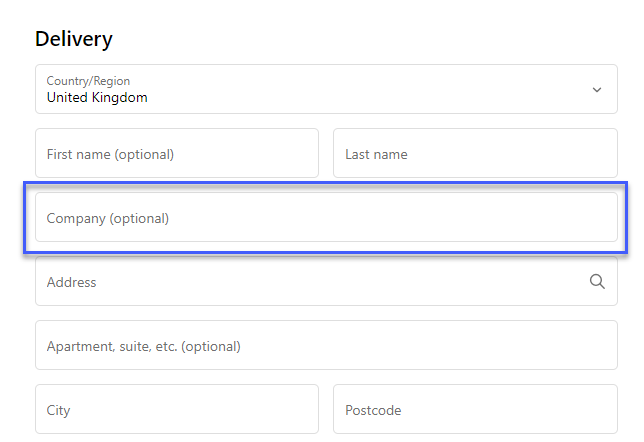
With that done, you should now see an optional Company address field in the checkout:
***
### Optional - Use without Address Capture (not recommended)
We recommend always using Address Capture, as this helps reduce the chances of mistakes caused by manual address entry,
ensuring addresses can be trusted as correct and giving the best customer experience. It is, however, possible to use just
Address Verification or just Email Validation if you don't want any kind of address autocompletion functionality.
If you want to use Address Verification and/or Email Validation on their own, follow the full installation and setup process as above,
then you can manually disable Address Capture. Here's how to do that:
* First, make sure that you've enabled at least one of Address Verification and/or Email Validation (see the [Enabling Loqate services](#enabling-loqate-services)
section earlier)
* Then, go to Settings > checkout and click the **Customize** option for your checkout
* Click on the **Settings** icon on the left-hand side, then scroll down to the **Address autocompletion** section
* Untick the **Use address autocompletion** option, then save the change to your Checkout configuration
This will have disabled the Address Capture functionality, while leaving Address Verify and/or Email Validation running.
***
### Optional - Advanced Settings
The Advanced Settings page is located in the Admin section of your Loqate app, and includes the following optional settings.
With this selected, Address Capture will always attempt to use any English results to set the delivery address, even with non-latin
results. Note that for this setting to work, the 'Display a Custom Loqate Capture Search Input on the checkout page' option
must be **enabled**.
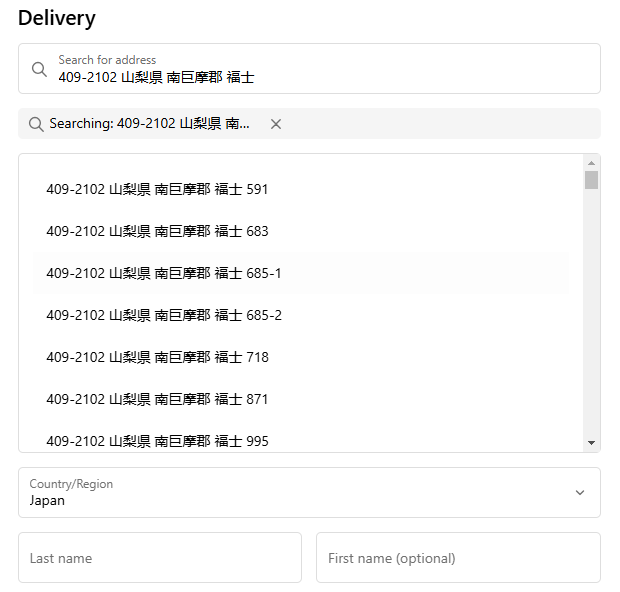
For example, here's a Japanese address searched for using Kanji characters:
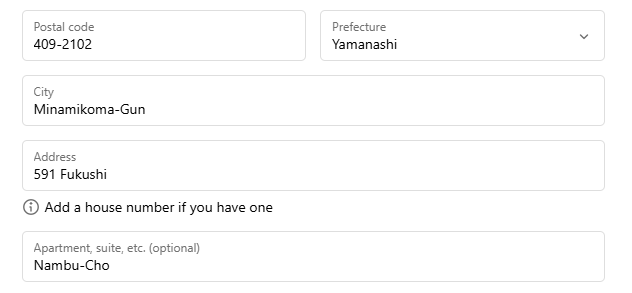
And here's the result populated using the English version of the address:
This is useful for when carriers have difficulty processing non-latin addresses.
With this enabled, customers can manually amend their addresses post-checkout, if what they initially entered can't be verified.
For example, if a customer hasn't entered their building number or apartment number they can go back and add it in.
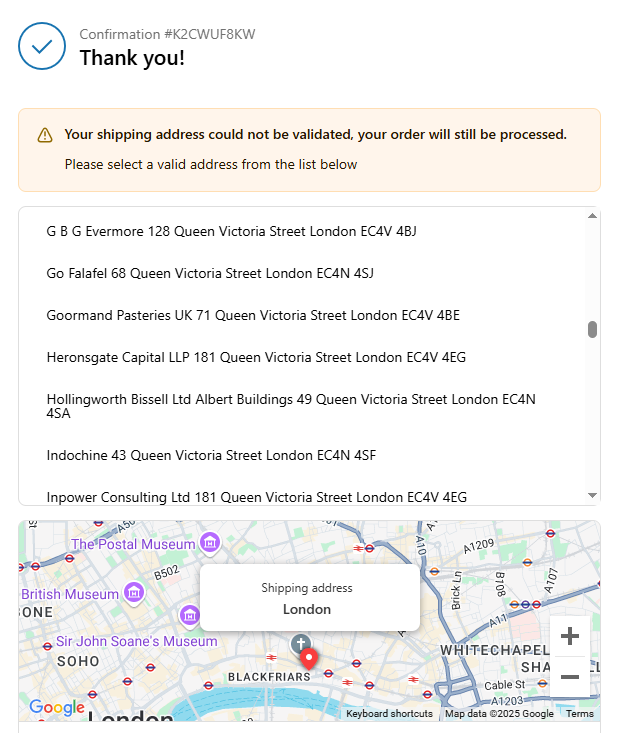
Under these circumstances, after an order has been confirmed the customer will be presented with a list of possible addresses to
choose from:
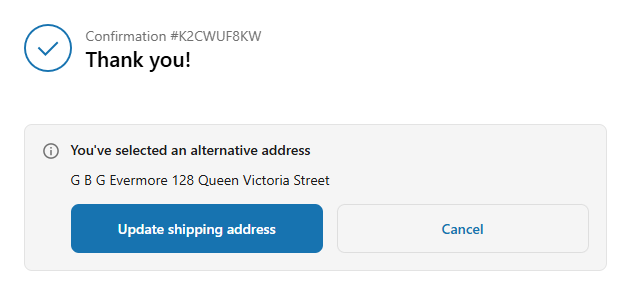
If the customer selects one of the suggested addresses, they will then see a notification acknowledging the address they've selected
and giving them the option to update their shipping address:
Sometimes it can be possible for a customer to enter an address with the wrong country, which as standard will be flagged as an
unverified address.
Selecting this option enables Address Verify to be automatically called for a second time whenever an address is returned as unverified.
For the second call, Address Verify will run using enhanced country verification, providing another opportunity to verify the address
with the correct country.
For this to function Address Verify must be enabled on the **Thank you** page. This functionality will incur additional charges for
additional verification.
Custom field mappings allow you to control how Loqate address data is mapped into Shopify's checkout fields. By default, the app uses
built-in logic to populate fields like Address Line 1, Address Line 2, City, and so on. With custom field mappings, you can override
this behaviour — either globally or on a per-country basis — to handle address formats that don't fit the default mapping.
This is useful when you need to combine multiple address components into a single Shopify field, apply conditional logic based on
whether certain fields have values, or handle country-specific formatting requirements.
To configure custom field mappings, click the **Custom Field Mappings** link on the Advanced Settings page. For full details on how
to set up and use this feature, see the dedicated guide:
Learn how to configure custom field mappings with template syntax, country overrides, and examples.
***
## Troubleshooting
The Loqate Shopify Integration requires a Shopify Plus account. If you don't use Shopify Plus, you won't see all of the necessary
options and won't be able to use this integration.
Ensure that the API key is correct on the Admin page.
Ensure that your API key is correct on the Admin page, and that you have sufficient credit on your Loqate account.
If you no longer want to use the Loqate Shopify Plus integration, you can uninstall it from your Shopify Plus store.
**Please note:** if you uninstall the Loqate app and then want to start using it again at a later date, you will need to go through the
full installation process again.
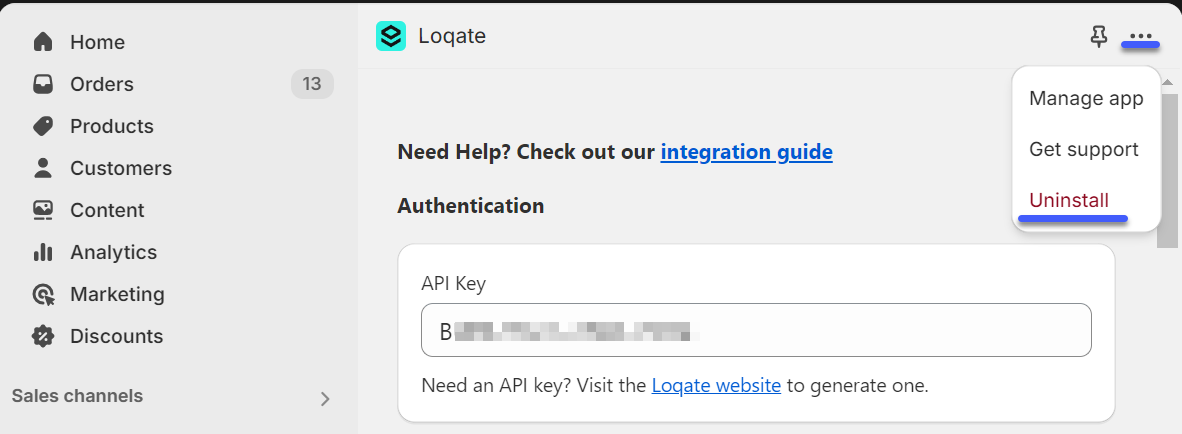
To uninstall the Loqate app, go to the Admin page of the app within your Shopify account and click on the three dots at the top-right of
the screen. You will see an option to uninstall there:
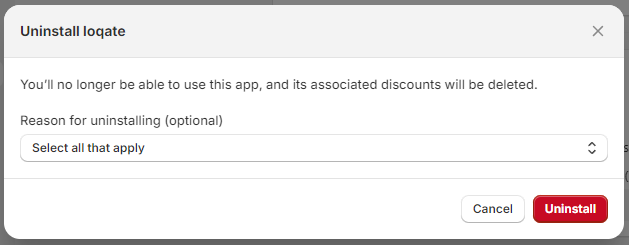
When you click **Uninstall**, you'll be prompted to choose a reason for uninstalling:
Select one or more reasons, then click the **Uninstall** button. This will uninstall the app and return you to the 'Installed Apps'
section of your Admin page.
***
If you haven't already, check out our 'About the Loqate Shopify Plus
Integration' article for examples of the Loqate Shopify Plus Integration in
use.
 * Copy and paste your Loqate API key into the API Key field on this screen, then click the **Save** button:
With that done, you can add one or more of the Loqate services to your store using the steps below.
### Enabling Loqate services
* Copy and paste your Loqate API key into the API Key field on this screen, then click the **Save** button:
With that done, you can add one or more of the Loqate services to your store using the steps below.
### Enabling Loqate services
 First, you need to add the **Loqate-Checkout** app block to your store on the Checkout page.
(see [https://www.shopify.com/enterprise/blog/customize-shopify-checkout](https://www.shopify.com/enterprise/blog/customize-shopify-checkout)).
App blocks allow you to customise the look and functionality of your checkout layout. This block is required in order to
use the Custom Capture Search Input on the Checkout page. Here's how to add this block:
1. In the Admin section of your Shopify Plus account, go to Settings > Checkout. From here you can either edit your existing checkout,
or create a new draft of your checkout layout
2. Next, select the Apps icon (the bottom icon) in the left-hand menu of the checkout editor, then search for 'Loqate'
3. Select the **loqate-checkout** app, then click the plus button and select **Checkout** from the drop-down list - this adds the
app block to the Checkout page
4. Next the [Standard Address Capture search must be disabled.](/integrations/shopify-plus-overview#optional-use-without-address-capture-not-recommended)
This will not turn off Capture entirely. Capture will now only run in the app block added using the instructions above. If the standard search is left enabled,
Capture address searches will happen in two places on the checkout page (in the custom search input as well as the address text input)
5. With that done, make sure to save the changes to your checkout, then exit the editor. If you created a new checkout draft,
you can click the **Publish** button to make it live.
First, you need to add the **Loqate-Checkout** app block to your store on the Checkout page.
(see [https://www.shopify.com/enterprise/blog/customize-shopify-checkout](https://www.shopify.com/enterprise/blog/customize-shopify-checkout)).
App blocks allow you to customise the look and functionality of your checkout layout. This block is required in order to
use the Custom Capture Search Input on the Checkout page. Here's how to add this block:
1. In the Admin section of your Shopify Plus account, go to Settings > Checkout. From here you can either edit your existing checkout,
or create a new draft of your checkout layout
2. Next, select the Apps icon (the bottom icon) in the left-hand menu of the checkout editor, then search for 'Loqate'
3. Select the **loqate-checkout** app, then click the plus button and select **Checkout** from the drop-down list - this adds the
app block to the Checkout page
4. Next the [Standard Address Capture search must be disabled.](/integrations/shopify-plus-overview#optional-use-without-address-capture-not-recommended)
This will not turn off Capture entirely. Capture will now only run in the app block added using the instructions above. If the standard search is left enabled,
Capture address searches will happen in two places on the checkout page (in the custom search input as well as the address text input)
5. With that done, make sure to save the changes to your checkout, then exit the editor. If you created a new checkout draft,
you can click the **Publish** button to make it live.
 * Once you're editing your checkout, go to the Settings menu (the cog icon on the left-hand side), scroll down to the
**Address autocompletion** section and select the **Loqate** option to set Loqate as your provider:
* Once you're editing your checkout, go to the Settings menu (the cog icon on the left-hand side), scroll down to the
**Address autocompletion** section and select the **Loqate** option to set Loqate as your provider:
 * Make sure you save the changes to your checkout, then exit the editor. If you created a new checkout draft,
you can click the **Publish** button to make it live.
Address Capture will now be available on your checkout. If you also want to enable Address Verify and/or Email Validation,
carry on through the Address Verify and Email Validation tabs.
* Make sure you save the changes to your checkout, then exit the editor. If you created a new checkout draft,
you can click the **Publish** button to make it live.
Address Capture will now be available on your checkout. If you also want to enable Address Verify and/or Email Validation,
carry on through the Address Verify and Email Validation tabs.
 * With that done, make sure you save the changes to your checkout, then exit the editor. If you created a new checkout draft,
you can click the **Publish** button to make it live.
* With that done, make sure you save the changes to your checkout, then exit the editor. If you created a new checkout draft,
you can click the **Publish** button to make it live.
 * Make sure the **Validate shipping address** option is unticked, then click the Save button
The final step is to enable Address Verify in the Loqate app's Admin page.
Once you've entered your key into the API Key field in the Loqate app's Admin page, the Address Verify section below will become editable:
* Scroll down to the Address Verify section and select the **Enable address verification for post checkout** option
* NOTE: to use the post checkout option, please ensure your store is not
[password protected](https://help.shopify.com/en/manual/online-store/themes/password-page)
* If you also want to enable Address Verify on the checkout page you can select the **Enable address verification for checkout**
option too — this is not recommended because it consumes Verify transactions during checkout (including abandoned checkouts). See the note below.
* Click the **Save** button, and Address Verify will now be available.
* Make sure the **Validate shipping address** option is unticked, then click the Save button
The final step is to enable Address Verify in the Loqate app's Admin page.
Once you've entered your key into the API Key field in the Loqate app's Admin page, the Address Verify section below will become editable:
* Scroll down to the Address Verify section and select the **Enable address verification for post checkout** option
* NOTE: to use the post checkout option, please ensure your store is not
[password protected](https://help.shopify.com/en/manual/online-store/themes/password-page)
* If you also want to enable Address Verify on the checkout page you can select the **Enable address verification for checkout**
option too — this is not recommended because it consumes Verify transactions during checkout (including abandoned checkouts). See the note below.
* Click the **Save** button, and Address Verify will now be available.
 Once that's done, you just need to select the **Enable email validation** option from the 'Email Validation' section on the Loqate
app's Admin page:
Once that's selected, click the **Save** button and move on to the next section.
Once that's done, you just need to select the **Enable email validation** option from the 'Email Validation' section on the Loqate
app's Admin page:
Once that's selected, click the **Save** button and move on to the next section.
 * Set Company name to **Optional**, then click the Save button
With that done, you should now see an optional Company address field in the checkout:
* Set Company name to **Optional**, then click the Save button
With that done, you should now see an optional Company address field in the checkout:
 ***
### Optional - Use without Address Capture (not recommended)
We recommend always using Address Capture, as this helps reduce the chances of mistakes caused by manual address entry,
ensuring addresses can be trusted as correct and giving the best customer experience. It is, however, possible to use just
Address Verification or just Email Validation if you don't want any kind of address autocompletion functionality.
If you want to use Address Verification and/or Email Validation on their own, follow the full installation and setup process as above,
then you can manually disable Address Capture. Here's how to do that:
* First, make sure that you've enabled at least one of Address Verification and/or Email Validation (see the [Enabling Loqate services](#enabling-loqate-services)
section earlier)
* Then, go to Settings > checkout and click the **Customize** option for your checkout
* Click on the **Settings** icon on the left-hand side, then scroll down to the **Address autocompletion** section
***
### Optional - Use without Address Capture (not recommended)
We recommend always using Address Capture, as this helps reduce the chances of mistakes caused by manual address entry,
ensuring addresses can be trusted as correct and giving the best customer experience. It is, however, possible to use just
Address Verification or just Email Validation if you don't want any kind of address autocompletion functionality.
If you want to use Address Verification and/or Email Validation on their own, follow the full installation and setup process as above,
then you can manually disable Address Capture. Here's how to do that:
* First, make sure that you've enabled at least one of Address Verification and/or Email Validation (see the [Enabling Loqate services](#enabling-loqate-services)
section earlier)
* Then, go to Settings > checkout and click the **Customize** option for your checkout
* Click on the **Settings** icon on the left-hand side, then scroll down to the **Address autocompletion** section
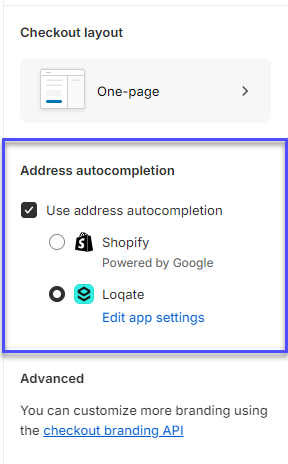 * Untick the **Use address autocompletion** option, then save the change to your Checkout configuration
This will have disabled the Address Capture functionality, while leaving Address Verify and/or Email Validation running.
***
### Optional - Advanced Settings
The Advanced Settings page is located in the Admin section of your Loqate app, and includes the following optional settings.
* Untick the **Use address autocompletion** option, then save the change to your Checkout configuration
This will have disabled the Address Capture functionality, while leaving Address Verify and/or Email Validation running.
***
### Optional - Advanced Settings
The Advanced Settings page is located in the Admin section of your Loqate app, and includes the following optional settings.
 And here's the result populated using the English version of the address:
 This is useful for when carriers have difficulty processing non-latin addresses.
 If the customer selects one of the suggested addresses, they will then see a notification acknowledging the address they've selected
and giving them the option to update their shipping address:
If the customer selects one of the suggested addresses, they will then see a notification acknowledging the address they've selected
and giving them the option to update their shipping address:
 When you click **Uninstall**, you'll be prompted to choose a reason for uninstalling:
 Select one or more reasons, then click the **Uninstall** button. This will uninstall the app and return you to the 'Installed Apps'
section of your Admin page.
Select one or more reasons, then click the **Uninstall** button. This will uninstall the app and return you to the 'Installed Apps'
section of your Admin page.