> ## Documentation Index
> Fetch the complete documentation index at: https://docs.loqate.com/llms.txt
> Use this file to discover all available pages before exploring further.
# Tag Setup Guide – Address, Email And Phone Validation
> Step-by-step guide to adding Loqate services to your website forms using automatically-generated code snippets.
## Who should use this guide?
If you already have a form on your website and want to add Address, Email or
Phone Validation, this guide will get you up and running as quickly as possible.
We have made integrating our services as simple as possible, with the majority
of the process guiding you through step by step. You are not expected to have
any technical expertise, but a basic understanding of HTML would be an
advantage.
For more advanced, customised installations, please see our API pages:
* [Address validation API page](/api-reference/address-capture/apis)
* [Phone validation API page](/api-reference/phone-validation/apis)
* [Email validation API page](/api-reference/email-validation/apis)
## Setup Video
## How to use this guide
This guide covers how to integrate Address Validation, Email Validation and
Phone Validation. Much of the setup process is the same for all three services -
the following sections are universal across all three:
* Adding the Loqate Tag to your site
* Settings (although different services do have slight different options in some
regards)
Some of the specific setup options and advanced customisation options are unique
to each service however, in which case we've clearly marked which sections are
relevant to which service.
Note that the **Adding the Loqate Tag to your site** and **Setup** sections
are required to get a service up and running - the **Settings** and **Further
Customisation** sections are optional, however we do recommend you go through
these when you first set up each service.
## Adding the Loqate Tag to your site
To get
started, [log into your Loqate account](https://account.loqate.com/Login/),
select **Add service** from the top of the page then click the **Start setup**
button under Address, Email and Phone Verification.
If you are integrating with any of
[our pre-built integrations](/integrations/all-integrations) such as
Magento 2 select the **App** option and choose the relevant application - your
installation will be a little different, so on the next step, you will be taken
to the associated app page where you can follow instructions for installation.
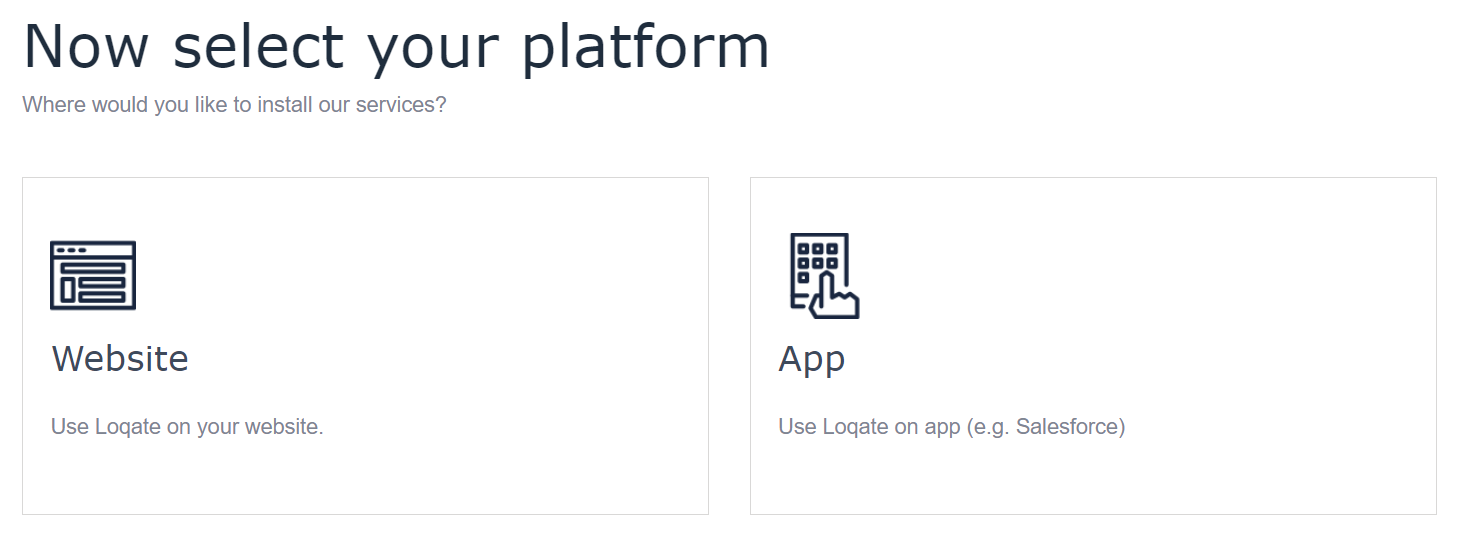
For everything else, select **Website** and enter the URL of the site you're
putting the service into. Click **Next** to continue.
Next you will be presented with a snippet of JavaScript code to add to your
website. Copy the code (or Tag) generated for you and paste it into the ``
section in the HTML of your website.
**Tip:** placing this tag on each page of your site makes the setup process easier
and is easy to do if you have a layout template for your site.
Once you have finished editing the page, save and upload the new file to your
servers and click the **Launch in-page setup** button on the setup screen.
The setup process will now open your site using the URL provided earlier, and
display setup options on the right-hand side of the screen (we'll refer to this
during the setup process as the on-screen setup section). The Tag setup will map
the fields automatically - see the **Setup** section below for more information
specific to the three different services.
## Setting up your service
Follow the instructions in the sections below to finish setting up Address
Validation, Email Validation and/or Phone Validation - the specific steps to
take differ depending on the service.
By default, the setup process will attempt to create all three services, and you
will see each of them listed in the on-screen setup section. If you would only
like to use one or two of these services, make sure to disable the service(s)
you won't be using, to make sure you don't set up any unwanted services by
accident.
If at any point you get stuck or have questions regarding our products or
setup process, [please contact our support
team](https://www.loqate.com/en-gb/contact/) or chat with us live from the
setup screen.
For added security, we advise you to look at the service settings on your
account. You can find out the benefits of doing so in the [Settings](#settings)
section of this guide.
#### Address Validation
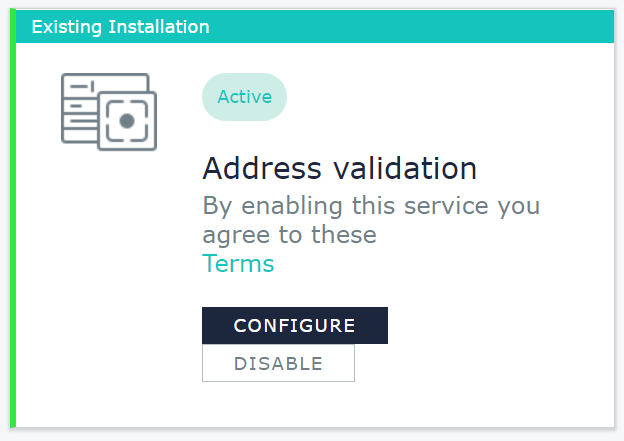
When your site loads at the end of the setup process, in the on-screen setup
section (on the right-hand side of the screen) you will see a list of services
available for your form. If one or more address fields have been detected then
the Address Validation service will be marked as Active.
Before looking at any configuration for your Address Validation you can test
whether everything is working by performing an address lookup:
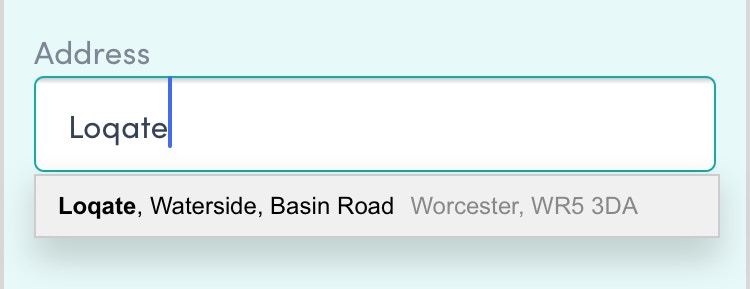
* Start to type any part of an address into one of the address fields on your
form
* A list of valid address should display below the field, matching as you type,
like the example below:
* The more you type, the more accurate the results will become
* Once you find the address you want, select it and the rest of your address
fields should autofill
If everything works as you expect it to, you can now give your installation a
name so that you can reference it in the future.
* Scroll down to the bottom of the configuration screen to find the
**Name** section
* Pick a name that makes it clear to anyone else where Address Validation is
used - for example 'Website Registration Form Address Validation'
Once that's done, you can press the **Save** button at the bottom of the on-screen
setup section, underneath the list of services. If the Address Validation
service isn't working as you'd expect it to however, or you want to make any
changes, see the configuration section below.
### Configuring the Address Validation Service
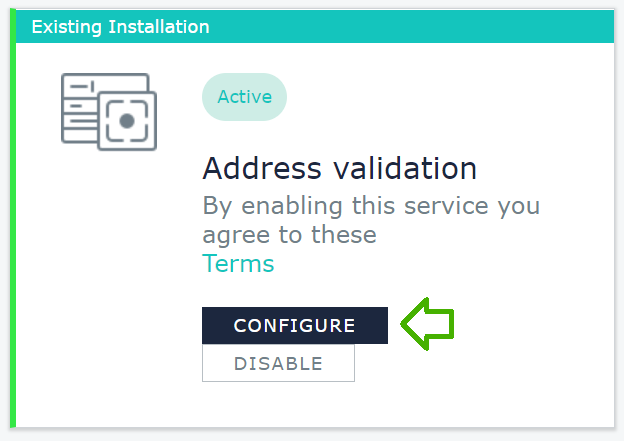
If you want to make any changes to how the address fields have been mapped, or
edit any other settings for the service, click the **Configure** button against
the Address Validation service to open up a configuration screen.
The two main functions of this screen are for:
* Mapping address fields
* Enabling Geolocation
#### Mapping Address Fields
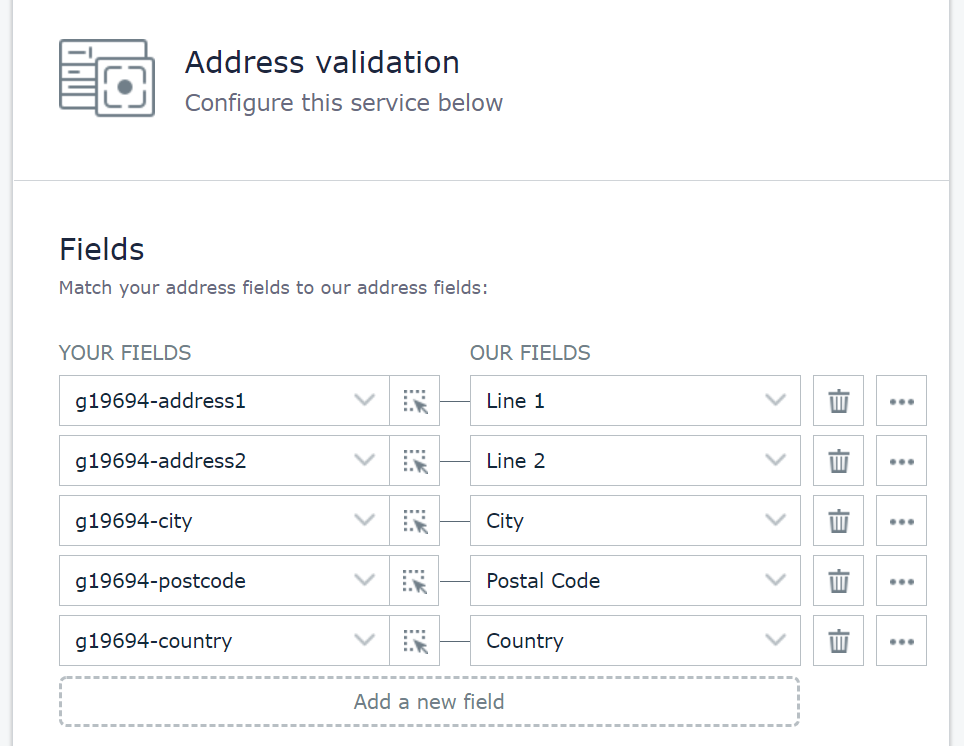
If your form has one or more address fields and you’ve named your field names or
ids conventionally (i.e. Line1, Line2, City, etc), the Address Validation
service will try to match the correct field types to the relevant address fields
on your form. You can see how these have been mapped under the **Fields** section
of the configuration screen:
From here you can edit the existing mapping or add entirely new fields.
Field types correspond to specific address components (i.e. Line1, Line 2, City,
etc.) - see the **Available Field Types** section below for information on the
most common field types that you can use.
* To edit an existing field mapping, click the arrow next to the field name and
select the relevant option from the drop-down list
* To create another field, click **Add a new field** and choose the relevant
option under both*Your Fields* and *Our Fields*
For either of the above examples, instead of choosing a field from the drop-down
list you can click the selection buttonand then select the field on your form
that you want to use.\
If you need to remove any fields, click the bin iconon the right hand side,next
to the unwanted field.\
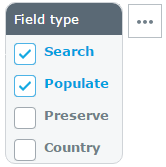
To the right of each fieldset is a buttonto access additional settings for that
field. There are four settings to choose from, which can be mixed and matched as
you please.
These settings are:
1. **Search:** turns the field into a search bar, showing the returned address
results when a user starts typing their address into the field
2. **Populate:** fills in the field with the relevant data after an
address is selected
3. **Preserve:** once populated, the field is not changed by the
address validation again. This can be useful if you need to manually make a
change and make it persist on the form
4. **Country:** turns the field into a country dropdown list
When you are happy with your setup, scroll to the bottom of the configuration
screen and click **DONE** andnd then try searching for an address.
If you are happy with the results, click **SAVE** at the bottom of
the on-screen setup section.
At this point, the Address Validation service will be live and running on your
website with all of the settings you have chosen.
If there are any more places you would like to install a service, you can click
the **Add another service** drop-down menu and select a service.
#### Available Field Types
Below is a table of the most commonly used fields available for Address
Validation:
| **Field name** | **Description** |
| -------------------- | ------------------------------------------------------------------------ |
| Line1-5 | The specific line number of the returned address |
| Town | The Town of the returned address |
| Sub Building | The Flat or Unit number within the building. i.e. Flat 1 |
| Street | The Street Name of the returned address |
| Search Input | Search bar where all the address validation magic happens |
| Postcode | The Postcode of the returned address |
| Formatted Address | The FULL address in the correct standardised format |
| District | The locality within the Town or City |
| County Name | The name of the County, Province or State, i.e. California |
| County Code | The code of the County, Province or State, i.e. CA |
| County | The County of the returned address |
| Country | The ISO 3166 Country name for the returned address |
| Company | Returns the full company name where registered |
| Building Number | Number of the building for the returned address |
| 3-Character ISO Code | The ISO 3166 3-character Country Code for the returned address, i.e. GBR |
| 2-Character ISO Code | The ISO 3166 2-character Country Code for the returned address, i.e. GB |
While these fields will be enough for the majority of use cases, this is not a
finite list and other fields and formats can be used.
#### Geolocation
It's also possible to allow address lookups to be based on the end user's
current location, using the Geolocation feature.
In order to access this additional functionality, do the following:
* Click the **Configure** button for your address validation service in the
on-screen setup section
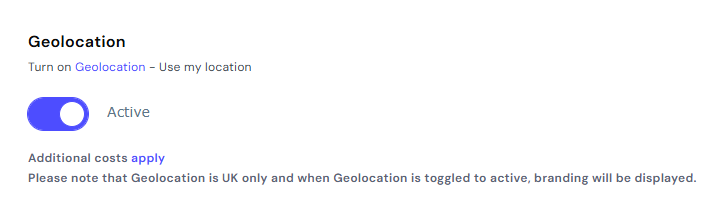
* Below the address mapping fields, you should see a **Geolocation** section with
a toggle switch (this is set to OFF by default)
* Toggle this switch to ON (showing the green background) to activate
Geolocation on the service
Once you’re ready, click **DONE** at the bottom of the configuration
screen and test your page. If you are happy with how the information is being
populated click the **SAVE** button at the bottom of the on-screen
setup section to complete all changes.
At this point, the Geolocation service will be live and running on your website
in addition to your address validation service.
### Turn off Browser Autofill
For the best experience when using the Address Validation service, we recommend
you turn off browser autofill functionality for address form fields.
There are two ways in which we suggest you do this - you can use either or both
of these methods:
* **Method one:** below where you placed the Loqate Tag script on the page (i.e.
in the `` section of your website), insert the following JavaScript code
snippet:
```javascript theme={null}
pca.on("options", function(type, key, options) \{ options.suppressAutocomplete =false;});
```
* **Method two**: add the attribute **autocomplete="none"** to the HTML for each
form field on the page. For example:
```html theme={null}
```
We also recommend that you test this code across multiple popular web browsers.
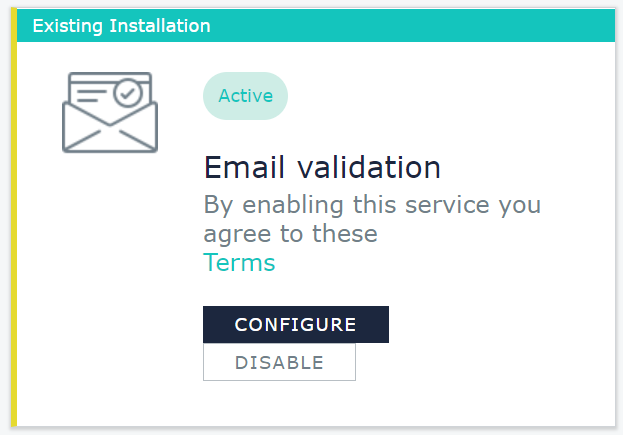
#### Email Validation
When your site loads at the end of the setup process, in the on-screen setup
section (on the right-hand side of the screen) you will see a list of services
available for your form. If an email address field has been detected then the
Email Validation service will be marked as Active.
If you want to make any changes to how the email address field has been mapped,
or edit any other settings for the service, click the **Configure** button against
the Email Validation service to open up a configuration screen.
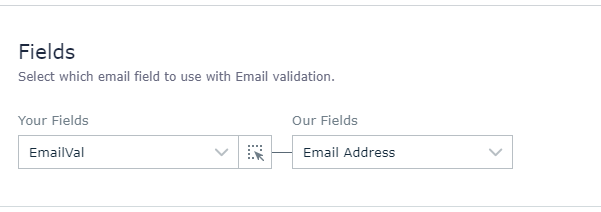
The main thing to look at is the field mapping. If your form has an email
address field then it will automatically be detected and mapped to the Email
validation service - the field will show up as highlighted on your form, and
under **Fields** you will be able to see how it has been mapped:
If your email address field hasn't been mapped properly, you can change this
manually by selecting the relevant field from the **Your Fields** dropdown.
If you're happy with how the email address field has been mapped, all you need
to do now is give your installation a name so you can reference it in the
future.
* Scroll down to the bottom of the configuration screen to find
the **Name** section
* Pick a name that makes it clear to anyone else where email validation is
used - for example 'Website Registration Form Email Validation'
Once that's done, your Email validation setup is complete. Scroll to the bottom
of the configuration screen and click **DONE**, then scroll to the bottom of the
on-screen setup section and click **SAVE**.
If there are any more places you would like to install a service, you can click
the **Add another service** drop-down menu and select a service.
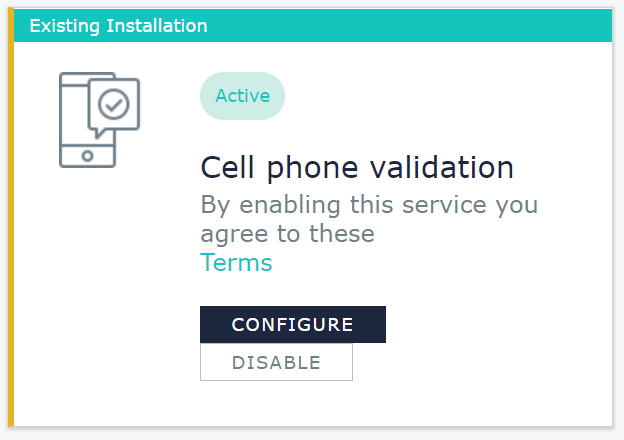
#### Phone Validation
When your site loads at the end of the setup process, in the on-screen setup
section (on the right-hand side of the screen) you will see a list of services
available for your form. If a phone number field has been detected then the Cell
Phone Validation service will be marked as Active.
We recommend that you always include a **Country** field on your Phone
Validation form, as the service requires a country to validate each phone number
against. If you include a Country field, the service will automatically detect
it and use the inputted country for validation purposes.
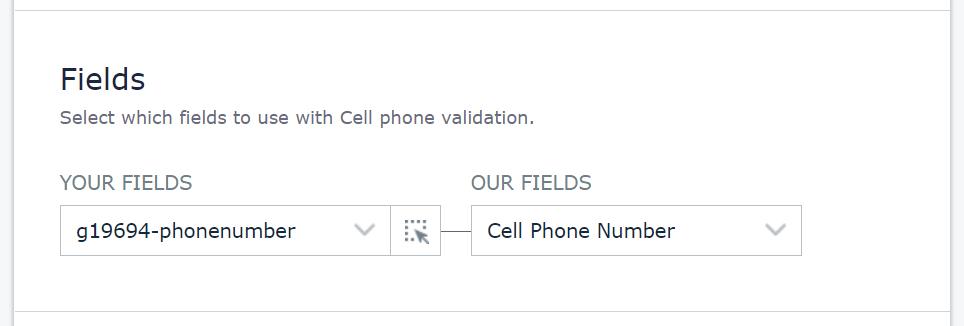
If you want to make any changes to how the phone number field has been mapped,
or edit any other settings for the service, click the **Configure** button
against the Cell Phone Validation service to open up a configuration screen.
If your phone number field hasn't been mapped properly, you can change this
manually by selecting the relevant field from the **Your Fields** dropdown.
If you're happy with how the phone number field has been mapped, all you need to
do now is give your installation a name so you can reference it in the future.
* Scroll down to the bottom of the configuration screen to find
the **Name** section
* Pick a name that makes it clear to anyone else where phone validation is
used - for example 'Website Registration Form Phone Validation'
Once that's done, your Phone Validation setup is complete. Scroll to the bottom
of the configuration screen and click **DONE**, then scroll to the bottom of the
on-screen setup section and click **SAVE**.
If there are any more places you would like to install a service, you can click
the **Add another service** drop-down menu and select a service.
None of the settings you choose during the initial setup are fixed in stone:
if you need to go back and change any of the settings for a service after it's
first set up, you can do so in your Account Section. See the **Setup** heading
in the **Settings** section below for details of how to do this.
## Settings
You can change your service settings and take further control over your usage in
the [Account Section](http://account.loqate.com) of your Loqate account.
To get to the settings options, from the landing page of your account choose
**Your Services** from the menu and then select the service you want to look at.
These settings break down into the following categories:
* [**Configuration**](#configuration)
* [**Limits**](#limits)
* [**Mappings**](#mappings)
* [**Data (Address Validation only)**](#data)
* [**Customise **](#customise)
* [**Advanced (available for the latest version of Capture only)**](#advanced)
* [**Setup**](#setup)
Most of these are the same for each service, but we'll point out where
appropriate anything which is specific to just one or more of the services.
The next sections of this guide will focus on each of the categories and walk
you through how to make the most of the options available to you.
**NOTE: If you make any changes, you will need to click
the *Save* button for those changes to take effect.**
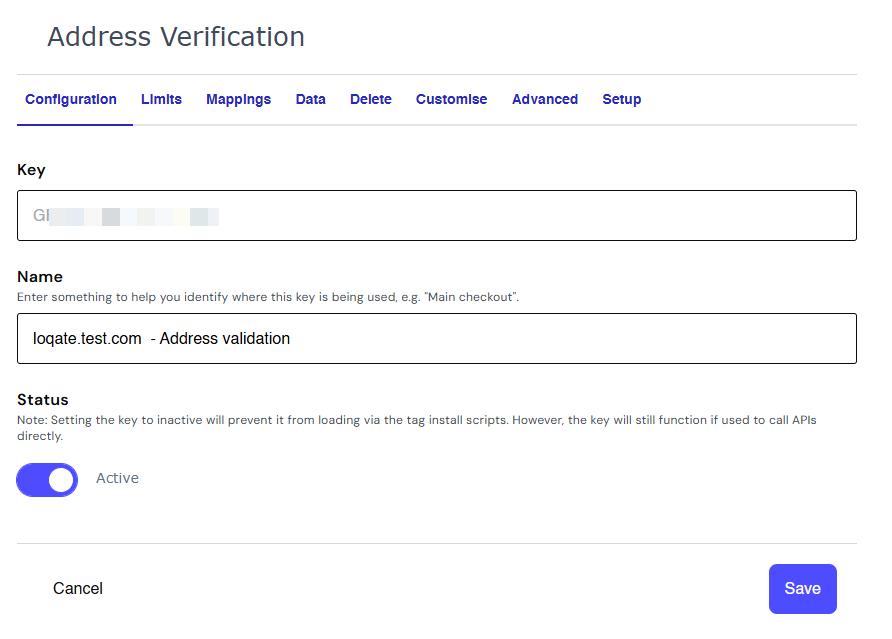
### Configuration
The Configuration tab gives you the following options to adjust:
* **Name**: customise the name of the key selected. This is primarily to help
you identify your own keys more easily, and can be particularly useful if you
are using more than one key under one account
* **Status**: toggle the key status to active/inactive - setting this to
inactive will stop any services associated with that key from working on your
site
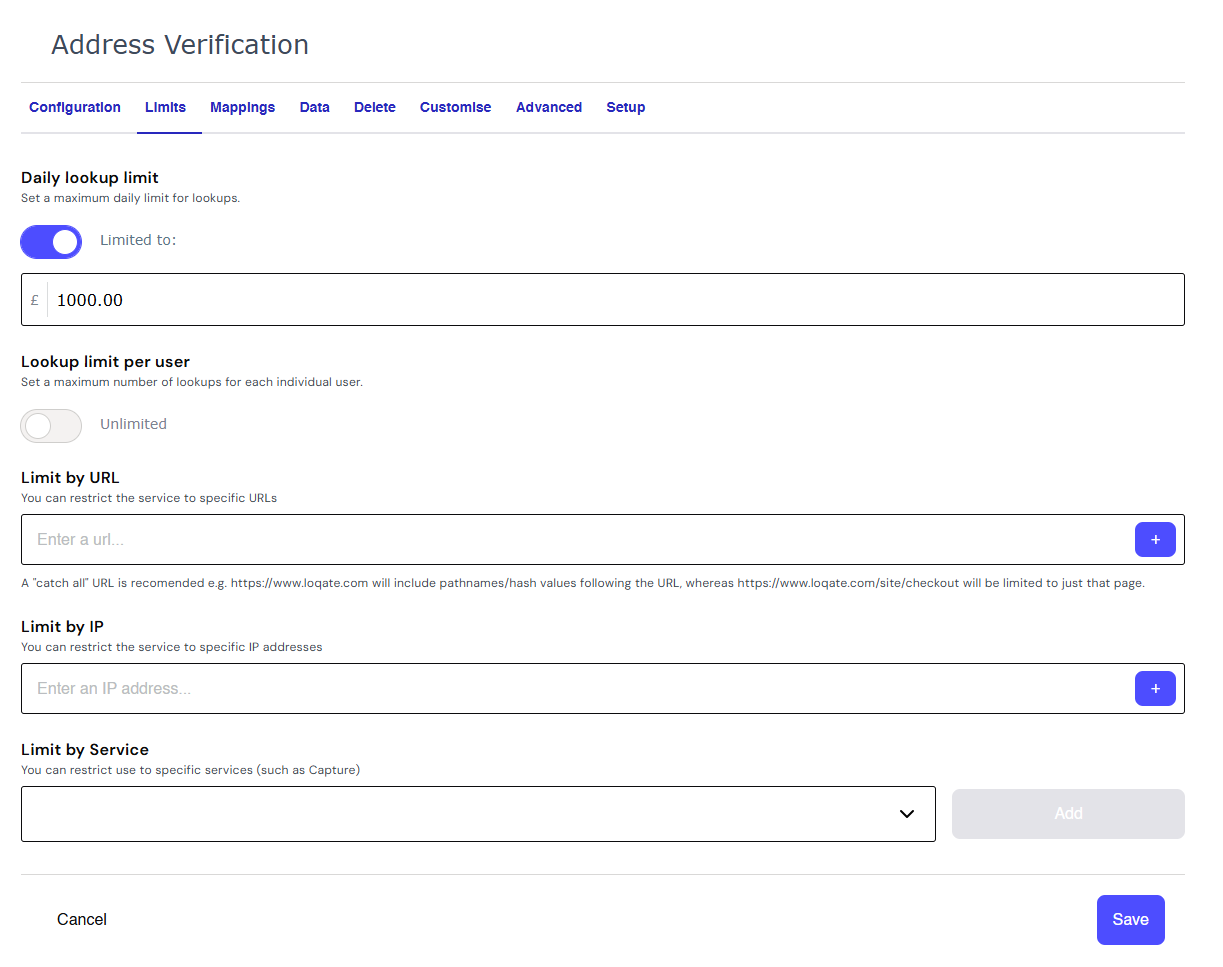
### Limits
The Limits tab helps you maintain control over who can use your keys and which
of your websites the service requests should be made from, and place limits on
the number of requests made by individual IP addresses. We strongly recommend
that you complete these settings.
The settings can be used as follows:
* **Daily lookup limit:** the maximum spend level allowed on this installation
per day. Set this to a sensible level that you do not want to go over and that
won't affect expected daily usage
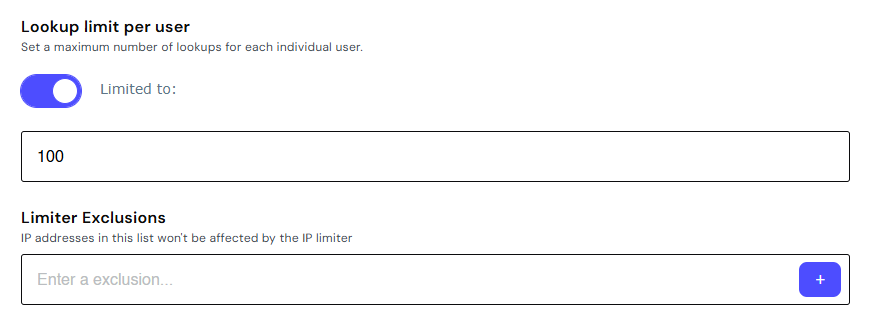
* **Lookup limit per user:** the maximum number of lookups that an individual
user can perform - calculated by IP address. By default this is set
to **Unlimited**, but by toggling the slider you can set a maximum limit
* **Limiter Exclusions:** when Lookup limit per user is toggled on,
the **Limiter Exclusions** option is also enabled. This allows you to create a
list of IP addresses which won't be affected by the per user limit - enter
an IP address you wish to exclude in the text box and then click the plus
icon. You can add as many IP addresses as you like
* **Limit by URL:** to help prevent fraudulent or accidental use of one of your
keys across domains, add the URLs that you expect the requests to be coming
from. Enter a URL address you wish to limit in the text box and then click the
plus icon. You can add as many URLs as you like
* You will also need to specify any subdomains and combinations of URLs that
might be
used. i.e. mysite.co.uk, mysite.com, mysite.co.uk, etc.
* **Limit by IP:** similar to the *Daily Limit*, this allows you to place request
limits against a group of IP addresses, which should help manage your cashflow
and cap individual usage. Enter an IP address you wish to limit in the text
box and then click the plus icon. You can add as many IP addresses as you like
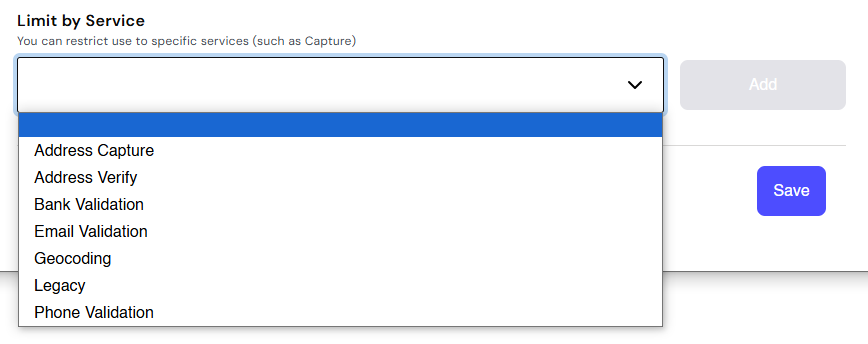
* **Limit by Service:** this allows you to restrict your key to one or more
Loqate services for security purposes - we recommend matching this setting to
the service you're using on that key (choose **Address Capture** for Address
Verification)
### Mappings
The Mappings tab allows you to edit the way your form fields are mapped to the
relevant Loqate service fields, without needing to go through the setup process
again.
If you're sure you know what each field's name is and how you want to map it,
this is a quick way of changing the mapping. If not, it may be better to head to
the **Setup** section (see below) and return to the on-page setup process.
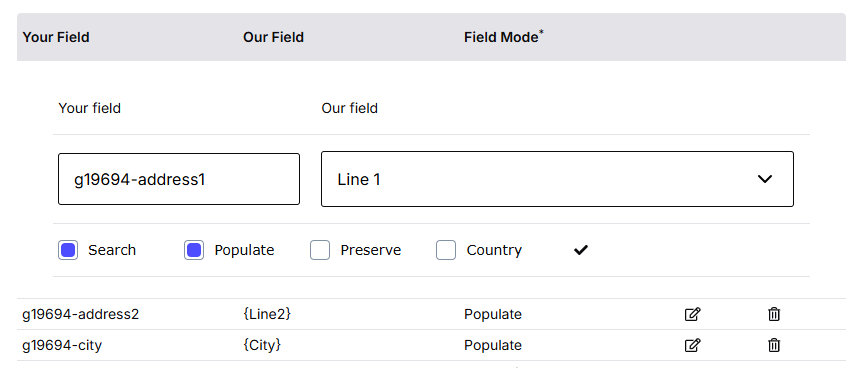
To make any changes, click on the edit icon next to the relevant field:
You can then amend either of the fields, and edit the Field Modes if required (see
the Address Validation Setup section for more information about Field Modes).
Alternatively, to add a new field just click on the **Add a field** button.
### Data
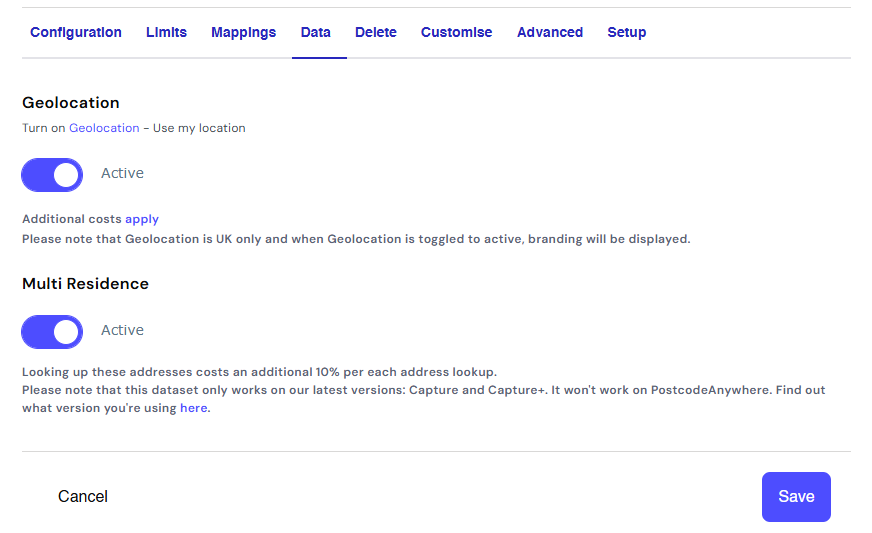
TheDatatab allows you to select which additional datasets you want returned for
Address Validations, on an individual key basis. Note that this tab is only
visible for Address Validation keys, and not Email or Phone Validation.
Alternatively, to apply Geolocation or Multi Residence data to all the keys
within your account, within your Account Section (account.loqate.com) you can go
to **Your account** > **Data settings** and toggle the switches to enable the
settings to be applied to all keys.
* **Geolocation**: text
generation [geolocation technology](https://www.loqate.com/en-gb/geocode) that
allows your mobile customers to find their location in a single tap
* **Multi Residence**: the
[Multiple Residence dataset](https://www.loqate.com/en-gb/datasets/multi-residence/) from
Royal Mail contains over 700,000 additional address records not recorded in
PAF® of any premise where multiple households share a letterbox, such as
apartment blocks
### Customise
The Customise settings help you manage the localisation of your forms. Under
thistab you can control a range of settings, which differ depending on the type
of key - Address Validation keys have slightly different settings to Email and
Phone Validation.
#### Address Validation
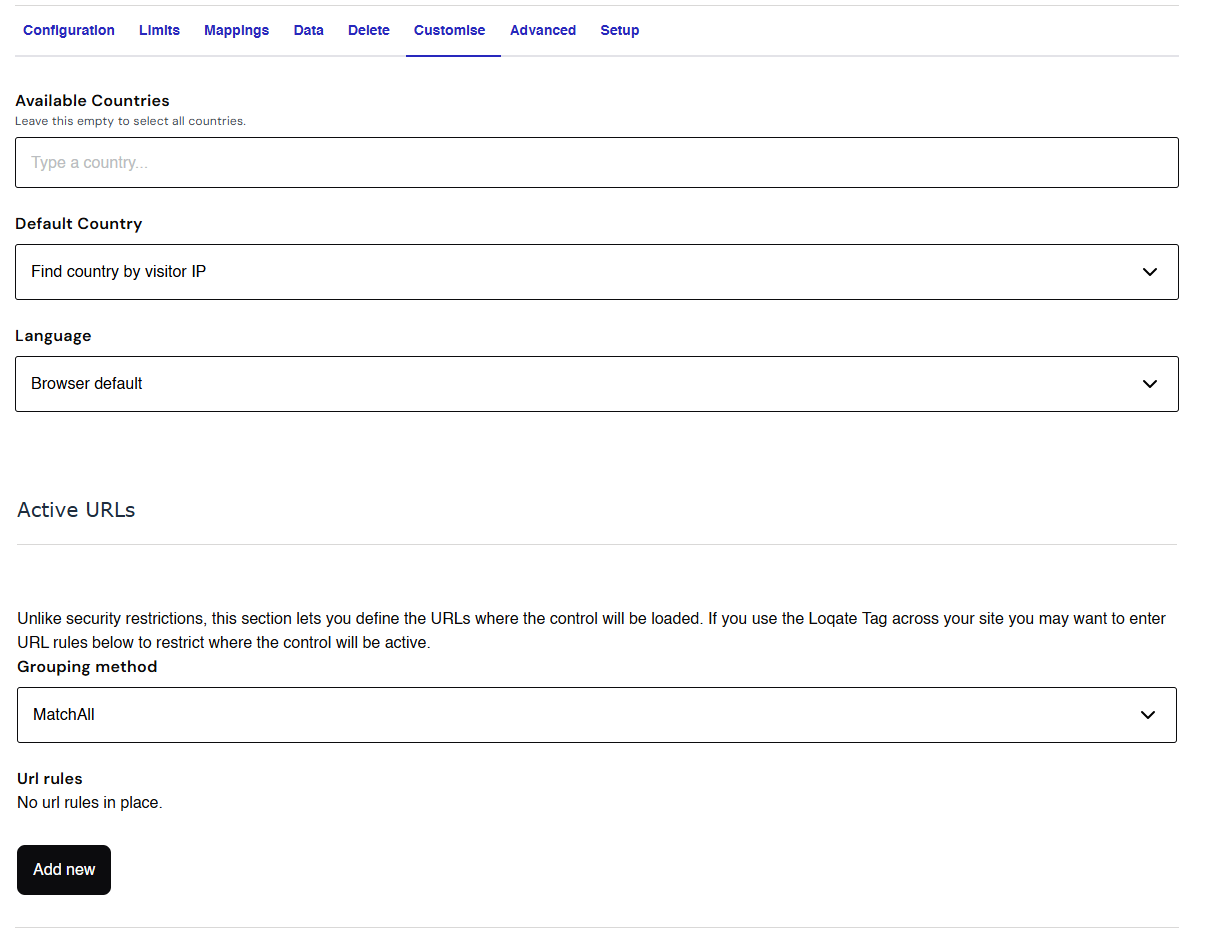
You can customise Address Validation keys by adjusting country settings and
default languages, and setting URL restriction rules. Here are the options:
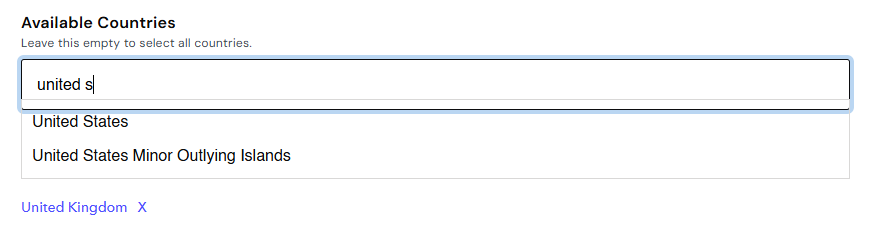
* **Available countries:** use this to limit which countries are available to
customers via the form. For each country you want lookups to be available for,
start typing the name into the text field and select the relevant option from
the list that appears. You can add as many countries as you need to this list.
If you need to remove a country from the list, click on the X next to its
name.
* **NOTE: the order in which countries appear within this list will be the
same order they will appear on the address validation form**
* **Default country:** by default, Address Validation will try to determine
which country your customer is connecting from by looking up their IP address.
You can override this and default to a country of your choice by selecting one
from the dropdown list. This may be useful if you expect the majority of your
customers come from one country
* **Language:** Address Validation results can be returned in a variety of
languages that use Roman characters. By default, the language will be set to
match the user’s browser settings, but you can specify a language to use by
selecting one from the dropdown list. Currently, Address Validation can
support the following languages: Dutch, English (UK), English (Canada),
English (US), French, German, Hungarian, Italian and Spanish
* **Active URLs:** If no URLs are specified here, the service will attempt to
trigger on any page where the relevant address/email/phone field(s) exist.
Specifying one or more URLs will restrict the service to only running on those
pages
#### Email and Phone Validation
Email and Phone Validation keys have slightly fewer customisation options than
Address Validation. Here are the options:
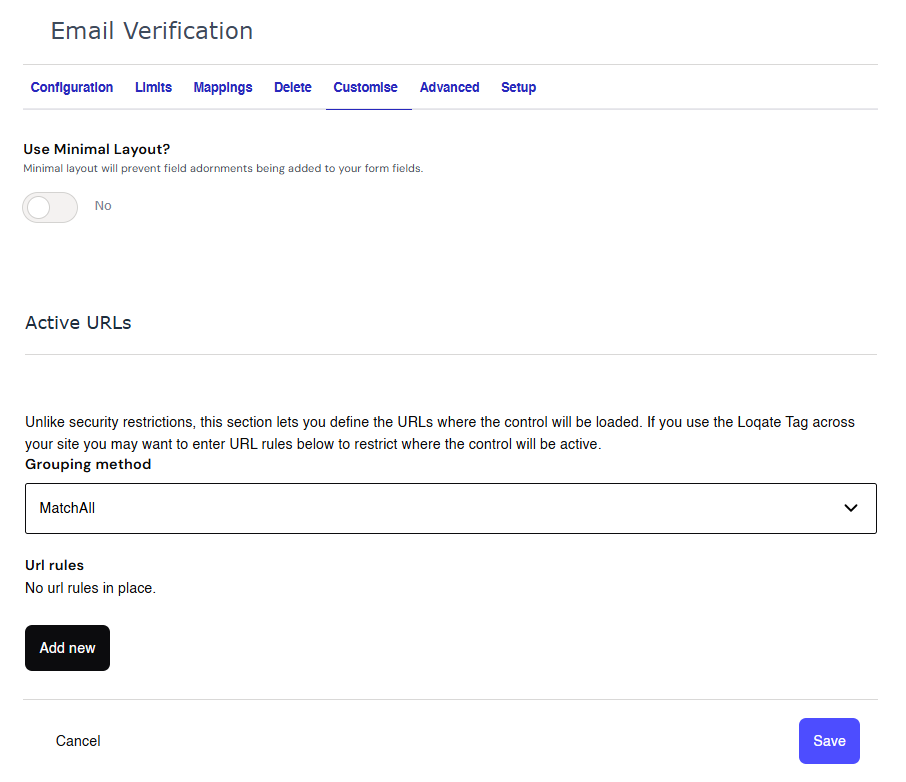
* **Use Minimal Layout?:** toggle this option on if you want to
disable the visual adornments that display next to email/phone number fields
to indicate successful/failed validation (i.e. tick or cross icons).
* **Active URLs:** if no URLs are specified here, the service will attempt to
trigger on any page where the relevant address/email/phone field(s) exist.
Specifying one or more URLs will restrict the service to only running on those
pages.
### Advanced
The Advanced tab contains two options which allow you to further customise your
searches. This tab is only visible if you're using the latest version of
Capture - earlier versions don't have access to the functionality included
within.
#### Location Biasing
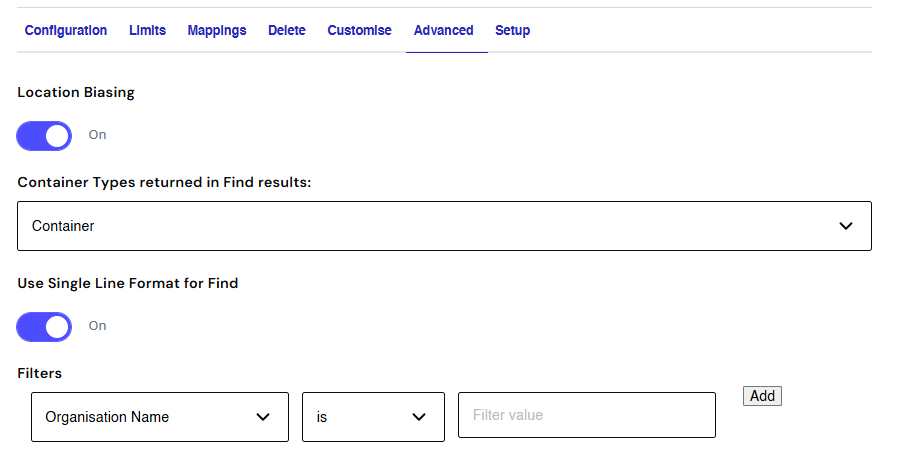
Enabling the Location Biasing feature results in reduced keystrokes and a
quicker address entry process for your customers.
Enabling the biasing feature is just a case of toggling the **Location
Biasing** switch to **On**.
#### Filters
The Filters feature allows you to set up one or more filters to restrict the
results of your searches - i.e. to choose whether you want your searches to
include or exclude certain things.
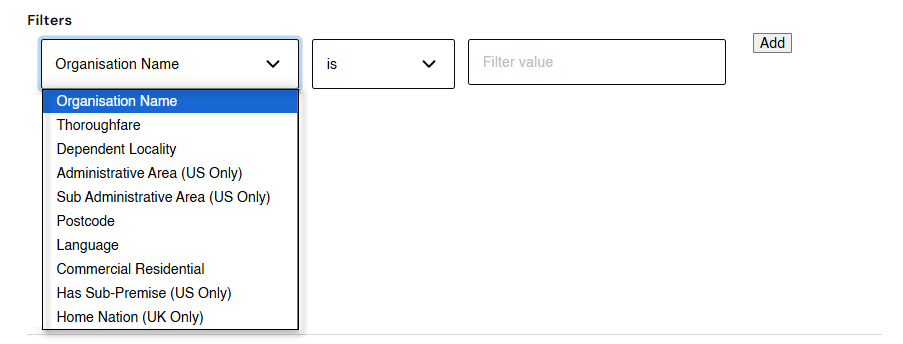
There are three components to each filter:
* **Filter name:** choose what you want to filter by - see the list below for
details of each of the possible options
* **Qualifier:** choose **is** or **is not** to set whether you want to include
or exclude results
* **Filter value:** set the specific value you want to include or exclude
For each filter you want to set up, fill in these three components and click the
**Add** button. You can create multiple filters, depending on what you want to
achieve.
Note that if you include more than one filter, search results will need to
fulfil both/all filters before being included.
Here is an example where two filters have been set up to allow for a search of
addresses in the city of Worcester, excluding any addresses registered to Loqate
(i.e. if you wanted to search a specific area but exclude one or more
organisations):
NOTE: when using Filters we recommend always performing single-country
searches, so that any country-specific Filters will return relevant results.
Using Filters which aren't applicable to certain countries can result in
nothing being returned.
Here are the full details of the different filters available (note that some are
only available with US and CA data):
| **Filter name** | **Description** |
| ----------------------- | ---------------------------------------------------------------------------------------------------------------------------------------------------------------------------------------------------------------------------------------------------------- |
| Organisation Name | Company/business name |
| Thoroughfare | Street name (dependent or main street) |
| Dependent Locality | City (dependent or main locality) |
| Administrative Area | Only available for US and CA datasets, and refers to US State / CA Province or TerritoryAreas are specified as two letter code - e.g. AdministrativeArea: AB |
| Sub Administrative Area | Only available for US and CA datasets, and generally refers to smaller areas than Administrative AreaFor US this is usually CountyFor CA this may vary based on the province, so could be County, Regional District, etc. |
| Postcode | Postal code/Postcode/Zip code |
| Language | Specified in ISO 639-2/B format (e.g. DEU for Germany & IND for Indonesia) - [see here for more details](https://en.wikipedia.org/wiki/List_of_ISO_639-2_codes) |
| Commercial Residential | Address type (Commercial or Residential); available for US addresses onlyTo specify commercial or residential filters use the following syntax:\&Filters=Attributes.CommercialResidential:Commercial\&Filters=Attributes.CommercialResidential:Residential |
### Setup
If at any point you need to change the way a service is set up on a form, you
can reactivate the setup process in this section.
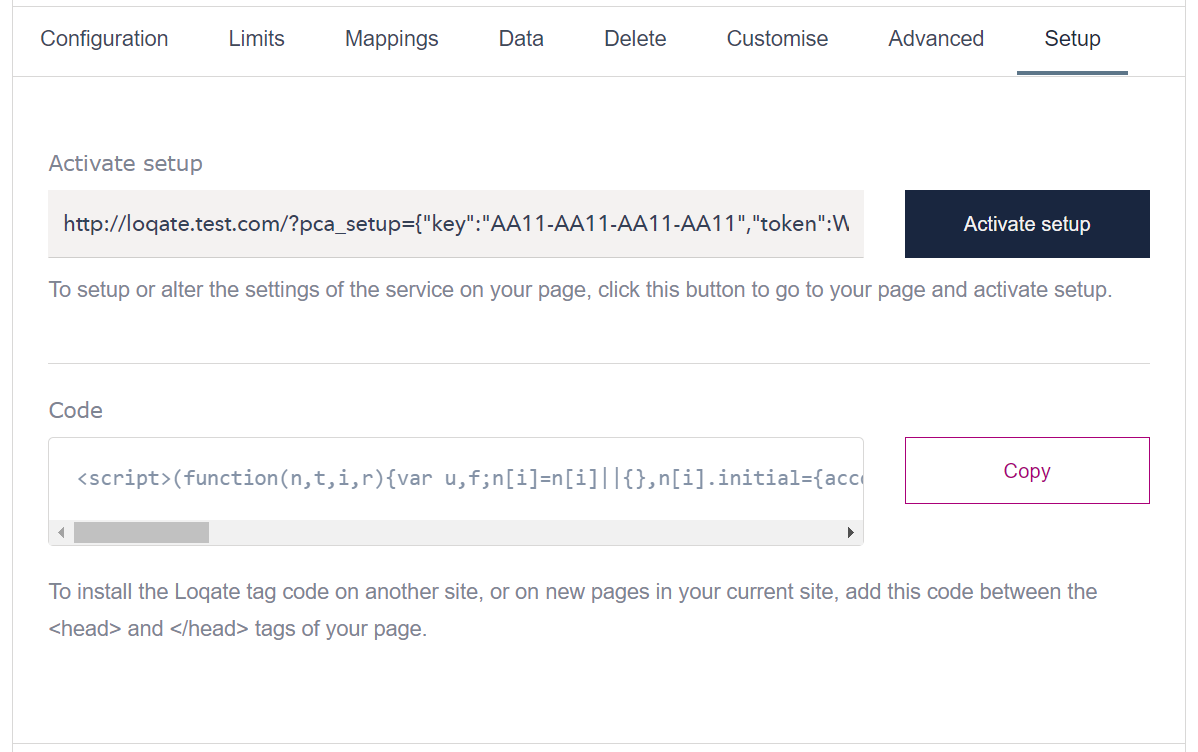
Click the **Activate setup** button to start the setup process again - this will
take you back through the setup process for mapping your address fields.
You can also copy the Loqate tag from here, if you want to add it to another
site or another page on your current site.
## Further customisation
Away from the Account Section, there are various ways in which you can further
customise your Address, Email and Phone Validation services. We'll break these
down by service below.
### Address Validation Customisation
#### Custom options
If you want to customise the look and feel of Address Validation, there is a
variety of options that you can set. Below is an example of the JavaScript
snippet to include in your page to add the option for customers to manually
enter an address. For more information about the available options, please get
in touch with the Loqate support team.
```html theme={null}

 If you are integrating with any of
[our pre-built integrations](/integrations/all-integrations) such as
Magento 2 select the **App** option and choose the relevant application - your
installation will be a little different, so on the next step, you will be taken
to the associated app page where you can follow instructions for installation.
For everything else, select **Website** and enter the URL of the site you're
putting the service into. Click **Next** to continue.
If you are integrating with any of
[our pre-built integrations](/integrations/all-integrations) such as
Magento 2 select the **App** option and choose the relevant application - your
installation will be a little different, so on the next step, you will be taken
to the associated app page where you can follow instructions for installation.
For everything else, select **Website** and enter the URL of the site you're
putting the service into. Click **Next** to continue.
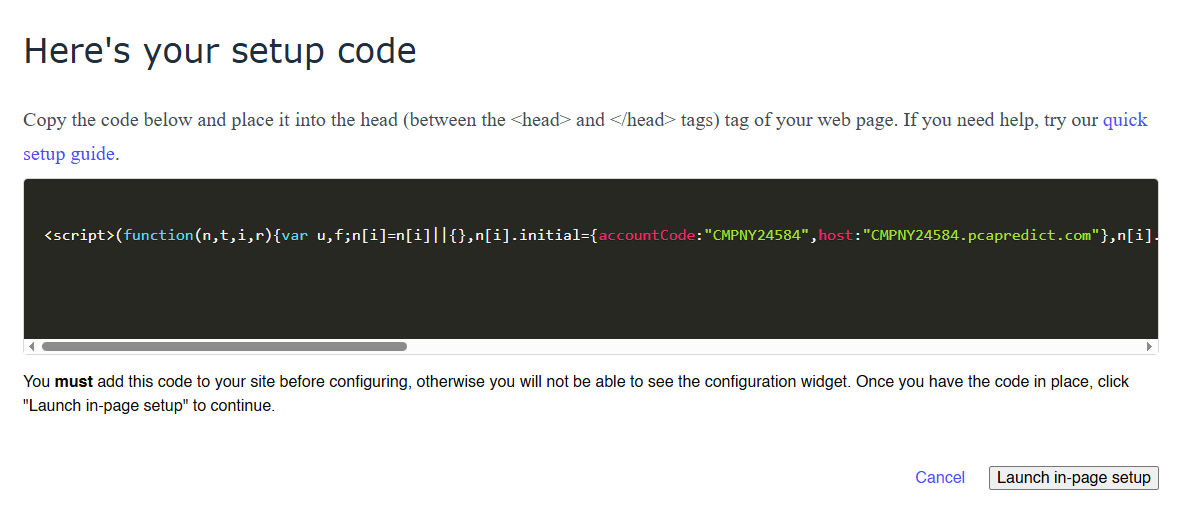 Next you will be presented with a snippet of JavaScript code to add to your
website. Copy the code (or Tag) generated for you and paste it into the ``
section in the HTML of your website.
**Tip:** placing this tag on each page of your site makes the setup process easier
and is easy to do if you have a layout template for your site.
Once you have finished editing the page, save and upload the new file to your
servers and click the **Launch in-page setup** button on the setup screen.
The setup process will now open your site using the URL provided earlier, and
display setup options on the right-hand side of the screen (we'll refer to this
during the setup process as the on-screen setup section). The Tag setup will map
the fields automatically - see the **Setup** section below for more information
specific to the three different services.
## Setting up your service
Follow the instructions in the sections below to finish setting up Address
Validation, Email Validation and/or Phone Validation - the specific steps to
take differ depending on the service.
By default, the setup process will attempt to create all three services, and you
will see each of them listed in the on-screen setup section. If you would only
like to use one or two of these services, make sure to disable the service(s)
you won't be using, to make sure you don't set up any unwanted services by
accident.
Next you will be presented with a snippet of JavaScript code to add to your
website. Copy the code (or Tag) generated for you and paste it into the ``
section in the HTML of your website.
**Tip:** placing this tag on each page of your site makes the setup process easier
and is easy to do if you have a layout template for your site.
Once you have finished editing the page, save and upload the new file to your
servers and click the **Launch in-page setup** button on the setup screen.
The setup process will now open your site using the URL provided earlier, and
display setup options on the right-hand side of the screen (we'll refer to this
during the setup process as the on-screen setup section). The Tag setup will map
the fields automatically - see the **Setup** section below for more information
specific to the three different services.
## Setting up your service
Follow the instructions in the sections below to finish setting up Address
Validation, Email Validation and/or Phone Validation - the specific steps to
take differ depending on the service.
By default, the setup process will attempt to create all three services, and you
will see each of them listed in the on-screen setup section. If you would only
like to use one or two of these services, make sure to disable the service(s)
you won't be using, to make sure you don't set up any unwanted services by
accident.
 Before looking at any configuration for your Address Validation you can test
whether everything is working by performing an address lookup:
* Start to type any part of an address into one of the address fields on your
form
* A list of valid address should display below the field, matching as you type,
like the example below:
Before looking at any configuration for your Address Validation you can test
whether everything is working by performing an address lookup:
* Start to type any part of an address into one of the address fields on your
form
* A list of valid address should display below the field, matching as you type,
like the example below:
 * The more you type, the more accurate the results will become
* Once you find the address you want, select it and the rest of your address
fields should autofill
If everything works as you expect it to, you can now give your installation a
name so that you can reference it in the future.
* Scroll down to the bottom of the configuration screen to find the
**Name** section
* Pick a name that makes it clear to anyone else where Address Validation is
used - for example 'Website Registration Form Address Validation'
Once that's done, you can press the **Save** button at the bottom of the on-screen
setup section, underneath the list of services. If the Address Validation
service isn't working as you'd expect it to however, or you want to make any
changes, see the configuration section below.
### Configuring the Address Validation Service
If you want to make any changes to how the address fields have been mapped, or
edit any other settings for the service, click the **Configure** button against
the Address Validation service to open up a configuration screen.
* The more you type, the more accurate the results will become
* Once you find the address you want, select it and the rest of your address
fields should autofill
If everything works as you expect it to, you can now give your installation a
name so that you can reference it in the future.
* Scroll down to the bottom of the configuration screen to find the
**Name** section
* Pick a name that makes it clear to anyone else where Address Validation is
used - for example 'Website Registration Form Address Validation'
Once that's done, you can press the **Save** button at the bottom of the on-screen
setup section, underneath the list of services. If the Address Validation
service isn't working as you'd expect it to however, or you want to make any
changes, see the configuration section below.
### Configuring the Address Validation Service
If you want to make any changes to how the address fields have been mapped, or
edit any other settings for the service, click the **Configure** button against
the Address Validation service to open up a configuration screen.
 The two main functions of this screen are for:
* Mapping address fields
* Enabling Geolocation
#### Mapping Address Fields
If your form has one or more address fields and you’ve named your field names or
ids conventionally (i.e. Line1, Line2, City, etc), the Address Validation
service will try to match the correct field types to the relevant address fields
on your form. You can see how these have been mapped under the **Fields** section
of the configuration screen:
The two main functions of this screen are for:
* Mapping address fields
* Enabling Geolocation
#### Mapping Address Fields
If your form has one or more address fields and you’ve named your field names or
ids conventionally (i.e. Line1, Line2, City, etc), the Address Validation
service will try to match the correct field types to the relevant address fields
on your form. You can see how these have been mapped under the **Fields** section
of the configuration screen:
 From here you can edit the existing mapping or add entirely new fields.
Field types correspond to specific address components (i.e. Line1, Line 2, City,
etc.) - see the **Available Field Types** section below for information on the
most common field types that you can use.
* To edit an existing field mapping, click the arrow next to the field name and
select the relevant option from the drop-down list
* To create another field, click **Add a new field** and choose the relevant
option under both*Your Fields* and *Our Fields*
For either of the above examples, instead of choosing a field from the drop-down
list you can click the selection buttonand then select the field on your form
that you want to use.\
If you need to remove any fields, click the bin iconon the right hand side,next
to the unwanted field.\
To the right of each fieldset is a buttonto access additional settings for that
field. There are four settings to choose from, which can be mixed and matched as
you please.
From here you can edit the existing mapping or add entirely new fields.
Field types correspond to specific address components (i.e. Line1, Line 2, City,
etc.) - see the **Available Field Types** section below for information on the
most common field types that you can use.
* To edit an existing field mapping, click the arrow next to the field name and
select the relevant option from the drop-down list
* To create another field, click **Add a new field** and choose the relevant
option under both*Your Fields* and *Our Fields*
For either of the above examples, instead of choosing a field from the drop-down
list you can click the selection buttonand then select the field on your form
that you want to use.\
If you need to remove any fields, click the bin iconon the right hand side,next
to the unwanted field.\
To the right of each fieldset is a buttonto access additional settings for that
field. There are four settings to choose from, which can be mixed and matched as
you please.
 These settings are:
1. **Search:** turns the field into a search bar, showing the returned address
results when a user starts typing their address into the field
2. **Populate:** fills in the field with the relevant data after an
address is selected
3. **Preserve:** once populated, the field is not changed by the
address validation again. This can be useful if you need to manually make a
change and make it persist on the form
4. **Country:** turns the field into a country dropdown list
When you are happy with your setup, scroll to the bottom of the configuration
screen and click **DONE** andnd then try searching for an address.
If you are happy with the results, click **SAVE** at the bottom of
the on-screen setup section.
At this point, the Address Validation service will be live and running on your
website with all of the settings you have chosen.
If there are any more places you would like to install a service, you can click
the **Add another service** drop-down menu and select a service.
#### Available Field Types
Below is a table of the most commonly used fields available for Address
Validation:
| **Field name** | **Description** |
| -------------------- | ------------------------------------------------------------------------ |
| Line1-5 | The specific line number of the returned address |
| Town | The Town of the returned address |
| Sub Building | The Flat or Unit number within the building. i.e. Flat 1 |
| Street | The Street Name of the returned address |
| Search Input | Search bar where all the address validation magic happens |
| Postcode | The Postcode of the returned address |
| Formatted Address | The FULL address in the correct standardised format |
| District | The locality within the Town or City |
| County Name | The name of the County, Province or State, i.e. California |
| County Code | The code of the County, Province or State, i.e. CA |
| County | The County of the returned address |
| Country | The ISO 3166 Country name for the returned address |
| Company | Returns the full company name where registered |
| Building Number | Number of the building for the returned address |
| 3-Character ISO Code | The ISO 3166 3-character Country Code for the returned address, i.e. GBR |
| 2-Character ISO Code | The ISO 3166 2-character Country Code for the returned address, i.e. GB |
While these fields will be enough for the majority of use cases, this is not a
finite list and other fields and formats can be used.
#### Geolocation
It's also possible to allow address lookups to be based on the end user's
current location, using the Geolocation feature.
In order to access this additional functionality, do the following:
* Click the **Configure** button for your address validation service in the
on-screen setup section
* Below the address mapping fields, you should see a **Geolocation** section with
a toggle switch (this is set to OFF by default)
These settings are:
1. **Search:** turns the field into a search bar, showing the returned address
results when a user starts typing their address into the field
2. **Populate:** fills in the field with the relevant data after an
address is selected
3. **Preserve:** once populated, the field is not changed by the
address validation again. This can be useful if you need to manually make a
change and make it persist on the form
4. **Country:** turns the field into a country dropdown list
When you are happy with your setup, scroll to the bottom of the configuration
screen and click **DONE** andnd then try searching for an address.
If you are happy with the results, click **SAVE** at the bottom of
the on-screen setup section.
At this point, the Address Validation service will be live and running on your
website with all of the settings you have chosen.
If there are any more places you would like to install a service, you can click
the **Add another service** drop-down menu and select a service.
#### Available Field Types
Below is a table of the most commonly used fields available for Address
Validation:
| **Field name** | **Description** |
| -------------------- | ------------------------------------------------------------------------ |
| Line1-5 | The specific line number of the returned address |
| Town | The Town of the returned address |
| Sub Building | The Flat or Unit number within the building. i.e. Flat 1 |
| Street | The Street Name of the returned address |
| Search Input | Search bar where all the address validation magic happens |
| Postcode | The Postcode of the returned address |
| Formatted Address | The FULL address in the correct standardised format |
| District | The locality within the Town or City |
| County Name | The name of the County, Province or State, i.e. California |
| County Code | The code of the County, Province or State, i.e. CA |
| County | The County of the returned address |
| Country | The ISO 3166 Country name for the returned address |
| Company | Returns the full company name where registered |
| Building Number | Number of the building for the returned address |
| 3-Character ISO Code | The ISO 3166 3-character Country Code for the returned address, i.e. GBR |
| 2-Character ISO Code | The ISO 3166 2-character Country Code for the returned address, i.e. GB |
While these fields will be enough for the majority of use cases, this is not a
finite list and other fields and formats can be used.
#### Geolocation
It's also possible to allow address lookups to be based on the end user's
current location, using the Geolocation feature.
In order to access this additional functionality, do the following:
* Click the **Configure** button for your address validation service in the
on-screen setup section
* Below the address mapping fields, you should see a **Geolocation** section with
a toggle switch (this is set to OFF by default)
 * Toggle this switch to ON (showing the green background) to activate
Geolocation on the service
Once you’re ready, click **DONE** at the bottom of the configuration
screen and test your page. If you are happy with how the information is being
populated click the **SAVE** button at the bottom of the on-screen
setup section to complete all changes.
At this point, the Geolocation service will be live and running on your website
in addition to your address validation service.
### Turn off Browser Autofill
For the best experience when using the Address Validation service, we recommend
you turn off browser autofill functionality for address form fields.
There are two ways in which we suggest you do this - you can use either or both
of these methods:
* **Method one:** below where you placed the Loqate Tag script on the page (i.e.
in the `` section of your website), insert the following JavaScript code
snippet:
```javascript theme={null}
pca.on("options", function(type, key, options) \{ options.suppressAutocomplete =false;});
```
* **Method two**: add the attribute **autocomplete="none"** to the HTML for each
form field on the page. For example:
```html theme={null}
```
We also recommend that you test this code across multiple popular web browsers.
#### Email Validation
When your site loads at the end of the setup process, in the on-screen setup
section (on the right-hand side of the screen) you will see a list of services
available for your form. If an email address field has been detected then the
Email Validation service will be marked as Active.
* Toggle this switch to ON (showing the green background) to activate
Geolocation on the service
Once you’re ready, click **DONE** at the bottom of the configuration
screen and test your page. If you are happy with how the information is being
populated click the **SAVE** button at the bottom of the on-screen
setup section to complete all changes.
At this point, the Geolocation service will be live and running on your website
in addition to your address validation service.
### Turn off Browser Autofill
For the best experience when using the Address Validation service, we recommend
you turn off browser autofill functionality for address form fields.
There are two ways in which we suggest you do this - you can use either or both
of these methods:
* **Method one:** below where you placed the Loqate Tag script on the page (i.e.
in the `` section of your website), insert the following JavaScript code
snippet:
```javascript theme={null}
pca.on("options", function(type, key, options) \{ options.suppressAutocomplete =false;});
```
* **Method two**: add the attribute **autocomplete="none"** to the HTML for each
form field on the page. For example:
```html theme={null}
```
We also recommend that you test this code across multiple popular web browsers.
#### Email Validation
When your site loads at the end of the setup process, in the on-screen setup
section (on the right-hand side of the screen) you will see a list of services
available for your form. If an email address field has been detected then the
Email Validation service will be marked as Active.
 If you want to make any changes to how the email address field has been mapped,
or edit any other settings for the service, click the **Configure** button against
the Email Validation service to open up a configuration screen.
The main thing to look at is the field mapping. If your form has an email
address field then it will automatically be detected and mapped to the Email
validation service - the field will show up as highlighted on your form, and
under **Fields** you will be able to see how it has been mapped:
If you want to make any changes to how the email address field has been mapped,
or edit any other settings for the service, click the **Configure** button against
the Email Validation service to open up a configuration screen.
The main thing to look at is the field mapping. If your form has an email
address field then it will automatically be detected and mapped to the Email
validation service - the field will show up as highlighted on your form, and
under **Fields** you will be able to see how it has been mapped:
 If your email address field hasn't been mapped properly, you can change this
manually by selecting the relevant field from the **Your Fields** dropdown.
If you're happy with how the email address field has been mapped, all you need
to do now is give your installation a name so you can reference it in the
future.
* Scroll down to the bottom of the configuration screen to find
the **Name** section
* Pick a name that makes it clear to anyone else where email validation is
used - for example 'Website Registration Form Email Validation'
Once that's done, your Email validation setup is complete. Scroll to the bottom
of the configuration screen and click **DONE**, then scroll to the bottom of the
on-screen setup section and click **SAVE**.
If there are any more places you would like to install a service, you can click
the **Add another service** drop-down menu and select a service.
#### Phone Validation
When your site loads at the end of the setup process, in the on-screen setup
section (on the right-hand side of the screen) you will see a list of services
available for your form. If a phone number field has been detected then the Cell
Phone Validation service will be marked as Active.
If your email address field hasn't been mapped properly, you can change this
manually by selecting the relevant field from the **Your Fields** dropdown.
If you're happy with how the email address field has been mapped, all you need
to do now is give your installation a name so you can reference it in the
future.
* Scroll down to the bottom of the configuration screen to find
the **Name** section
* Pick a name that makes it clear to anyone else where email validation is
used - for example 'Website Registration Form Email Validation'
Once that's done, your Email validation setup is complete. Scroll to the bottom
of the configuration screen and click **DONE**, then scroll to the bottom of the
on-screen setup section and click **SAVE**.
If there are any more places you would like to install a service, you can click
the **Add another service** drop-down menu and select a service.
#### Phone Validation
When your site loads at the end of the setup process, in the on-screen setup
section (on the right-hand side of the screen) you will see a list of services
available for your form. If a phone number field has been detected then the Cell
Phone Validation service will be marked as Active.
 We recommend that you always include a **Country** field on your Phone
Validation form, as the service requires a country to validate each phone number
against. If you include a Country field, the service will automatically detect
it and use the inputted country for validation purposes.
If you want to make any changes to how the phone number field has been mapped,
or edit any other settings for the service, click the **Configure** button
against the Cell Phone Validation service to open up a configuration screen.
We recommend that you always include a **Country** field on your Phone
Validation form, as the service requires a country to validate each phone number
against. If you include a Country field, the service will automatically detect
it and use the inputted country for validation purposes.
If you want to make any changes to how the phone number field has been mapped,
or edit any other settings for the service, click the **Configure** button
against the Cell Phone Validation service to open up a configuration screen.
 If your phone number field hasn't been mapped properly, you can change this
manually by selecting the relevant field from the **Your Fields** dropdown.
If you're happy with how the phone number field has been mapped, all you need to
do now is give your installation a name so you can reference it in the future.
* Scroll down to the bottom of the configuration screen to find
the **Name** section
* Pick a name that makes it clear to anyone else where phone validation is
used - for example 'Website Registration Form Phone Validation'
Once that's done, your Phone Validation setup is complete. Scroll to the bottom
of the configuration screen and click **DONE**, then scroll to the bottom of the
on-screen setup section and click **SAVE**.
If there are any more places you would like to install a service, you can click
the **Add another service** drop-down menu and select a service.
If your phone number field hasn't been mapped properly, you can change this
manually by selecting the relevant field from the **Your Fields** dropdown.
If you're happy with how the phone number field has been mapped, all you need to
do now is give your installation a name so you can reference it in the future.
* Scroll down to the bottom of the configuration screen to find
the **Name** section
* Pick a name that makes it clear to anyone else where phone validation is
used - for example 'Website Registration Form Phone Validation'
Once that's done, your Phone Validation setup is complete. Scroll to the bottom
of the configuration screen and click **DONE**, then scroll to the bottom of the
on-screen setup section and click **SAVE**.
If there are any more places you would like to install a service, you can click
the **Add another service** drop-down menu and select a service.
 These settings break down into the following categories:
* [**Configuration**](#configuration)
* [**Limits**](#limits)
* [**Mappings**](#mappings)
* [**Data (Address Validation only)**](#data)
* [**Customise **](#customise)
* [**Advanced (available for the latest version of Capture only)**](#advanced)
* [**Setup**](#setup)
Most of these are the same for each service, but we'll point out where
appropriate anything which is specific to just one or more of the services.
The next sections of this guide will focus on each of the categories and walk
you through how to make the most of the options available to you.
**NOTE: If you make any changes, you will need to click
the *Save* button for those changes to take effect.**
### Configuration
The Configuration tab gives you the following options to adjust:
* **Name**: customise the name of the key selected. This is primarily to help
you identify your own keys more easily, and can be particularly useful if you
are using more than one key under one account
* **Status**: toggle the key status to active/inactive - setting this to
inactive will stop any services associated with that key from working on your
site
These settings break down into the following categories:
* [**Configuration**](#configuration)
* [**Limits**](#limits)
* [**Mappings**](#mappings)
* [**Data (Address Validation only)**](#data)
* [**Customise **](#customise)
* [**Advanced (available for the latest version of Capture only)**](#advanced)
* [**Setup**](#setup)
Most of these are the same for each service, but we'll point out where
appropriate anything which is specific to just one or more of the services.
The next sections of this guide will focus on each of the categories and walk
you through how to make the most of the options available to you.
**NOTE: If you make any changes, you will need to click
the *Save* button for those changes to take effect.**
### Configuration
The Configuration tab gives you the following options to adjust:
* **Name**: customise the name of the key selected. This is primarily to help
you identify your own keys more easily, and can be particularly useful if you
are using more than one key under one account
* **Status**: toggle the key status to active/inactive - setting this to
inactive will stop any services associated with that key from working on your
site
 ### Limits
The Limits tab helps you maintain control over who can use your keys and which
of your websites the service requests should be made from, and place limits on
the number of requests made by individual IP addresses. We strongly recommend
that you complete these settings.
### Limits
The Limits tab helps you maintain control over who can use your keys and which
of your websites the service requests should be made from, and place limits on
the number of requests made by individual IP addresses. We strongly recommend
that you complete these settings.
 The settings can be used as follows:
* **Daily lookup limit:** the maximum spend level allowed on this installation
per day. Set this to a sensible level that you do not want to go over and that
won't affect expected daily usage
* **Lookup limit per user:** the maximum number of lookups that an individual
user can perform - calculated by IP address. By default this is set
to **Unlimited**, but by toggling the slider you can set a maximum limit
* **Limiter Exclusions:** when Lookup limit per user is toggled on,
the **Limiter Exclusions** option is also enabled. This allows you to create a
list of IP addresses which won't be affected by the per user limit - enter
an IP address you wish to exclude in the text box and then click the plus
icon. You can add as many IP addresses as you like
The settings can be used as follows:
* **Daily lookup limit:** the maximum spend level allowed on this installation
per day. Set this to a sensible level that you do not want to go over and that
won't affect expected daily usage
* **Lookup limit per user:** the maximum number of lookups that an individual
user can perform - calculated by IP address. By default this is set
to **Unlimited**, but by toggling the slider you can set a maximum limit
* **Limiter Exclusions:** when Lookup limit per user is toggled on,
the **Limiter Exclusions** option is also enabled. This allows you to create a
list of IP addresses which won't be affected by the per user limit - enter
an IP address you wish to exclude in the text box and then click the plus
icon. You can add as many IP addresses as you like
 * **Limit by URL:** to help prevent fraudulent or accidental use of one of your
keys across domains, add the URLs that you expect the requests to be coming
from. Enter a URL address you wish to limit in the text box and then click the
plus icon. You can add as many URLs as you like
* You will also need to specify any subdomains and combinations of URLs that
might be
used. i.e. mysite.co.uk, mysite.com, mysite.co.uk, etc.
* **Limit by IP:** similar to the *Daily Limit*, this allows you to place request
limits against a group of IP addresses, which should help manage your cashflow
and cap individual usage. Enter an IP address you wish to limit in the text
box and then click the plus icon. You can add as many IP addresses as you like
* **Limit by Service:** this allows you to restrict your key to one or more
Loqate services for security purposes - we recommend matching this setting to
the service you're using on that key (choose **Address Capture** for Address
Verification)
* **Limit by URL:** to help prevent fraudulent or accidental use of one of your
keys across domains, add the URLs that you expect the requests to be coming
from. Enter a URL address you wish to limit in the text box and then click the
plus icon. You can add as many URLs as you like
* You will also need to specify any subdomains and combinations of URLs that
might be
used. i.e. mysite.co.uk, mysite.com, mysite.co.uk, etc.
* **Limit by IP:** similar to the *Daily Limit*, this allows you to place request
limits against a group of IP addresses, which should help manage your cashflow
and cap individual usage. Enter an IP address you wish to limit in the text
box and then click the plus icon. You can add as many IP addresses as you like
* **Limit by Service:** this allows you to restrict your key to one or more
Loqate services for security purposes - we recommend matching this setting to
the service you're using on that key (choose **Address Capture** for Address
Verification)
 ### Mappings
The Mappings tab allows you to edit the way your form fields are mapped to the
relevant Loqate service fields, without needing to go through the setup process
again.
If you're sure you know what each field's name is and how you want to map it,
this is a quick way of changing the mapping. If not, it may be better to head to
the **Setup** section (see below) and return to the on-page setup process.
To make any changes, click on the edit icon next to the relevant field:
### Mappings
The Mappings tab allows you to edit the way your form fields are mapped to the
relevant Loqate service fields, without needing to go through the setup process
again.
If you're sure you know what each field's name is and how you want to map it,
this is a quick way of changing the mapping. If not, it may be better to head to
the **Setup** section (see below) and return to the on-page setup process.
To make any changes, click on the edit icon next to the relevant field:
 You can then amend either of the fields, and edit the Field Modes if required (see
the Address Validation Setup section for more information about Field Modes).
You can then amend either of the fields, and edit the Field Modes if required (see
the Address Validation Setup section for more information about Field Modes).
 Alternatively, to add a new field just click on the **Add a field** button.
### Data
TheDatatab allows you to select which additional datasets you want returned for
Address Validations, on an individual key basis. Note that this tab is only
visible for Address Validation keys, and not Email or Phone Validation.
Alternatively, to apply Geolocation or Multi Residence data to all the keys
within your account, within your Account Section (account.loqate.com) you can go
to **Your account** > **Data settings** and toggle the switches to enable the
settings to be applied to all keys.
* **Geolocation**: text
generation [geolocation technology](https://www.loqate.com/en-gb/geocode) that
allows your mobile customers to find their location in a single tap
* **Multi Residence**: the
[Multiple Residence dataset](https://www.loqate.com/en-gb/datasets/multi-residence/) from
Royal Mail contains over 700,000 additional address records not recorded in
PAF® of any premise where multiple households share a letterbox, such as
apartment blocks
Alternatively, to add a new field just click on the **Add a field** button.
### Data
TheDatatab allows you to select which additional datasets you want returned for
Address Validations, on an individual key basis. Note that this tab is only
visible for Address Validation keys, and not Email or Phone Validation.
Alternatively, to apply Geolocation or Multi Residence data to all the keys
within your account, within your Account Section (account.loqate.com) you can go
to **Your account** > **Data settings** and toggle the switches to enable the
settings to be applied to all keys.
* **Geolocation**: text
generation [geolocation technology](https://www.loqate.com/en-gb/geocode) that
allows your mobile customers to find their location in a single tap
* **Multi Residence**: the
[Multiple Residence dataset](https://www.loqate.com/en-gb/datasets/multi-residence/) from
Royal Mail contains over 700,000 additional address records not recorded in
PAF® of any premise where multiple households share a letterbox, such as
apartment blocks
 ### Customise
The Customise settings help you manage the localisation of your forms. Under
thistab you can control a range of settings, which differ depending on the type
of key - Address Validation keys have slightly different settings to Email and
Phone Validation.
#### Address Validation
You can customise Address Validation keys by adjusting country settings and
default languages, and setting URL restriction rules. Here are the options:
### Customise
The Customise settings help you manage the localisation of your forms. Under
thistab you can control a range of settings, which differ depending on the type
of key - Address Validation keys have slightly different settings to Email and
Phone Validation.
#### Address Validation
You can customise Address Validation keys by adjusting country settings and
default languages, and setting URL restriction rules. Here are the options:
 * **Available countries:** use this to limit which countries are available to
customers via the form. For each country you want lookups to be available for,
start typing the name into the text field and select the relevant option from
the list that appears. You can add as many countries as you need to this list.
If you need to remove a country from the list, click on the X next to its
name.
* **NOTE: the order in which countries appear within this list will be the
same order they will appear on the address validation form**
* **Available countries:** use this to limit which countries are available to
customers via the form. For each country you want lookups to be available for,
start typing the name into the text field and select the relevant option from
the list that appears. You can add as many countries as you need to this list.
If you need to remove a country from the list, click on the X next to its
name.
* **NOTE: the order in which countries appear within this list will be the
same order they will appear on the address validation form**
 * **Default country:** by default, Address Validation will try to determine
which country your customer is connecting from by looking up their IP address.
You can override this and default to a country of your choice by selecting one
from the dropdown list. This may be useful if you expect the majority of your
customers come from one country
* **Language:** Address Validation results can be returned in a variety of
languages that use Roman characters. By default, the language will be set to
match the user’s browser settings, but you can specify a language to use by
selecting one from the dropdown list. Currently, Address Validation can
support the following languages: Dutch, English (UK), English (Canada),
English (US), French, German, Hungarian, Italian and Spanish
* **Active URLs:** If no URLs are specified here, the service will attempt to
trigger on any page where the relevant address/email/phone field(s) exist.
Specifying one or more URLs will restrict the service to only running on those
pages
#### Email and Phone Validation
Email and Phone Validation keys have slightly fewer customisation options than
Address Validation. Here are the options:
* **Default country:** by default, Address Validation will try to determine
which country your customer is connecting from by looking up their IP address.
You can override this and default to a country of your choice by selecting one
from the dropdown list. This may be useful if you expect the majority of your
customers come from one country
* **Language:** Address Validation results can be returned in a variety of
languages that use Roman characters. By default, the language will be set to
match the user’s browser settings, but you can specify a language to use by
selecting one from the dropdown list. Currently, Address Validation can
support the following languages: Dutch, English (UK), English (Canada),
English (US), French, German, Hungarian, Italian and Spanish
* **Active URLs:** If no URLs are specified here, the service will attempt to
trigger on any page where the relevant address/email/phone field(s) exist.
Specifying one or more URLs will restrict the service to only running on those
pages
#### Email and Phone Validation
Email and Phone Validation keys have slightly fewer customisation options than
Address Validation. Here are the options:
 * **Use Minimal Layout?:** toggle this option on if you want to
disable the visual adornments that display next to email/phone number fields
to indicate successful/failed validation (i.e. tick or cross icons).
* **Use Minimal Layout?:** toggle this option on if you want to
disable the visual adornments that display next to email/phone number fields
to indicate successful/failed validation (i.e. tick or cross icons).
 * **Active URLs:** if no URLs are specified here, the service will attempt to
trigger on any page where the relevant address/email/phone field(s) exist.
Specifying one or more URLs will restrict the service to only running on those
pages.
### Advanced
The Advanced tab contains two options which allow you to further customise your
searches. This tab is only visible if you're using the latest version of
Capture - earlier versions don't have access to the functionality included
within.
* **Active URLs:** if no URLs are specified here, the service will attempt to
trigger on any page where the relevant address/email/phone field(s) exist.
Specifying one or more URLs will restrict the service to only running on those
pages.
### Advanced
The Advanced tab contains two options which allow you to further customise your
searches. This tab is only visible if you're using the latest version of
Capture - earlier versions don't have access to the functionality included
within.
 #### Location Biasing
Enabling the Location Biasing feature results in reduced keystrokes and a
quicker address entry process for your customers.
Enabling the biasing feature is just a case of toggling the **Location
Biasing** switch to **On**.
#### Location Biasing
Enabling the Location Biasing feature results in reduced keystrokes and a
quicker address entry process for your customers.
Enabling the biasing feature is just a case of toggling the **Location
Biasing** switch to **On**.
 #### Filters
The Filters feature allows you to set up one or more filters to restrict the
results of your searches - i.e. to choose whether you want your searches to
include or exclude certain things.
#### Filters
The Filters feature allows you to set up one or more filters to restrict the
results of your searches - i.e. to choose whether you want your searches to
include or exclude certain things.
 There are three components to each filter:
* **Filter name:** choose what you want to filter by - see the list below for
details of each of the possible options
* **Qualifier:** choose **is** or **is not** to set whether you want to include
or exclude results
* **Filter value:** set the specific value you want to include or exclude
For each filter you want to set up, fill in these three components and click the
**Add** button. You can create multiple filters, depending on what you want to
achieve.
There are three components to each filter:
* **Filter name:** choose what you want to filter by - see the list below for
details of each of the possible options
* **Qualifier:** choose **is** or **is not** to set whether you want to include
or exclude results
* **Filter value:** set the specific value you want to include or exclude
For each filter you want to set up, fill in these three components and click the
**Add** button. You can create multiple filters, depending on what you want to
achieve.

 Click the **Activate setup** button to start the setup process again - this will
take you back through the setup process for mapping your address fields.
You can also copy the Loqate tag from here, if you want to add it to another
site or another page on your current site.
## Further customisation
Away from the Account Section, there are various ways in which you can further
customise your Address, Email and Phone Validation services. We'll break these
down by service below.
### Address Validation Customisation
#### Custom options
If you want to customise the look and feel of Address Validation, there is a
variety of options that you can set. Below is an example of the JavaScript
snippet to include in your page to add the option for customers to manually
enter an address. For more information about the available options, please get
in touch with the Loqate support team.
```html theme={null}
Click the **Activate setup** button to start the setup process again - this will
take you back through the setup process for mapping your address fields.
You can also copy the Loqate tag from here, if you want to add it to another
site or another page on your current site.
## Further customisation
Away from the Account Section, there are various ways in which you can further
customise your Address, Email and Phone Validation services. We'll break these
down by service below.
### Address Validation Customisation
#### Custom options
If you want to customise the look and feel of Address Validation, there is a
variety of options that you can set. Below is an example of the JavaScript
snippet to include in your page to add the option for customers to manually
enter an address. For more information about the available options, please get
in touch with the Loqate support team.
```html theme={null}