This guide is specifically for the cloud version of Address Verify. Documentation for on-premise installations of Address Verify can be found at
On-Premise documentation.
- Create an account, if you don’t already have one
- Create an API key for use with Address Verify
- Make a simple Address Verify request
- Interpret the response from your request
Creating an account and API key
Before you can start making any requests, you’ll need to have a valid Loqate account and an API key to use with Address Verify. If you don’t have these set up already, you can:- Create an account at account.loqate.com
- Create an API key by selecting the Add a service option within your account. See our Creating API Keys page for full details – we recommend creating a generic API key for use with Address Verify
Making a simple Verify request
With a valid account and API key, you can now start making requests to Address Verify. The endpoint to use is:Assumptions
Address Verify can accept a wide range of input parameters, and requests for either single addresses or batches. For the purposes of this guide, we’re going to concentrate on a simple, stripped-down request for a single address, with just a few essential parameters.Example requests
Below we have provided two simple Address Verify request examples – one unstructured (i.e. with all the address details in a single field) and one structured (i.e. with address details broken out into multiple fields). Both will result in the same level of detail in the response. You can copy and paste these example requests into a tool such as Postman – just remember to replace the sample API key (AA11-AA11-AA11-AA11) with your own valid API key.Unstructured request
Structured request
Example response
Both example requests above will return a response with the same fields in the Matches section (the only difference being the Input):Interpreting the response
As you can see, an Address Verify response contains a range of information. This detail-rich response can be highly valuable in practice, but to begin with we recommend concentrating on a few key parts of the response to interpret what the results mean. The two main components we’re going to look at in this guide are:- AVC
- A few key address fields
The AVC
The Address Verification Code, or AVC for short, contains a wealth of information about how well the address that you inputted matches Loqate’s reference data. The AVC is broken down into four main parts: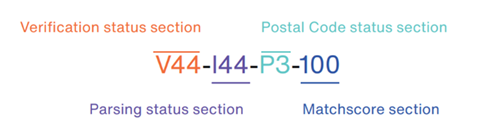
The verification status section
This section is comprised of three characters – a letter followed by two numbers. For the purposes of this quickstart guide though, we’re only going to focus on the first two characters. These are:- Verification Status: how well Address Verify was able to match the data you included in your request (otherwise referred to as ‘input data’) with Loqate’s reference data
- Possible values are V|P|A|R|U - Verified, Partially verified, Ambiguous, Reverted and Unverified
- The post-processed verification match level (0-5): how well the input data matches the reference data after any changes/additions performed during the verification process
- The higher the number, the greater the granularity to which the input data matches – from O (None) to 5 (Delivery point – PostBox or SubBuilding)
- V – verified: a match was made between the input data and a single record from the available reference data
- 4: the input data matches the reference data up to Premise level
The matchscore section
The matchscore indicates how much the input data was changed during the verification process to achieve the post-processed verification match level. It presents as a percentage between 0 and 100, where 100% means a complete match between the input data and the closest match in the reference data. The lower the matchscore, the more the data was changed. For example, a matchscore of 100 – as per the example response above - shows that no changes were required, so the input data wasn’t changed at all. Generally, a matchscore of 95 or above indicates that only a character or two was changed. The acceptable value of the matchscore will depend on your business needs. For direct mail, you might want to aim for 95 or above. For other applications, 80 might be acceptable.The matchscore value gives no indication of the level of verification, only the amount that the input data needed to be changed to match a single record in the reference data.
The level of verification is shown by the post-processed verification match level.
Address fields
When looking at an Address Verify response, you’ll notice that it’s split up into two sections. The Input section includes all of the address fields that you included in your request, while the Matches section includes all of the populated fields that are returned from the reference data. For the purposes of this quickstart guide, we’re going to pick out some of the most common address fields from the result.- Address: the full address, correctly formatted for mailing in the relevant country, including line breaks
- DeliveryAddress: the full address minus the Organization, Locality, AdministrativeArea hierarchy and PostalCode hierarchy fields, correctly formatted for mailing in the relevant country, including line breaks
- AdministrativeArea: The most common geographic data element within a country. For instance, USA State, or Canadian Province
- Locality: the most common population center data element within a country. For instance, USA City, or Canadian Municipality
- Thoroughfare: the most common street or block data element within a country. For instance, USA Street
- Premise: the alphanumeric code identifying an individual location, should one exist, commonly referred to as house or building number
- Building: the descriptive name identifying an individual location, should one exist
- SubBuilding: the secondary identifiers for a particular delivery point. For instance, “FLAT 1” or “SUITE 212”
- PostalCode: the complete postal code for a particular delivery point, when available